
Learn how to authenticate to SAP LeanIX services.
Overview
In this guide, you will learn how authentication to SAP LeanIX services works.
To authenticate your requests, follow these key steps:
- Obtain an API token by creating a Technical User.
- Obtain an access token.
- Make authenticated requests to services by including the access token in the Authorization header.
Note
Before you begin, make sure that you know your SAP LeanIX subdomain. You can copy your subdomain value from the Workspace URL. To learn more, see Base URL.
Authentication Flow
SAP LeanIX employs the OAuth 2.0 protocol for user authentication across all available APIs. In the image below, you can see how the authentication process works for an example API request.
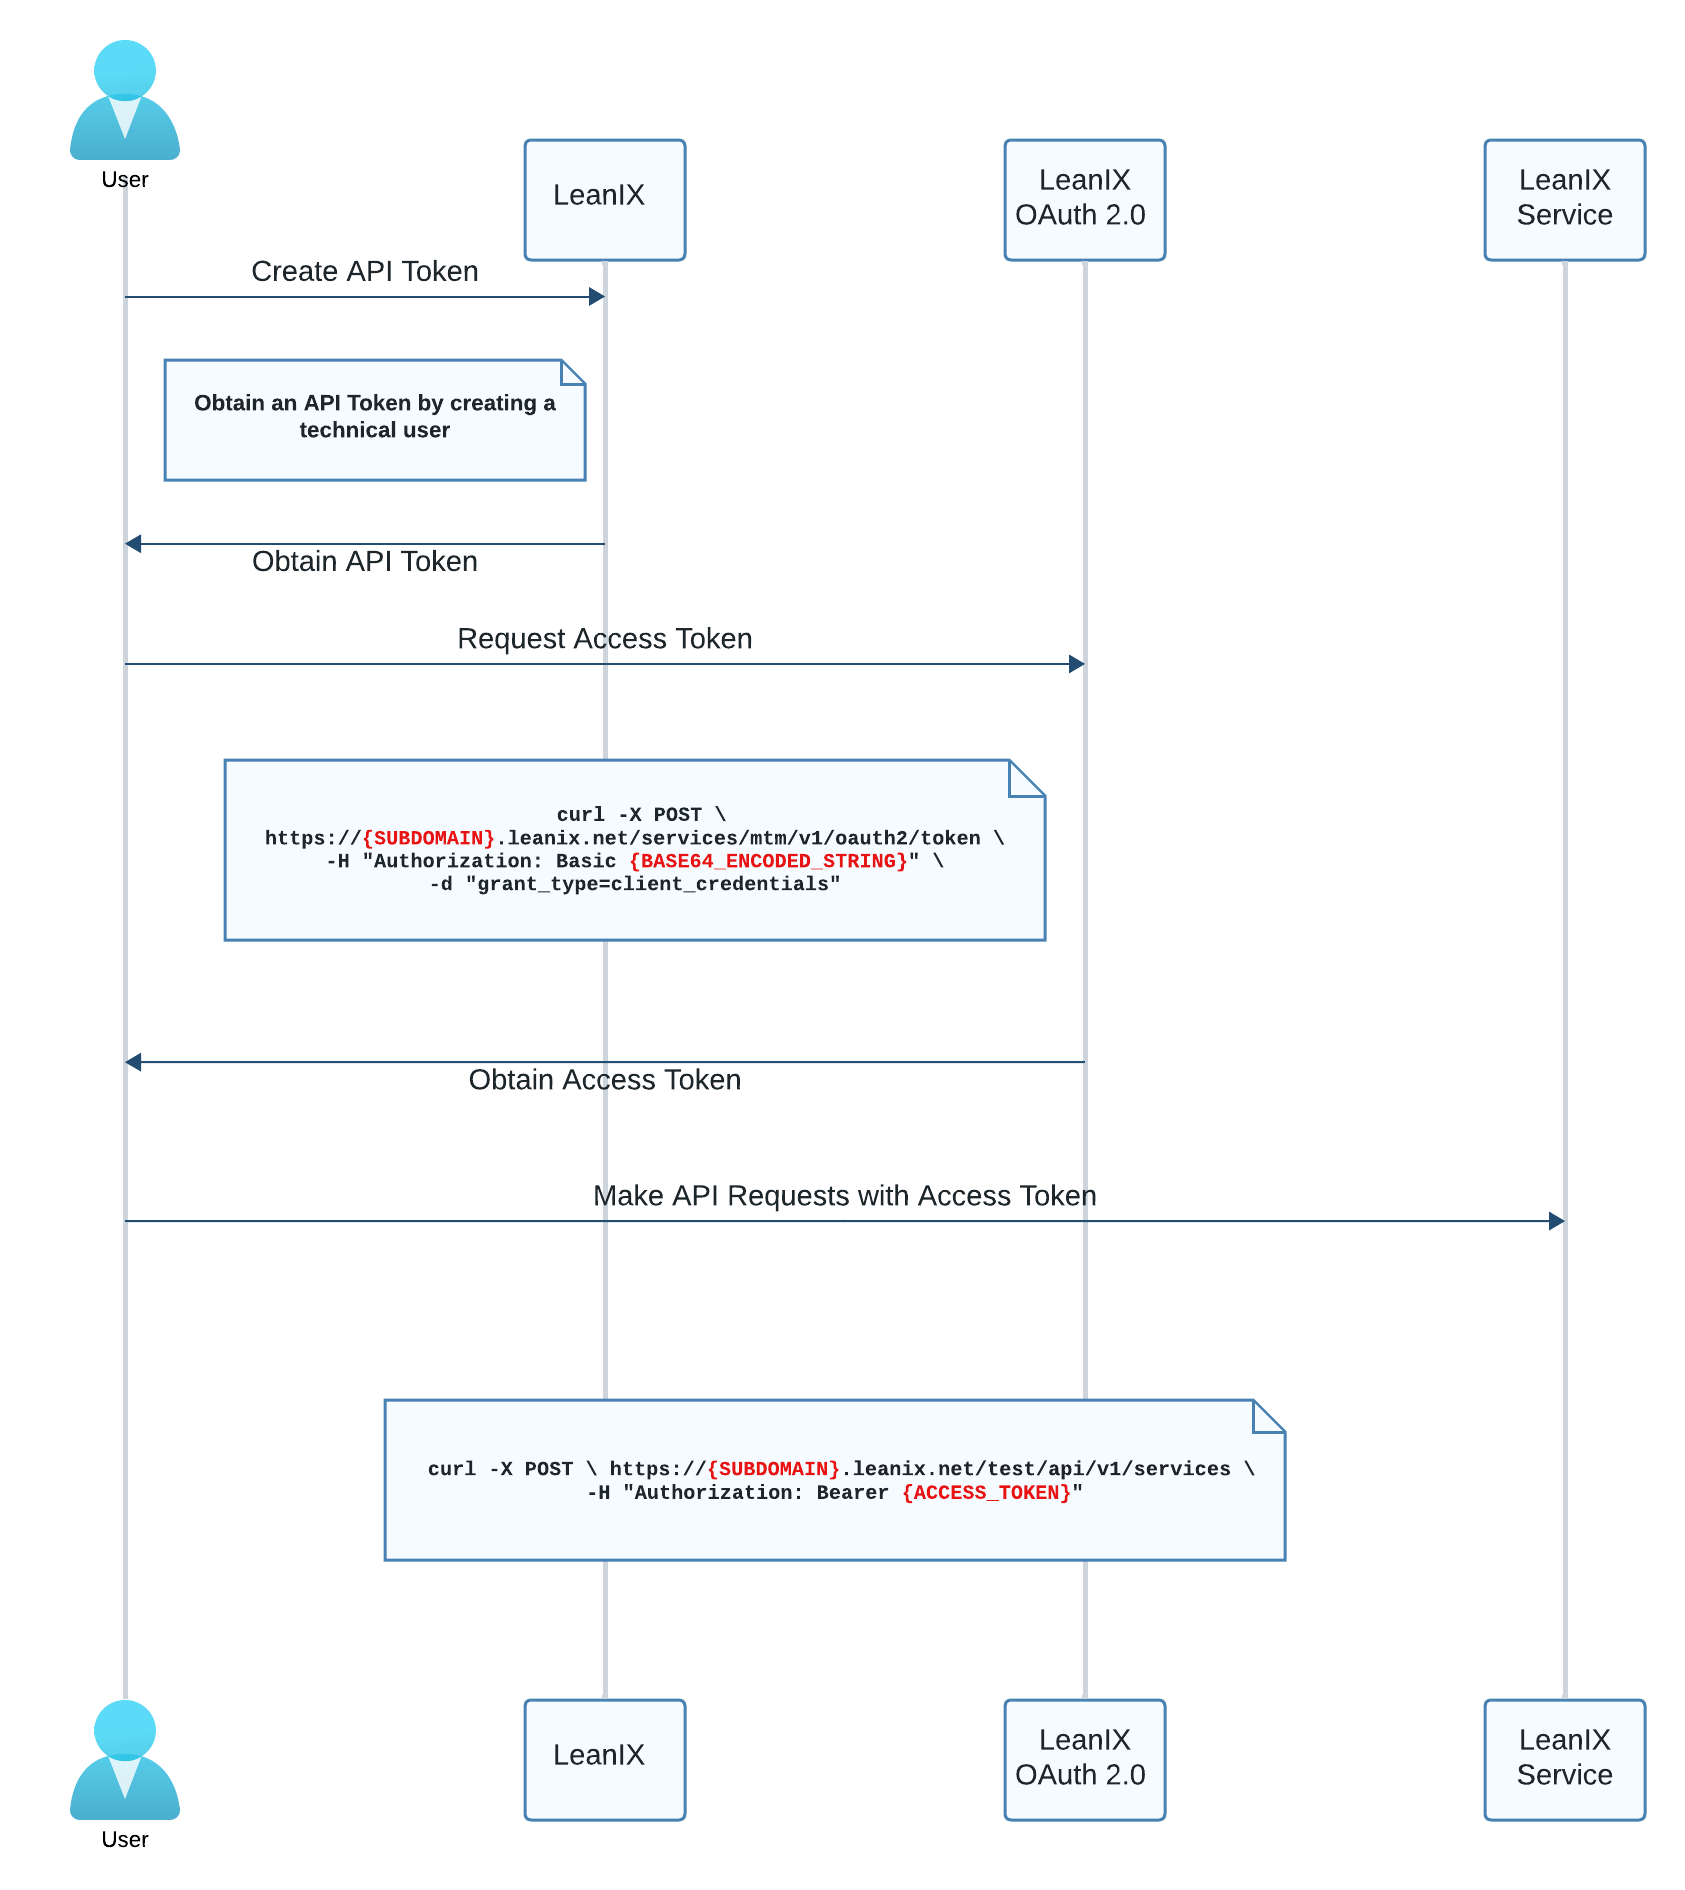
SAP LeanIX OAuth 2.0 Flow
Step 1: Get an API Token
To request an access token, you need to get an API token first. As an admin, you can generate an API token by creating a technical user. To learn how, see Technical Users.
Caution
The API token is shown only once. Make sure that you store it securely.
How to securely use an API token?
Treat an API token like a password or other sensitive credentials.
Here are some best practices to securely use API tokens. This list is non-exhaustive.
- Don’t share API tokens with anyone who shouldn’t be using them.
- Delete unnecessary API tokens by deleting Technical Users.
- Replace API tokens periodically.
- Store API tokens securely, for example, use secrets management tools.
- Securely use API tokens in your code.
- Transfer API tokens securely.
- Set up monitoring and auditing to detect and respond to any unauthorized access.
Step 2: Get an Access Token
Now that you have an API token, you can obtain an access token.
Request an Access Token
To request an access token, make a POST request to the following endpoint:
https://{SUBDOMAIN}.leanix.net/services/mtm/v1/oauth2/token
This API uses the Basic HTTP authentication scheme. For more information, see The 'Basic' HTTP Authentication Scheme section of the Internet Standards Track document issued by the Internet Engineering Task Force (IETF).
For credentials, use apitoken as the username and the obtained API token as the password. Set the grant_type to client_credentials.
The following examples show how to make a request to obtain an access token. JAANYFMYQcNtZ6ettSH9pF88RLdVBGfuY6bDFThw is an example API token that we use for illustrative purposes.
Example request:
curl -u apitoken:JAANYFMYQcNtZ6ettSH9pF88RLdVBGfuY6bDFThw \
	--request POST https://{SUBDOMAIN}.leanix.net/services/mtm/v1/oauth2/token \
	--data grant_type=client_credentials
const axios = require('axios');
const qs = require('qs');
const username = "apitoken"
const password = "JAANYFMYQcNtZ6ettSH9pF88RLdVBGfuY6bDFThw"
const data = { 'grant_type': 'client_credentials'};
const instance = "https://{SUBDOMAIN}.leanix.net";
const tokenEndpoint = "https://{SUBDOMAIN}.leanix.net/services/mtm/v1/oauth2/token"

// Step 2: Make a POST request to obtain the access token
const getToken = async () => {
  try {
    const response = await axios.post(
      tokenEndpoint,
      data: qs.stringify(data),
      {
        auth: {
          username: username,
          password: password,
        },
        headers: {
          'Content-Type': 'application/x-www-form-urlencoded',
        },
      }
    );

    // Step 3: Receive and use the access token
    const accessToken = response.data.access_token;
  } catch (error) {
    console.error('Error obtaining access token:', error.message);
  }
};
OkHttpClient client = new OkHttpClient();

MediaType mediaType = MediaType.parse("application/x-www-form-urlencoded");
RequestBody body = RequestBody.create(mediaType, "grant_type=client_credentials");
Request request = new Request.Builder()
  .url("https://{SUBDOMAIN}.leanix.net/services/mtm/v1/oauth2/token")
  .post(body)
  .addHeader("Authorization", Credentials.basic("apitoken", "JAANYFMYQcNtZ6ettSH9pF88RLdVBGfuY6bDFThw"))
  .build();

Response response = client.newCall(request).execute();
import requests

# Set a timeout to prevent hanging requests
TIMEOUT = 10
OAUTH2_URL = "https://{SUBDOMAIN}.leanix.net/services/mtm/v1/oauth2/token"

# Step 2: Make a POST request to obtain the access token, for obtain the access token we
# use the Basic Authorization scheme, you can implement this by using the `auth` parameter
# of the requests library.
response = requests.post(
    OAUTH2_URL,
    auth=("apitoken", "JAANYFMYQcNtZ6ettSH9pF88RLdVBGfuY6bDFThw"),
    data={"grant_type": "client_credentials"},
    timeout=TIMEOUT,
)
# Check if the request was succesfull
response.raise_for_status()
# The access token is available under the `access_token` response field.
response_payload = response.json()
access_token = response_payload["access_token"]
Review the Response
The response from the https://{SUBDOMAIN}.leanix.net/services/mtm/v1/oauth2/token endpoint includes your access token. Handle the response according to your programming language or tool.
Example response:
{
 "scope":"",
 "expired":false,
 "access_token":"eyJhbGciOiJSUzI1NiJ9.eyJz [...] ssqaPSA",
 "token_type":"bearer",
 "expires_in":3599
}
The access_token is returned in JWT (JSON Web Token) format. JWTs are encoded tokens that carry information in a compact and self-contained manner. In the context of OAuth 2.0, access tokens are often JWTs.
Tokens are signed with a private key, enabling our APIs to validate their authenticity. The signing process ensures that the token has not been tampered with and comes from a trusted source.
You can decode your access token using tools such as JWT.IO. Once you have decoded your token, you can view the token details, such as:
- Permissions: Information about the user's permissions or scope, indicating what actions or resources the token holder is authorized to access.
- Expiration time: The validity duration of the access token in seconds is specified in
expires_in. The access token is valid for 3600 seconds, which is equivalent to one hour.
Note
OAuth 2.0 access tokens often have a limited lifespan for security purposes. By setting an expiration time, the system can automatically revoke access after a certain period, minimizing the risk of unauthorized access if the token is compromised. This practice is part of the OAuth 2.0 security model to ensure that tokens are regularly refreshed, requiring the client to reauthenticate to obtain a new valid token.
Step 3: Make Authenticated Requests to Services
After obtaining an access token, you can use it to make authenticated requests to SAP LeanIX services.
To authorize your request, insert your access token into the Authorization header. Be sure to include the Bearer prefix to specify the token type.
As an example, let's fetch a list of Applications, internally referred to as services, from the IT Inventory of a Workspace.
Note
Reuse the access token in your API requests within the token lifetime. Do not request new access tokens while the current token is still valid.
Repeatedly requesting new tokens without necessity may lead to security vulnerabilities and unnecessary load on the authorization server. Adhere to the token expiration time and only request a new token when necessary.
In the following example request, the access token (eyJhbGciOiJSUzI1NiJ9.eyJz [...] ssqaPSA) is shortened. When implementing this in your applications, ensure that you use a complete and unaltered access token.
Example request:
curl -H "Authorization: Bearer {ACCESS_TOKEN}" \
	https://{SUBDOMAIN}.leanix.net/services/poll/v2/pollRuns
const axios = require('axios');

// Replace {SUBDOMAIN} with your actual subdomain
const url = 'https://{SUBDOMAIN}.leanix.net/services/poll/v2/pollRuns';
const accessToken = 'eyJhbGciOiJSUzI1NiJ9.eyJz [...] ssqaPSA'; // Replace with your actual access token

// Step 2: Make a GET request to the /v1/services API endpoint
axios.get(url, {
  headers: {
    'Authorization': `Bearer ${accessToken}`,
  },
})
  .then(response => {
    // Process the response as needed
    console.log(response.data);
  })
  .catch(error => {
    console.error('Error:', error.message);
  });
OkHttpClient client = new OkHttpClient();

Request request = new Request.Builder()
  .url("https://{SUBDOMAIN}.leanix.net/services/poll/v2/pollRuns")
  .get()
  .addHeader("Authorization", "Bearer eyJhbGciOiJSUzI1NiJ9.eyJz [...] ssqaPSA")
  .build();

Response response = client.newCall(request).execute();
import requests

timeout = 20
url = 'https://{SUBDOMAIN}.leanix.net/services/poll/v2/pollRuns'
headers = {'Authorization': 'Bearer eyJhbGciOiJSUzI1NiJ9.eyJz [...] ssqaPSA'}

response = requests.get(url, headers=headers, timeout=timeout)

# Process the response as needed
print(response.text)