
Learn how to list your workspace fact sheets using the LeanIX Reporting Library.
Overview
Custom reports offer a powerful way to extract valuable insights from your SAP LeanIX data. By creating tailored reports, you can focus on specific aspects of your organization's IT landscape and track key performance indicators (KPIs) that align with your strategic goals. Whether you're analyzing IT portfolio trends, assessing supplier performance, or monitoring project progress, custom reports provide a flexible and insightful approach to data visualization.
This tutorial is designed to provide developers with hands-on experience and a practical introduction to the fundamental features of the LeanIX Reporting Library. As you navigate through subsequent tutorials, you'll explore more complex and advanced scenarios.
In this tutorial, you'll learn how to get started with the LeanIX Reporting Library by creating a custom report that lists all fact sheets available in your workspace. The report represents a set of HTML elements that display the name, type, and description of each fact sheet.
By the end of this tutorial, you'll be able to create a custom report that lists all workspace fact sheets.
Prerequisites
Before you start, do the following:
- Get admin access to your SAP LeanIX workspace.
- Obtain an API token by creating a technical user. For more information, see Technical Users.
- Create a project skeleton structure using the scaffolder of the LeanIX Reporting CLI. To learn more, see Setting Up Your Custom Reports Project.
This tutorial assumes you have basic knowledge of:
- JavaScript
- Reports in SAP LeanIX
Step 1: Navigate to the Project Directory
To get started, navigate to the directory of your project skeleton using the following command:
cd custom-reports-demo
Step 2: Create a Custom Report Module
Create a new JavaScript module named factSheets.js under the src folder and insert the following code into it. This module exports the FactSheetsReport class that provides a list of fact sheets, displaying their displayName and description attributes in the report.
/**
 * Tutorial: Building Your First Custom Report
 */
export class FactSheetsReport {
  /**
   * Create a FactSheetsReport instance.
   * @param {Object} setup - The setup configuration.
   */
  constructor(setup) {
    this.setup = setup;
  }

  /**
   * Create a configuration object according to the reporting frameworks specification.
   * @return {Object} The configuration object.
   */
  createConfig() {
    return {
      facets: [
        {
          key: 'main',
          attributes: ['displayName', 'description'],
          callback: this.render.bind(this) // Bind 'this' to ensure it points to the FactSheetsReport object
        }
      ]
    };
  }

  /**
   * Render the data returned from the request.
   * Create a div element and render the data with the `displayName` and `id` of it.
   * @param {Array} data - The data to render.
   */
  render(data) {
    // Create main container with flex layout
    const container = document.createElement('div');
    container.classList.add('flex', 'flex-col')

    // Create and append heading
    const heading = document.createElement('h1');
    heading.textContent = 'Detailed Data Display';
    container.appendChild(heading);

    // Create and append fact sheet divs for each data item
    data.forEach((item) => {
      const itemDiv = this.createFactSheetDiv(item);
      container.appendChild(itemDiv);
    });

    // Clear existing content and append the new content
    const report = document.getElementById('report');
    report.innerHTML = '';
    report.appendChild(container);
  }

  /**
   * Create a div for a fact sheet item.
   * @param {Object} item - The fact sheet item.
   * @return {HTMLElement} The fact sheet div.
   */
  createFactSheetDiv(item) {
    // Create main div for the fact sheet
    const itemDiv = document.createElement('div');
    itemDiv.classList.add('p-2');

    // Create and append display name
    const strongText = document.createElement('strong');
    strongText.textContent = item.displayName;
    itemDiv.appendChild(strongText);

    // Create and append type
    const typeContainer = document.createElement('p');
    typeContainer.innerHTML = `<strong>Type</strong>: ${lx.translateFactSheetType(item.type)}`;
    itemDiv.appendChild(typeContainer);

    // Create and append description if it exists
    if (item.description) {
      const descriptionContainer = document.createElement('p');
      descriptionContainer.innerHTML = `<strong>Description</strong>: ${item.description}`;
      itemDiv.appendChild(descriptionContainer);
    }

    // Add the Fact Sheet Level
    if (item.level) {
      const factSheetLevelContainer = document.createElement('p');
      factSheetLevelContainer.innerHTML = `<strong>Level</strong>: ${item.level}`
      itemDiv.appendChild(factSheetLevelContainer);
    }

    return itemDiv;
  }
}
Step 3: Import Fact Sheet Information into the Main Module
Open the generated index.js file of your project skeleton and replace the code with the following:
// Importing '@leanix/reporting' makes the `lx` object globally available
import '@leanix/reporting';
// Import css assets for the custom report.
import './assets/main.css';
// Import our custom report module.
// import { FactSheets } from './factSheets.js';
import { FactSheetsReport } from './factSheets.js'

// Invoke the `lx.init()` method to signal the reporting framework to begin
// report initialization.
// `init()` returns a promise, which gets resolved once the initialization
// process is complete.
lx.init().then(function (setup) {
  // Once initialization completes, we receive a `setup` object with LeanIX
  // data for our report. Next, we construct the report object and configure it.
  let report = new FactSheetsReport(setup);
  let config = report.createConfig();

  // Pass the finalized configuration object to `lx.ready()` function,
  // notifying LeanIX that our report is prepared to receive and process data.
  lx.ready(config);
});
Step 4: Start the Development Server
Once you've imported FactSheetsReport into the main module, you can start the development server. Run the following command:
npm start
A new tab opens in your browser displaying your custom report in the Reports section within your SAP LeanIX environment. If the tab doesn't open, the command provides a link that you can copy and then paste into the address bar of your browser.
The following image shows the outcome of the script used in this tutorial.
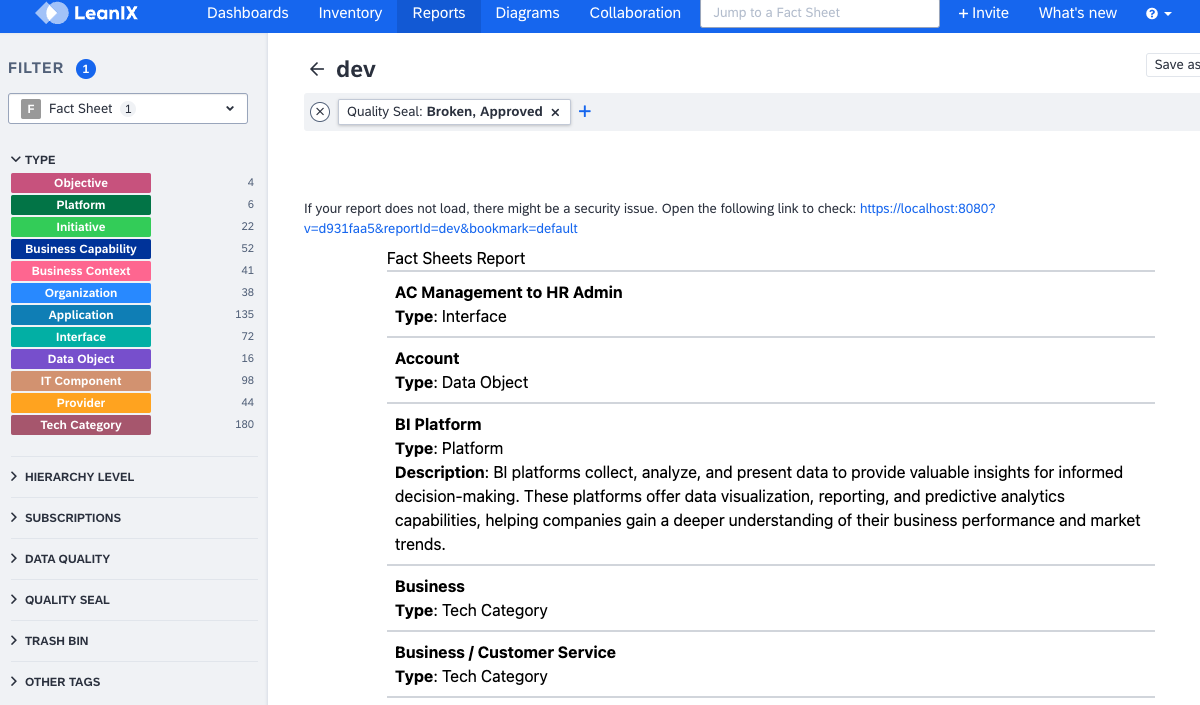
Custom Report That Lists All Fact Sheets Available in a Workspace
Summary
This tutorial has provided an introduction to creating custom reports using the LeanIX Reporting Framework. You learned how to:
- Import the LeanIX Reporting Library, initialize the LeanIX Reporting Framework, and create a custom report class
- Configure the report and render fact sheet data by creating a customized view of your fact sheets
- Apply the
lx.ready()method to indicate that the report is prepared and ready for receiving and processing data