
SAP LeanIX Overview
Introductory guide to begin your SAP LeanIX journey.
Overview
The getting started section helps new users understand SAP LeanIX's enterprise architecture products. It covers key concepts, user interface, and essential features, giving you a foundational understanding of SAP LeanIX and its role in enterprise architecture management.
Introduction to SAP LeanIX
SAP LeanIX is a SaaS application that allows you to manage and optimize enterprise architecture. Enterprise architecture management is the practice of aligning IT infrastructure and systems with business strategy and goals. It involves documenting the organization's IT landscape, planning, designing, and overseeing the implementation of architectural changes to meet changing business needs
SAP LeanIX provides a 360° overview of all your applications, business capabilities, and IT components so you can gain control of your expanding IT landscape and create roadmaps for major transformation initiatives. Through collaborative and democratized data collection, out-of-the-box integrations, and fast insights through reports and diagrams, SAP LeanIX enables you to manage enterprise architecture effectively.
With SAP LeanIX, you can:
- Effectively align IT strategies with business goals
- Map all applications to the business capabilities they support and the underlying dependencies
- Design the ideal IT architecture you aim to create
- Identify cost-saving opportunities and optimize IT investments
- Improve integration and interoperability among different systems and applications
- Mitigate security and compliance risks from technical debt and obsolescence
- Make better, faster business decisions and enhance operational efficiency
SAP LeanIX Products
SAP LeanIX comprises three products supporting different enterprise architecture domains and use cases.
- SAP LeanIX Application Portfolio Management: The base product for documenting and managing your application landscape. It provides insights into application lifecycles, dependencies, technical and functional fit, and business impact. Primarily, it drives the use cases of Application Portfolio Assessment and Rationalization by helping you identify redundancies and optimize technology investments.
- SAP LeanIX Architecture and Road Map Planning: An additional product that compliments SAP LeanIX Application Portfolio Management. It offers advanced features to plan target architecture, visualize the impacts of the planned transformations, and implement and monitor transformation initiatives. It drives the use cases of Application Modernization and ERP Transformation. Learn more in SAP LeanIX Architecture and Road Map Planning.
- SAP LeanIX Technology Risk and Compliance: This product extends the capabilities of SAP LeanIX Application Portfolio Management. It facilitates the discovery of the infrastructure layer in your application landscape and enables you to manage obsolescence risks and technology standards. This ensures operational stability and relevance of your technology stack. It drives the use case of Obsolescence risk management and Technology Standards Management. Learn more in SAP LeanIX Technology Risk and Compliance.
Key Concepts and Features
Fact Sheets and Meta Model
SAP LeanIX documents the organization's IT landscape and architectural elements using so-called fact sheets. Each architectural object, such as applications, business capabilities, IT components, etc., has its own fact sheet to store relevant information.
There are 12 predefined fact sheet types, each serving as a template with specific attributes and fields. For instance, to capture information about an application, you would use the application fact sheet type. It includes attributes such as lifecycle, technical fit, functional fit, etc. Subsequently, individual fact sheets are created for each application you wish to document.
Fact sheets form the foundation of the meta model. Meta model is like a blueprint that defines the relationships between different architectural elements and how the information in fact sheets is interconnected. For example, business capabilities rely on applications, which, in turn, use IT Components, while organizations use applications and so forth.
The meta model can also be customized to adjust the structure and relationships of architectural elements. However, customizing the meta model should be done thoughtfully, as the out-of-the-box meta model is already well-designed for its intended purpose. To learn more about the meta model and modeling fact sheets, see Meta Model.
The high-level representation of the out-of-the-box meta model below shows the associated relationships:
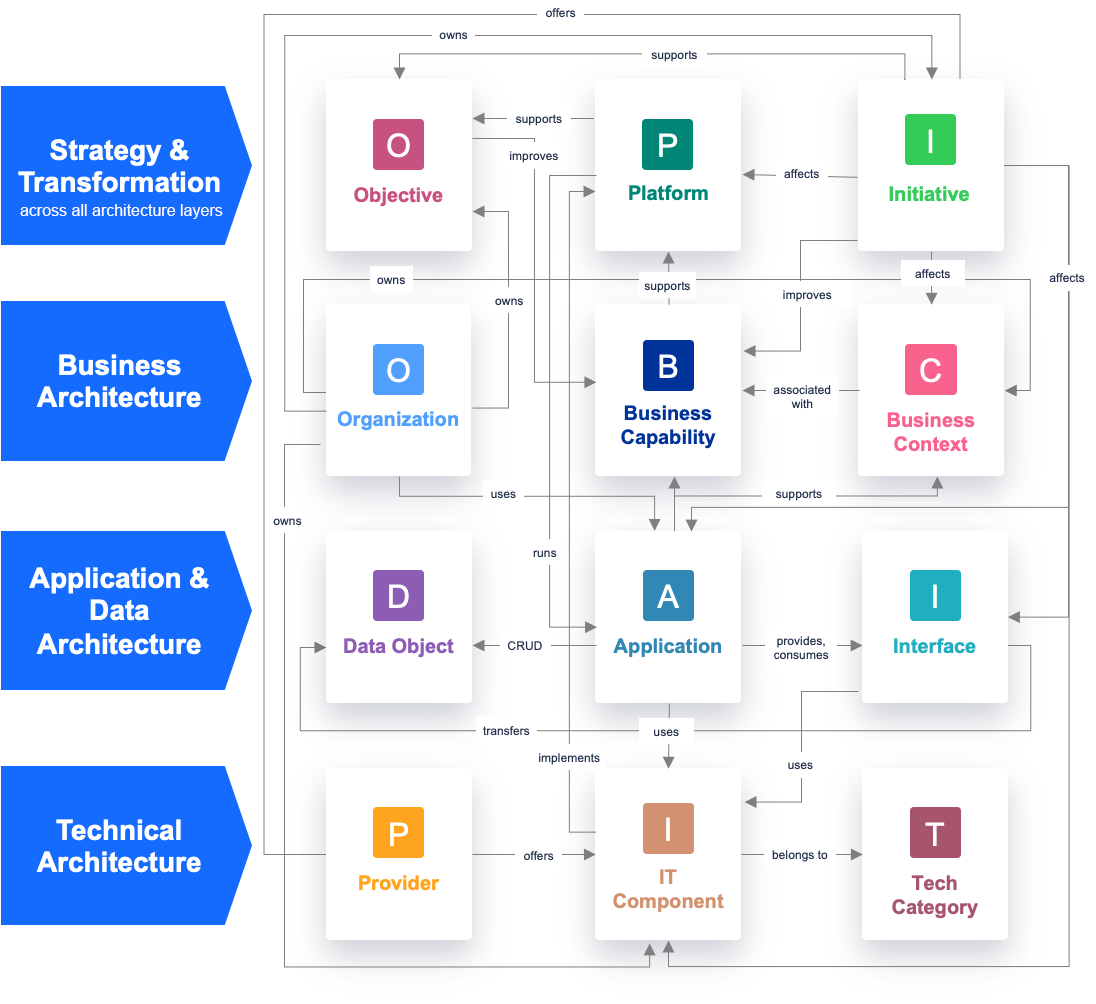
SAP LeanIX Meta Model
Inventory and Collaboration
The inventory is the centralized repository where you create, add, and manage fact sheets. If you are seeking information from the fact sheets or if you are responsible for maintaining and ensuring the accuracy of the information in a fact sheet, the inventory is your go-to place.
Documenting an organization's IT landscape is a collaborative effort, and contributors such as application owners, business owners, data architects, etc, play an important role. Collaboration features like surveys, fact sheet subscription, comments, and to-dos help keep data accurate and up-to-date. Additionally, fact sheet completeness and quality seal features assist enterprise architects in tracking the quality and completeness of data.
Reports and Diagrams
Reports and Diagrams in SAP LeanIX provide visual representations and insights into your enterprise architecture data. You use reports to obtain a clear overview of the as-is and future-state architecture and identify trends, redundancies, and risks. For instance, landscape reports can be used to get a comprehensive view of the IT landscape, matrix reports provide correlations between attributes of different fact sheet types, and roadmap reports can be used to outline strategic initiatives and priorities for future-state architecture.
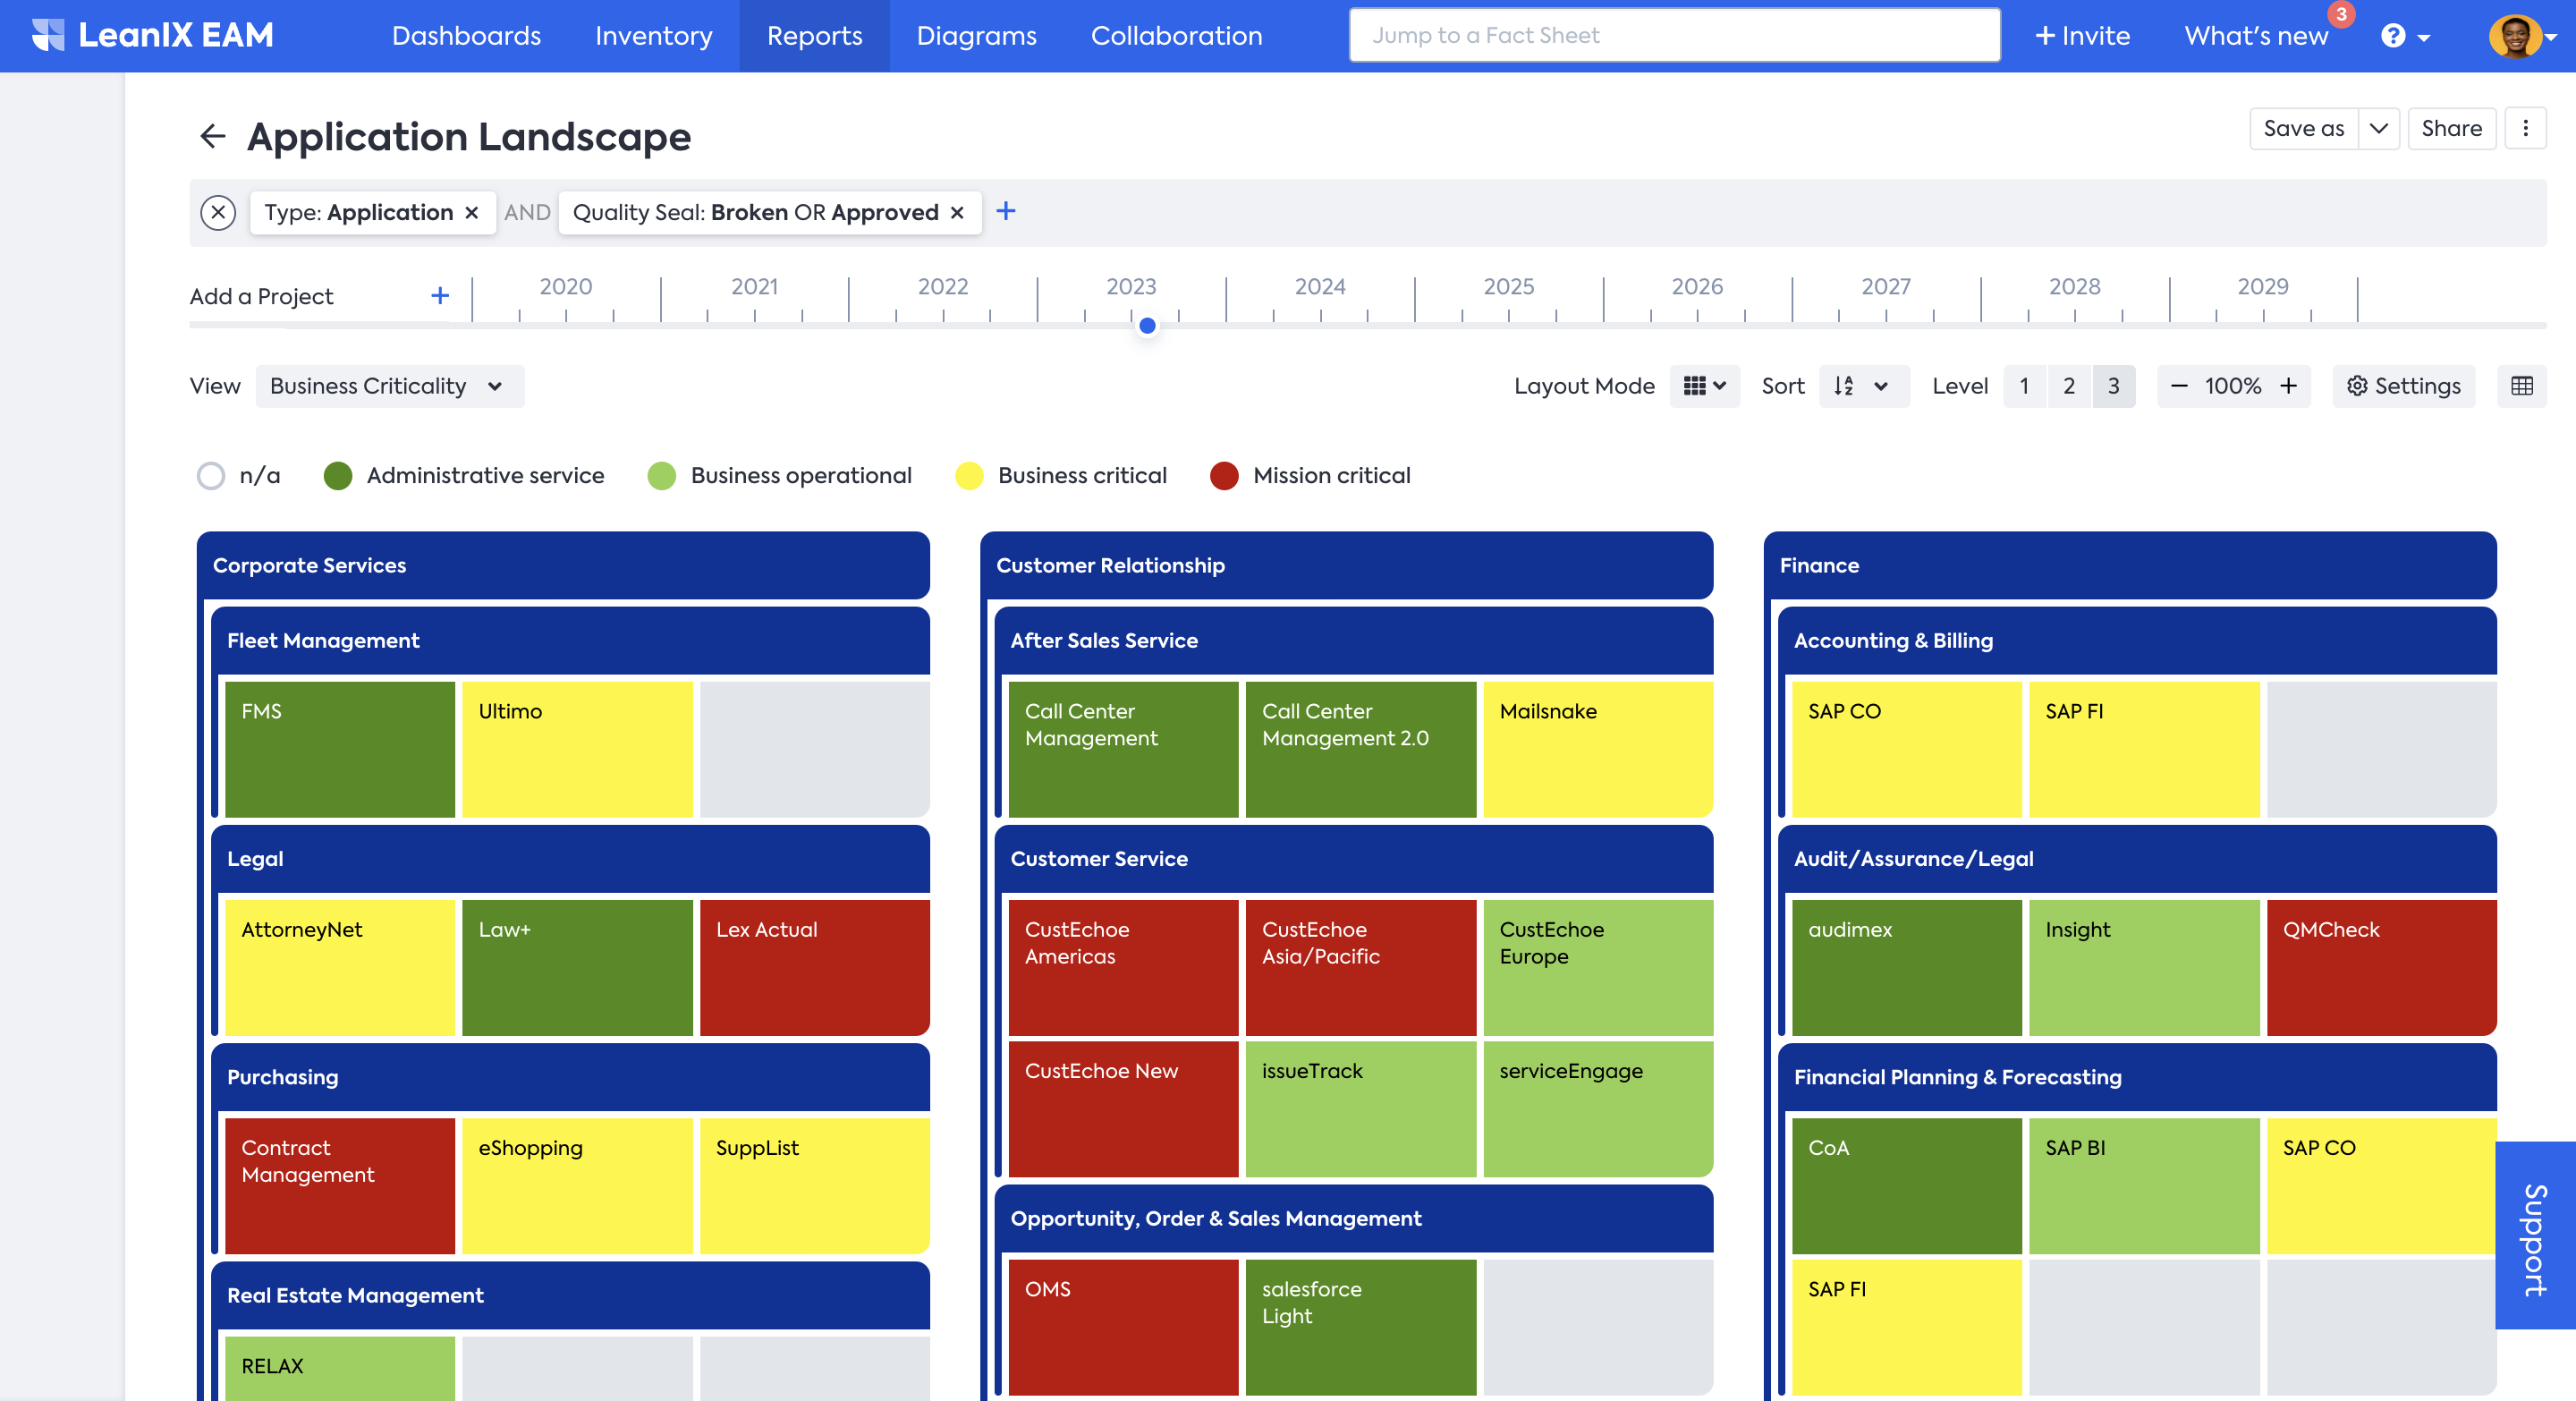
Application Landscape Report
Similarly, diagrams enable you to build visual models of an organization's enterprise architecture. You can break down complex architecture into manageable parts and interactively visualize relationships, data flow, and dependencies between various architectural elements. These visualization and analytical capabilities enable enterprise architects to chart out needed action plans, such as application rationalization, modernization, cloud migration, ERP transformation, etc.
Who Uses SAP LeanIX
A variety of individuals in different roles use SAP LeanIX:
- Enterprise architects: document, model, analyze, and optimize the enterprise architecture of the entire organization. To get started as a workspace administrator, see SAP LeanIX for Enterprise Architects.
- CIOs and IT leadership: gain a holistic view of IT performance, identify areas for optimization, and ensure alignment of IT with overall business strategy.
- Application and business owners: understand how IT supports their business capabilities, ensure application data is accurate and up to date, and make data-driven decisions for improvement. To understand how to use SAP LeanIX, see SAP LeanIX for Application and Business Owners.
- IT security: manage compliance, data privacy, and risk across the organization's tech landscape. To learn how obsolescence risk is managed, see Obsolescence Risk Management use case.
- Transformation and project managers: gain transparency into all IT projects to create roadmaps, manage interdependencies, refine budgeting, and mitigate risk. To understand how to use SAP LeanIX, see SAP LeanIX for Application and Business Owners. For a better understanding related to your roles, explore the Architecture and Road Map Planning guide and ERP Transformation use case.
- Solution architects: design, implement, and integrate solutions to meet specific business and technology needs.
SAP LeanIX Resources
For additional resources for further insights and support, see SAP LeanIX Resources.
Updated 4 days ago