
Virtual Workspaces
Manage access to fact sheets for custom user groups
Overview
With virtual workspaces you manage access control to fact sheets. Organize users into groups and assign or restrict access to fact sheets for each group. Allow users to only access specific fact sheets, for example:
- Fact sheets of the legal entity they belong to
- Fact sheets of their team
- Fact sheets of the region they are working in
Virtual workspaces are an additional option within your existing workspace. Although they are called workspaces, you can think of them as filters that hide or show fact sheets. User role permissions, such as viewer, member, or admin within SAP LeanIX, remain unchanged.
Essentials
- Fact sheets only
Virtual workspaces manage access to fact sheets. Diagrams, reports, and update notifications for fact sheets from all workspaces are accessible to all users. Fact sheets in diagrams are visible, even if the virtual workspace restricts access for this user. Clicking on a restricted fact sheet will result in an error for this user. - Activation required
Reach out to the support team to enable the feature. If in doubt, check your contract to determine if you already have the virtual workspaces feature. If not, it is always possible to add it through your CSM. - Single sign-on (SSO) required
You need to authenticate your users via SSO and also manage roles via your identity provider (IpP).
Access Control for Virtual Workspaces
The following components work together to achieve effective access control management:
- Virtual workspaces:
Virtual workspaces represent logical or organizational units within your organization. Such a unit could be a region, for example Americas or APAC. You define virtual workspaces based on the user groups you want to manage access for. - Access control entities:
Access control entities represent virtual workspaces. To create a workspace, you add a new access control entity. For example, the access control entity APAC creates the virtual workspace for the region APAC.
Access control entities are key to managing the access. You list all your access control entities in the ACL and assign them to users and to fact sheets. - User groups:
You assign users to access control entities. A user can belong to one or more entities, or none at all. You can combine several different access control entities to represent where the user needs access. You perform the assignment in your IdP through Active Directory (AD) user groups. - Fact sheets:
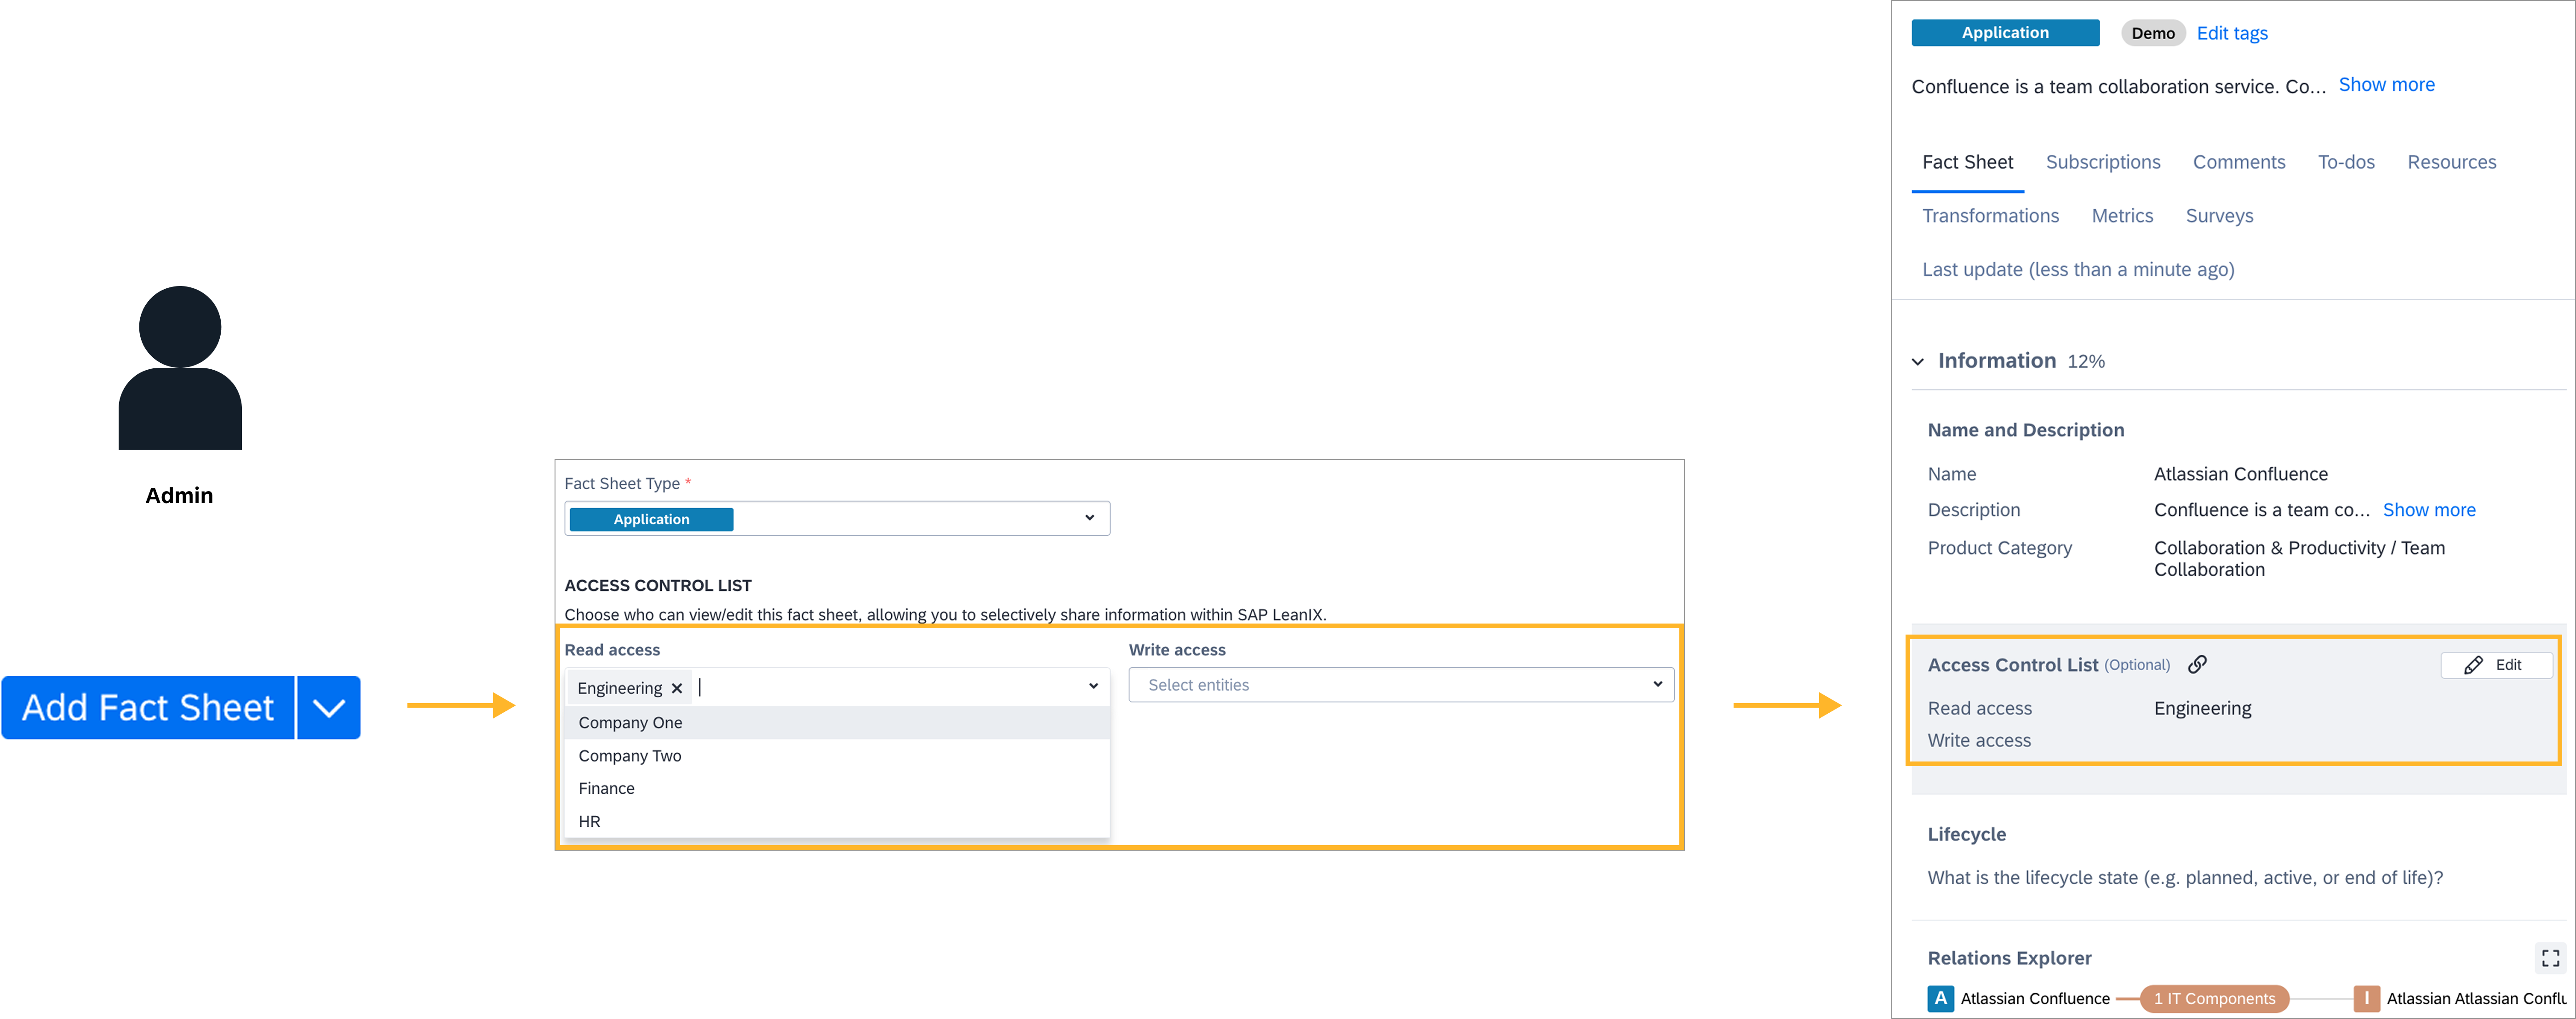
To apply access control, you assign access control entities to fact sheets. Once assigned, fact sheets belong to virtual workspaces. For every access control entity you specify read or write permissions for a fact sheet. - Access control list (ACL):
The ACL brings together all the access rights you configure for users and fact sheets. When a user logs in to SAP LeanIX, their details are checked including access permissions from the ACL. Only users that match the access control entities of the fact sheet are given read/write access to a fact sheet.
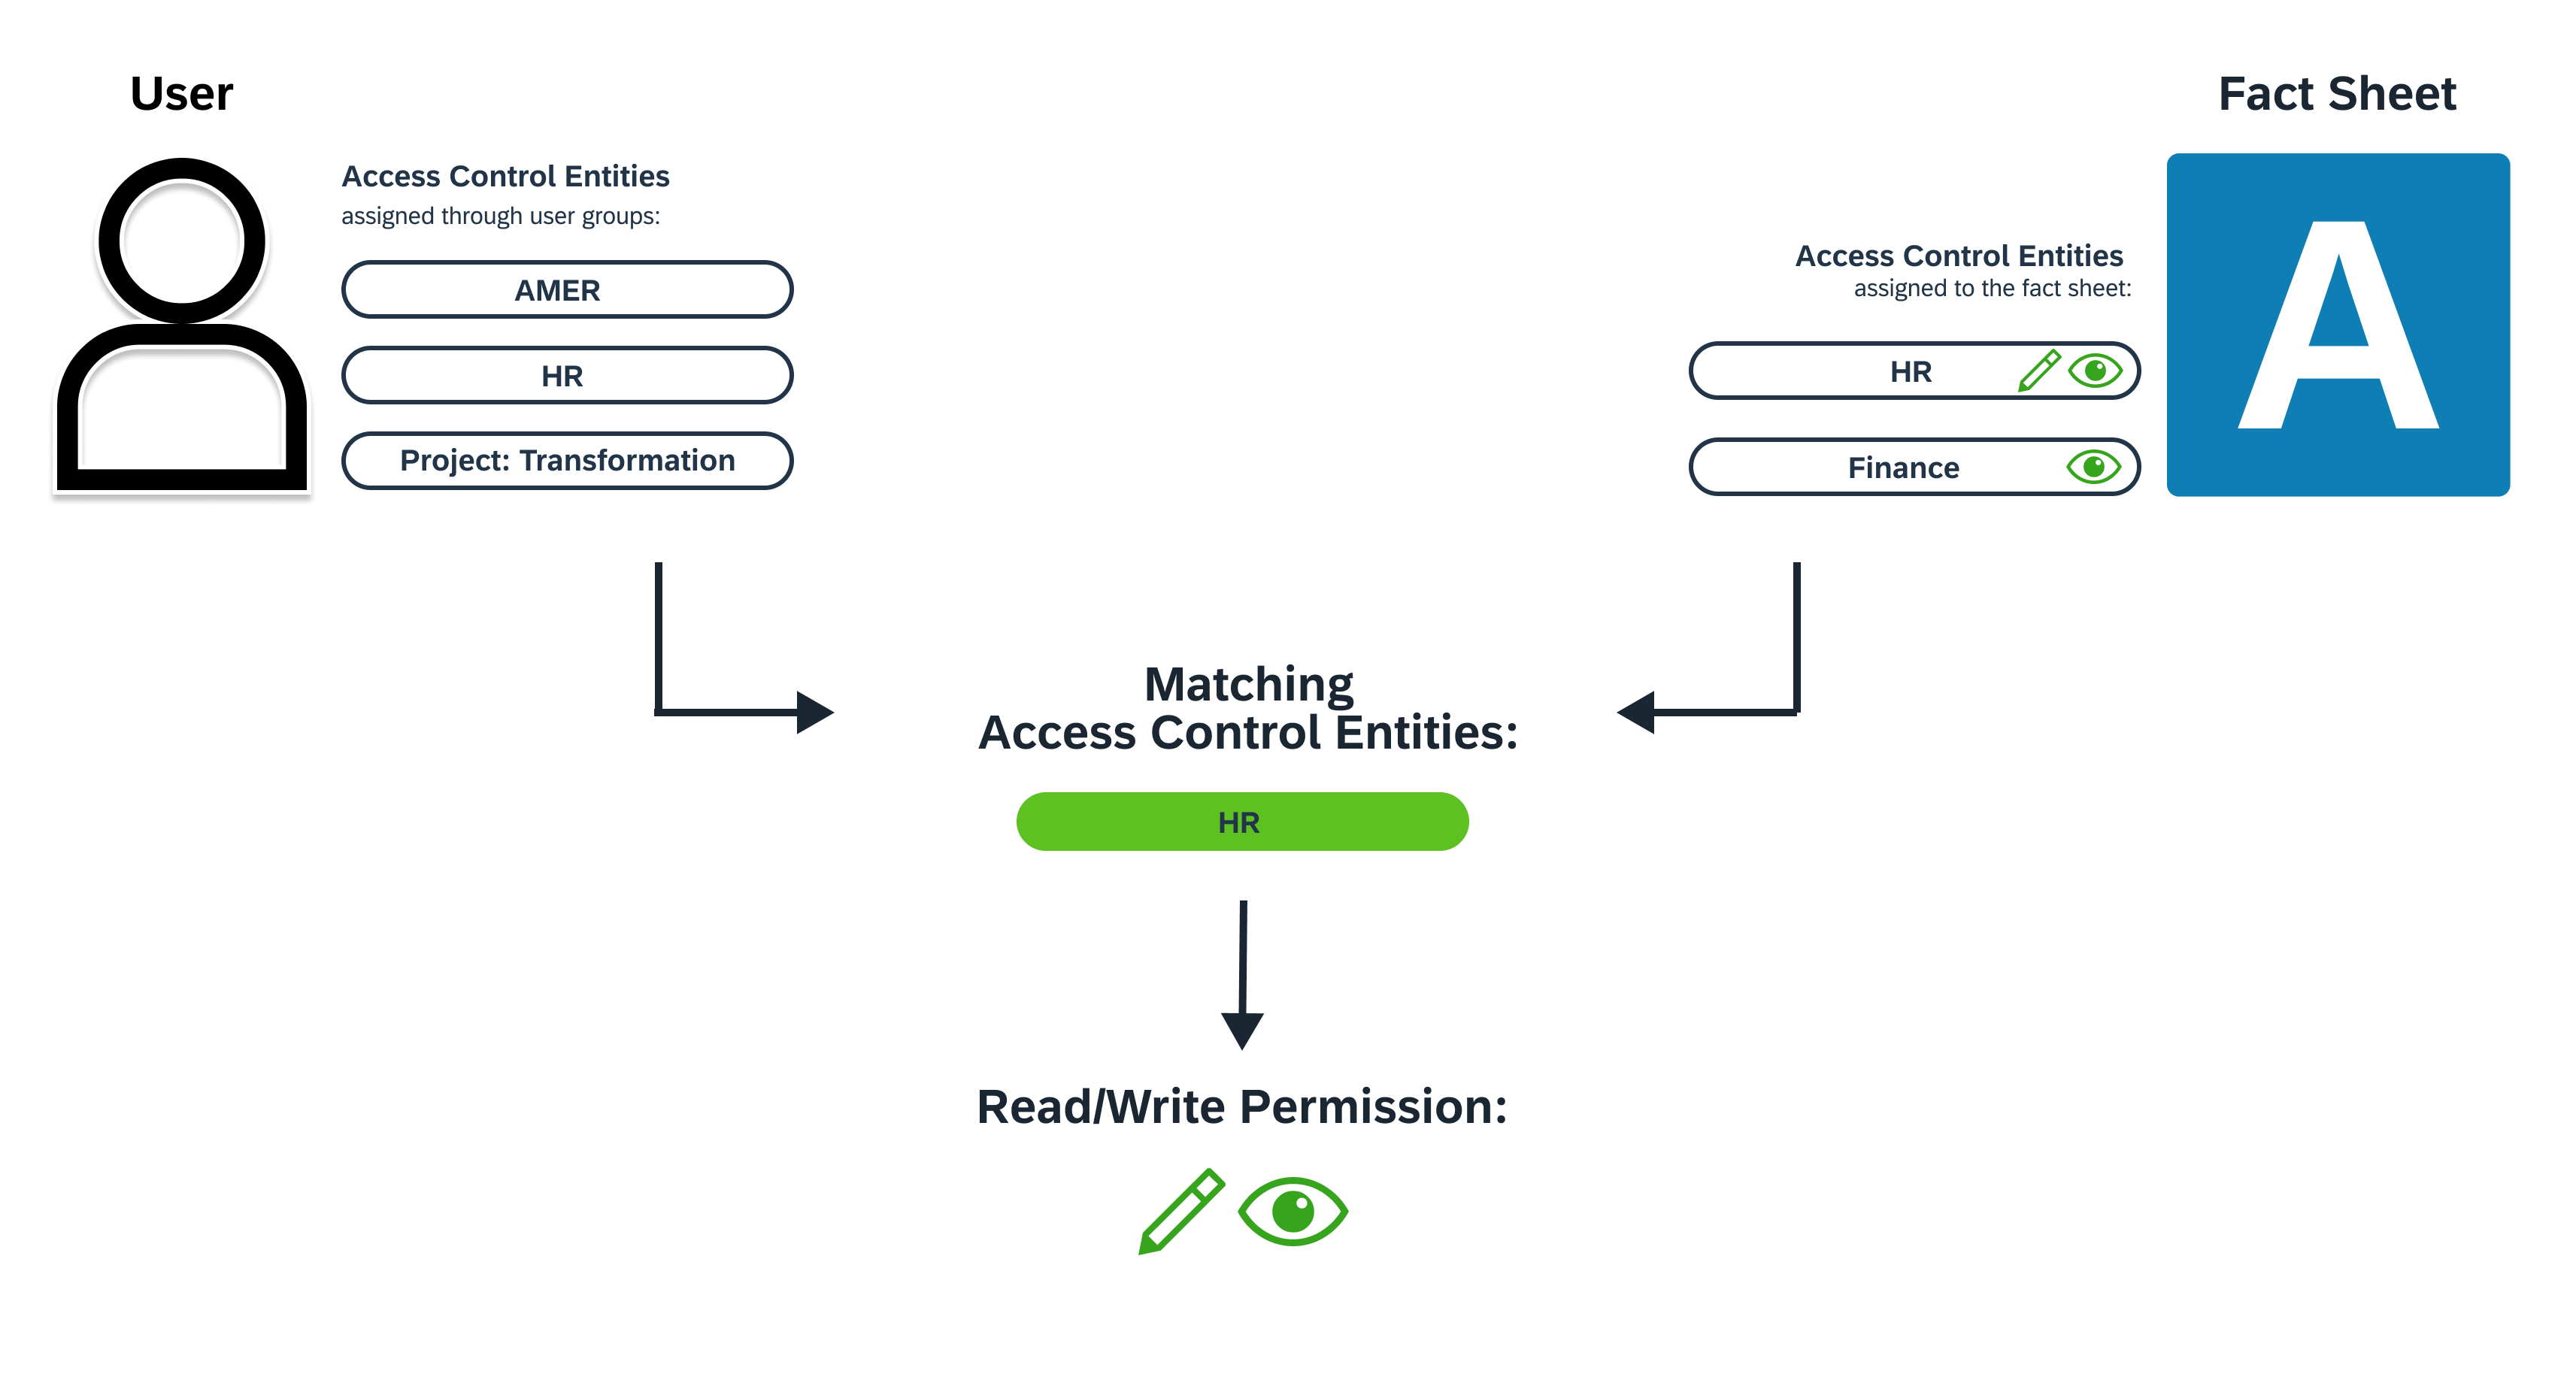
Checking for Matching Access Control Entities
Together, the access control entity assignment for each user and for each fact sheet create the unique virtual workspaces for each user. The user will see all fact sheets of each access control entity. The more access control entities a user is assigned to, the more fact sheets the user can access. Additionally, all fact sheets without any restrictions are accessible for all users in all virtual workspaces. By limiting access to fact sheets, you give your users focus.
To start configuring virtual workspaces see See Virtual Workspace Configuration.
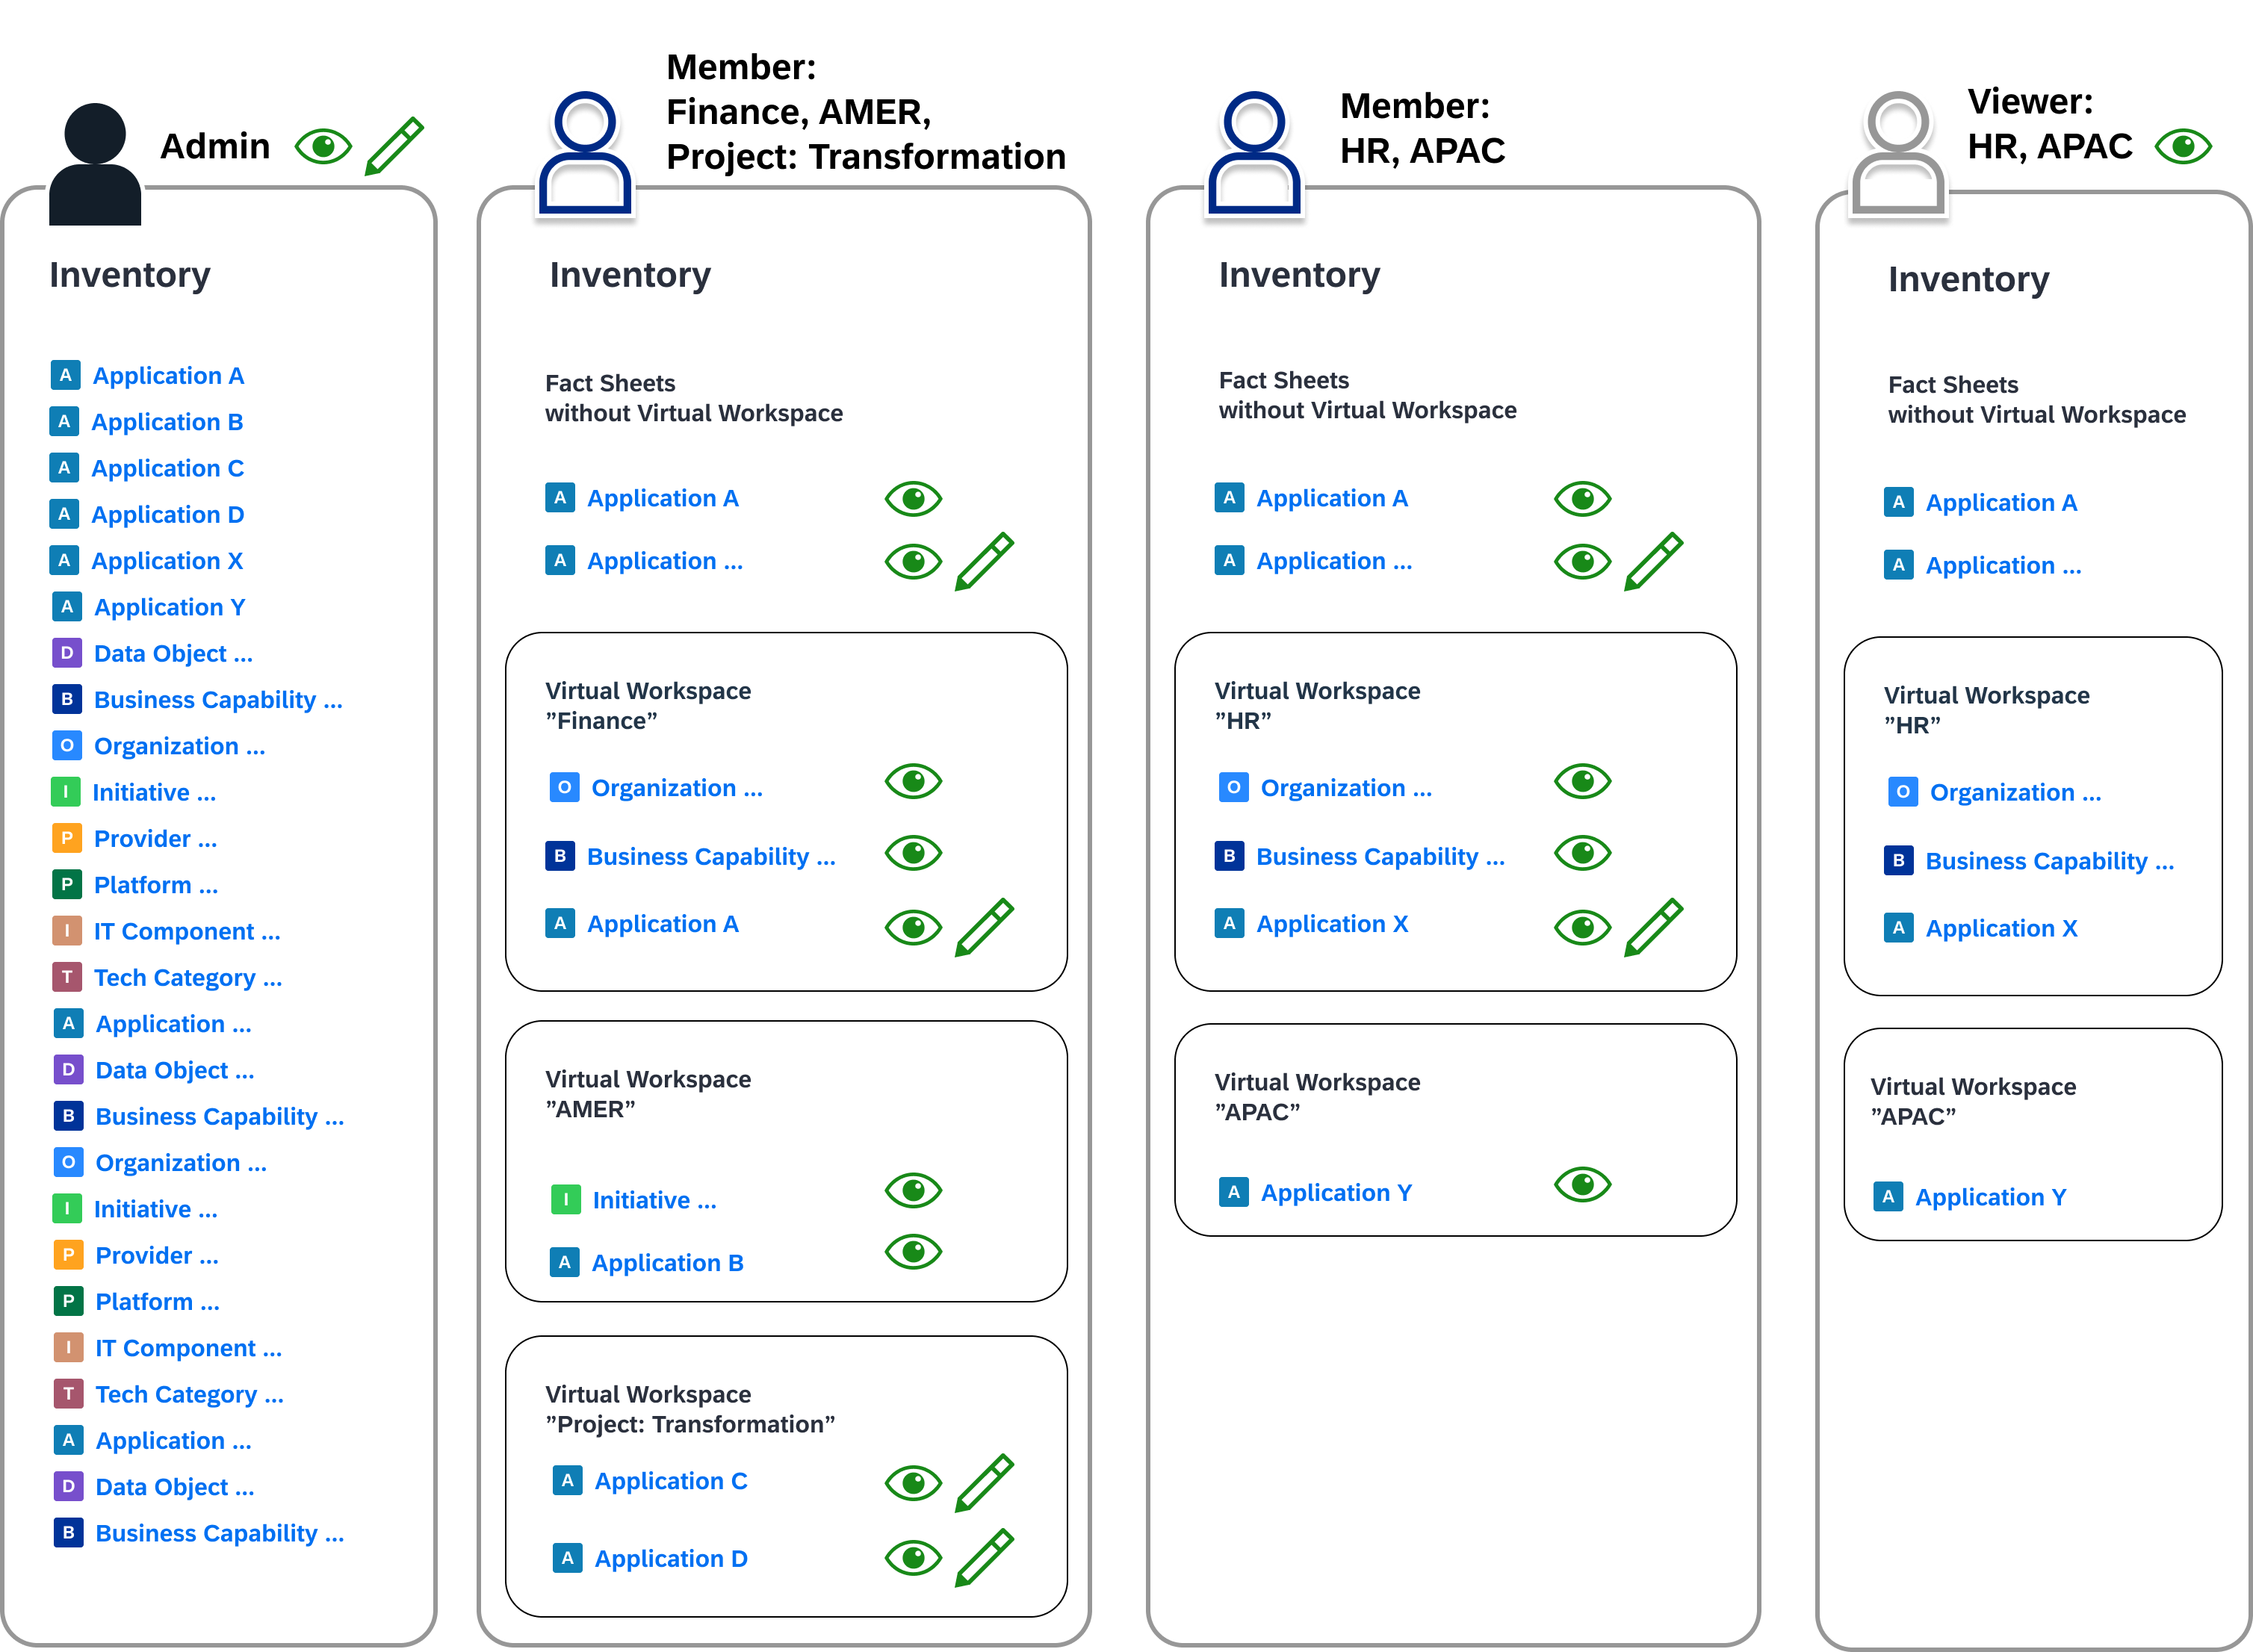
Unique Virtual Workspaces for Each User
Access Control Behavior for Different User Roles
User role permissions, such as viewer, member, or admin take precedence over the virtual workspaces. Depending on the user role, the read/write settings apply differently.
| User Role | Read/Write Access Behavior |
|---|---|
| Viewer | Viewers cannot edit anything, but they can see fact sheets for their virtual workspaces. |
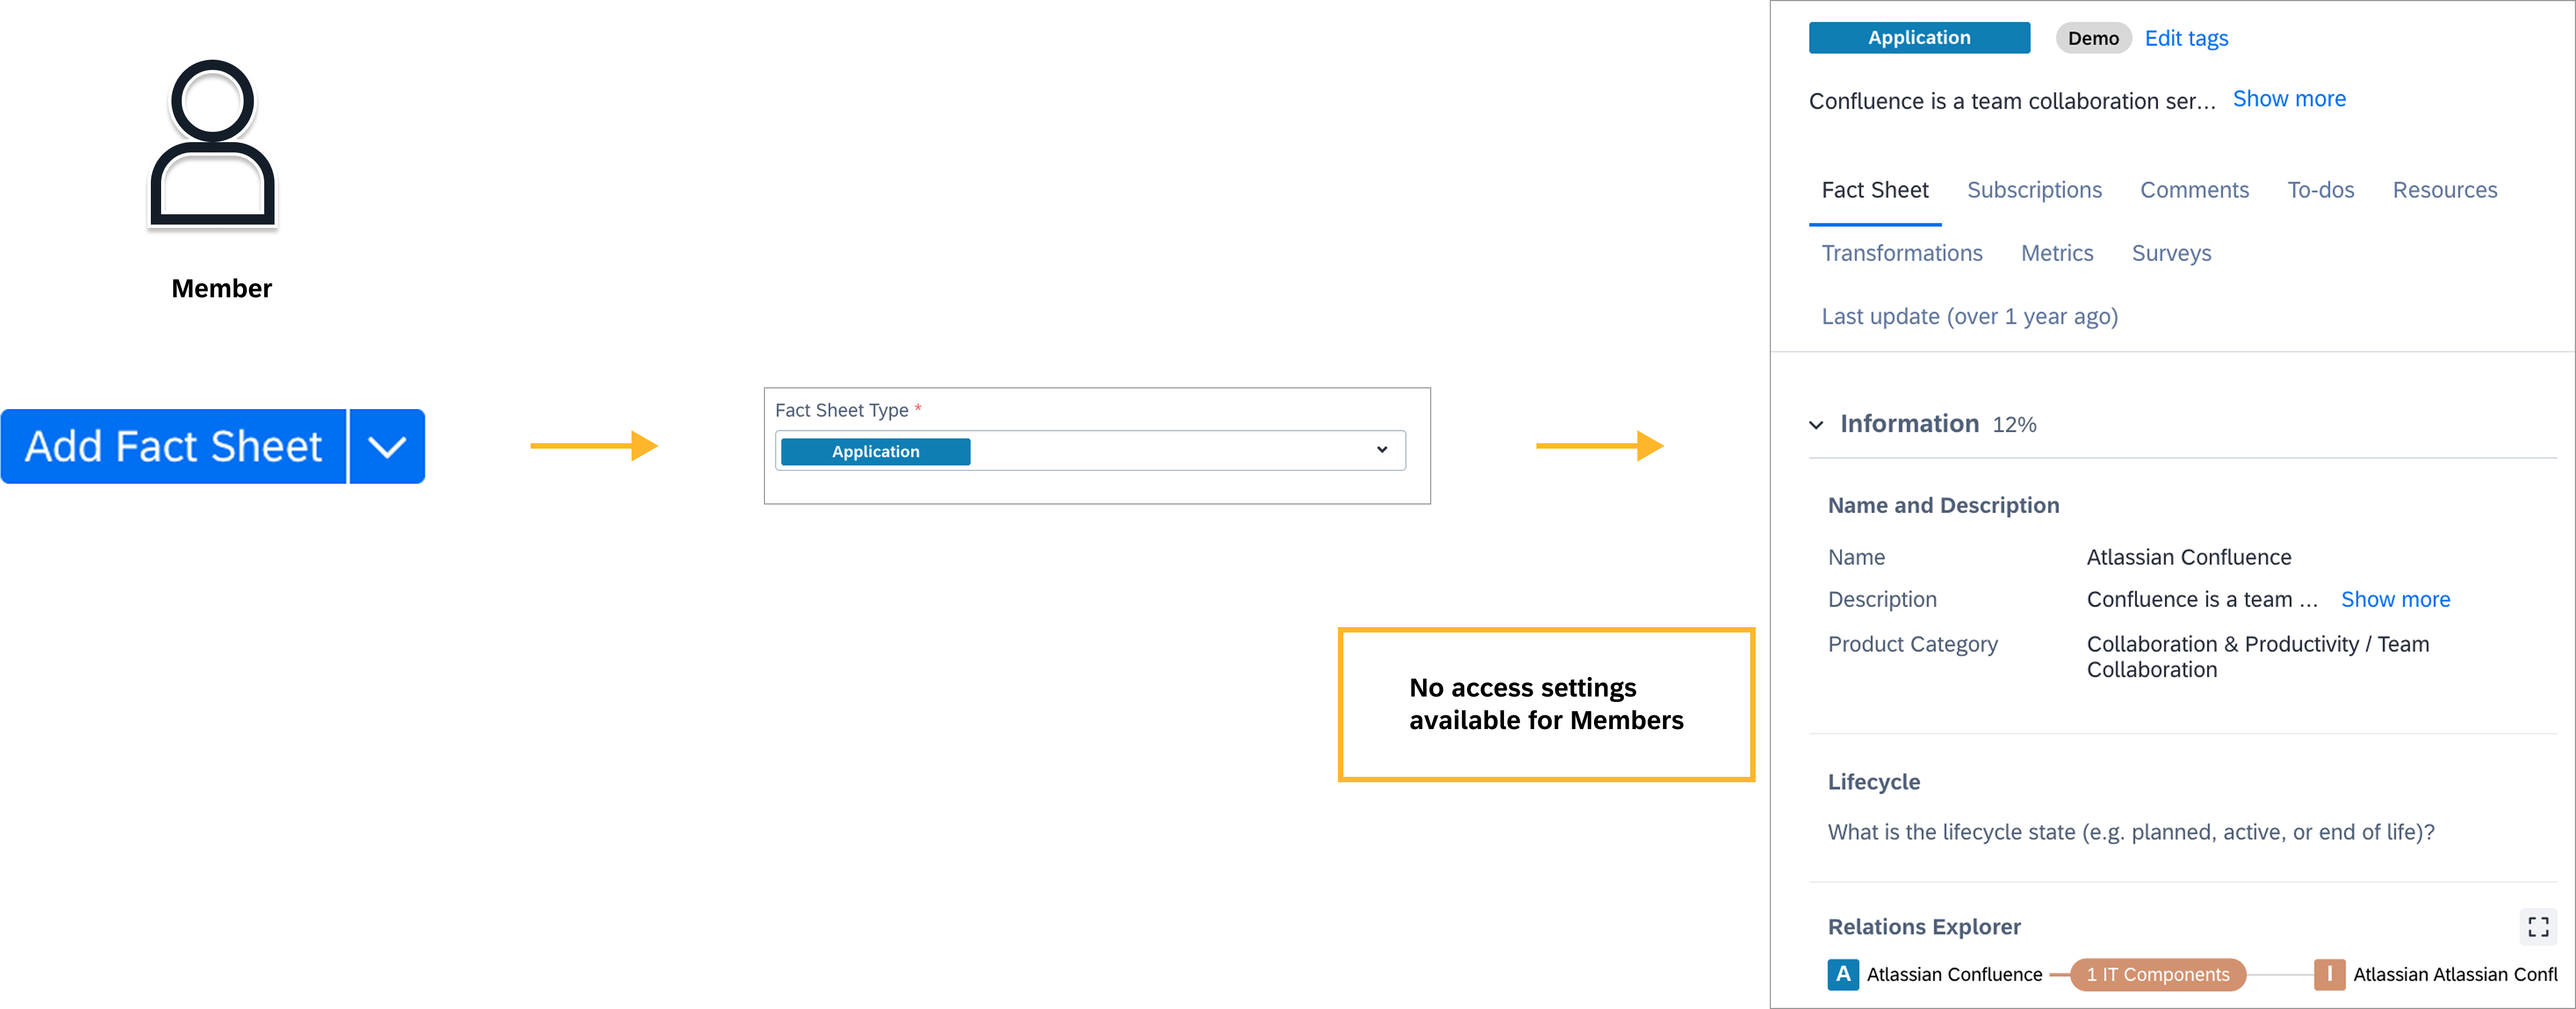
| Member | Members can see and edit fact sheets in their virtual workspace. When a member creates a new fact sheet, it is created with with the member’s access settings. Members cannot see the access control configuration and therefore cannot change these settings. See User Flow for a Member Creating a New Fact Sheet |
| Admin | Admins can see and edit all fact sheets in all virtual workspaces. Admins can change the access control settings for the meta model and the fact sheet. See User Flow for an Admin Creating a New Fact Sheet |
User Flow for an Admin Creating a New Fact Sheet
User Flow for a Member Creating a New Fact Sheet
Updated 24 days ago