Creating Fact Sheets
Learn how to create fact sheets in the inventory. This guide also covers fact sheet naming conventions and cloning fact sheets.
Introduction
There are various ways to create fact sheets in SAP LeanIX: you can create them individually in the inventory, in bulk through Excel file imports, or automatically through discoveries and the reference catalog.
This guide covers the creation of fact sheets in inventory. To learn about creating fact sheets through spreadsheet import, see Importing Fact Sheet Data Through Excel File. For information on discoveries and integrations, see Discoveries and Integrations.
Users with appropriate permissions, such as members and administrators by default, can create fact sheets. Admins can configure this permission to include other user roles, including custom roles. They can also modify the permission for each fact sheet type to restrict or expand creation rights. To learn more, see Fact Sheet Permissions.
Creating a Fact Sheet in the Inventory
Creating a fact sheet in the inventory is more than simply filling out the fact sheet creation form; it’s about ensuring sufficient data quality to provide meaningful value to your organization. To support this, SAP LeanIX lets you leverage information from the reference catalog by providing matching fact sheet recommendations as you type the name of the fact sheet you are creating.
- Starting from a recommendation: Choosing from the recommendation creates the fact sheet with essential information from the reference catalog pre-filled. By starting with recommendations whenever possible, you maintain a high level of data quality and consistency across your inventory. It also ensures regular updates to the fact sheet as the catalog evolves. To learn about the reference catalog, see Reference Catalog.
- Creating from scratch: When the fact sheet you are creating is not available in the reference catalog, and you do not find an appropriate recommendation, you can create it from scratch by filling in the required attributes.
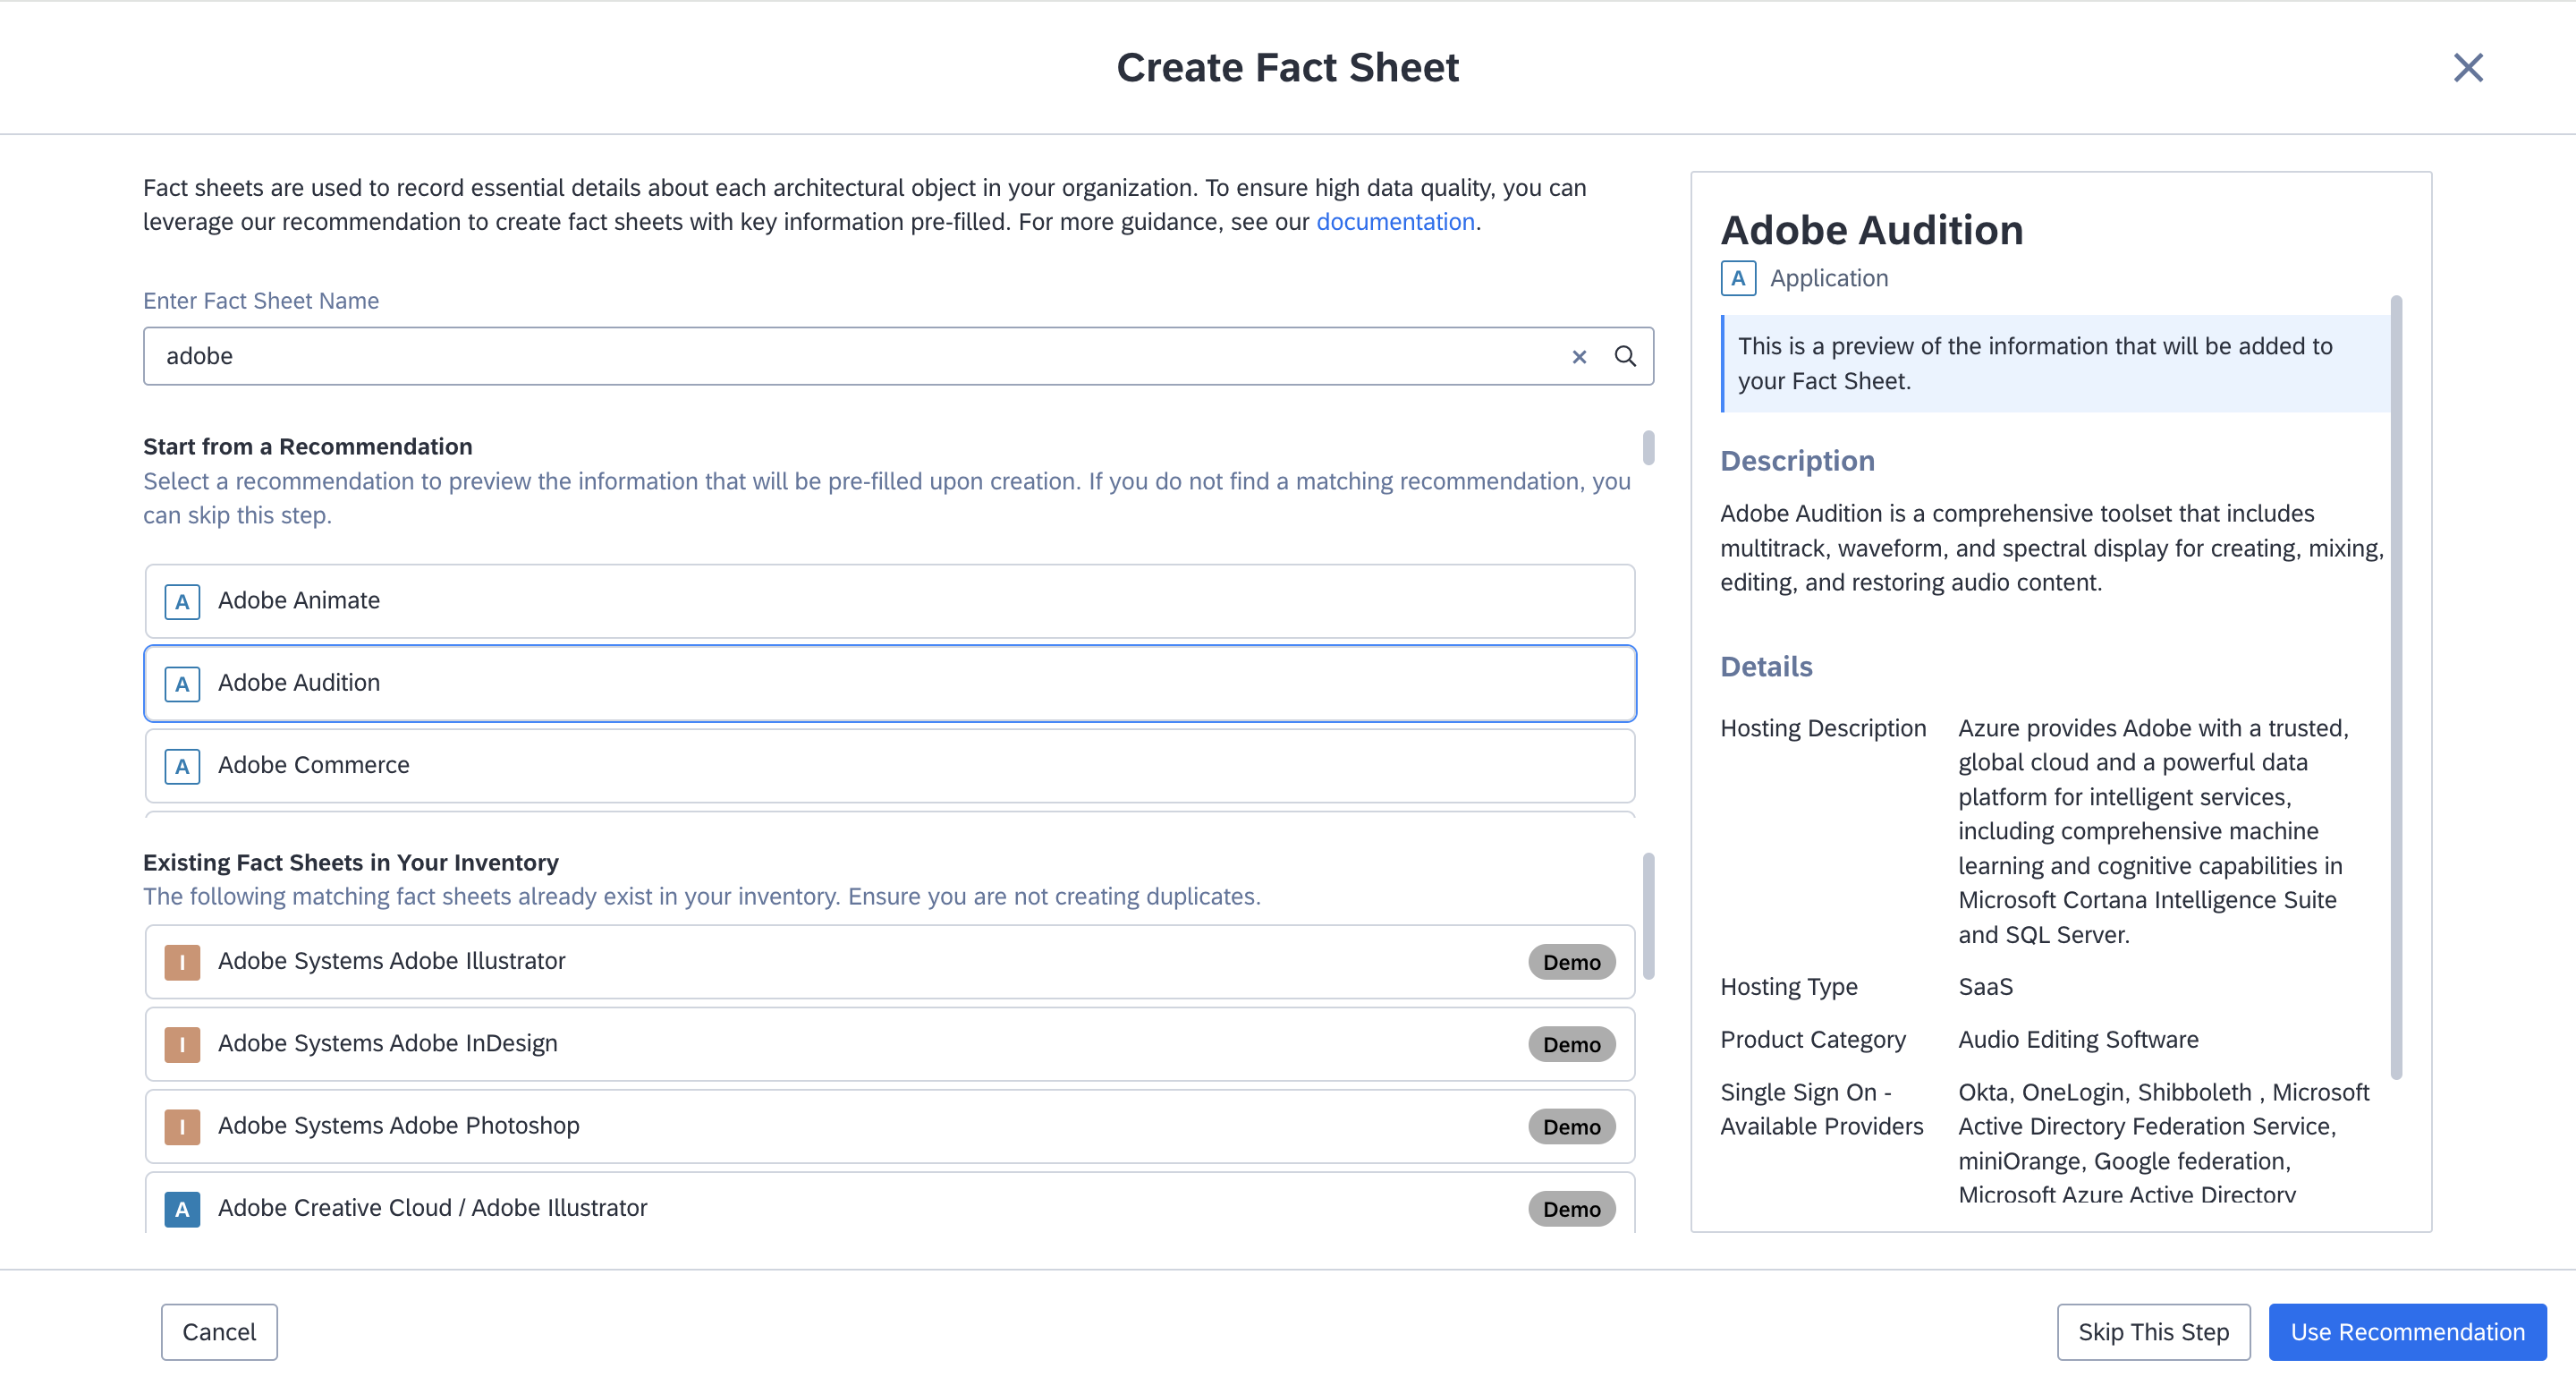
As you type the fact sheet's name, you also get a list of existing fact sheets in your inventory that match the name. Selecting a fact sheet lets you preview its information in the right-side pane, helping you check and avoid creating duplicates.
Tip
- Making a subscription type or a subscription role a mandatory attribute prompts fact sheet creators to assign a subscriber before they can finish creating the fact sheet. This ensures that a subscriber is assigned to the fact sheet at the time of fact sheet creation, promoting accountability and responsibility for maintaining data quality. To learn more, see Fact Sheet Subscription. To learn about mandatory attributes, see Mandatory Attributes.
- While creating the fact sheet, if you do not know who to assign as a subscriber, you can temporarily assign it to yourself and then assign it to the right person later.
- You can directly access the fact sheet creation form using its URL. Share the URL with SAP LeanIX users in your organization to involve them in building the inventory.
To create a fact sheet, do the following:
-
Navigate to the Inventory tab of your workspace.
-
At the top, click Add Fact Sheet. This leads to the fact sheet creation form.

Accessing Fact Sheet Creation Form in the Inventory to Create Fact Sheet
-
Type in the name of the fact sheet to get a list of recommendations and existing matching fact sheets.
-
To start from a recommendation, select it and click Use Recommendation. Selecting a recommendation shows you a preview of the available information in the right-side pane. If you want to create the fact sheet from scratch, click Skip This Step.

Fact Sheet Creation Form
-
Fill in the necessary fields and click Create to finish or Create Another to continue creating more fact sheets.
Note
- Note a limitation: only subscription roles specifically defined as accountable, responsible, or observer are available in the fact sheet creation form. Subscription roles set to 'all' type, even when made mandatory, will not appear in the form. To learn about subscription role creation, see Creating a Subscription Role.
- If you are unable to add the same user as a subscriber under multiple roles, it means your admin has restricted multiple subscriptions in the settings. To learn more, see Restricting Multiple Subscriptions from the Same User to a Fact Sheet.
- When creating a fact sheet from the recommendations, if you are unable to change the fact sheet’s name, it is because, in the reference catalog settings, your admin has chosen to sync the name field from the reference catalog.
Fact Sheet Naming Convention
Fact sheets have 3 different name values to ensure structured and consistent identification:
Name: This is the user-provided identifier for the fact sheet. It doesn't have to be unique by itself but is used to form the full name. If the provided name doesn't result in a unique full name, the user is prompted to provide a different name.
Full Name: The system automatically generates the full name using the fact sheet's name and it may include prefixes (such as provider information) and suffixes (like release details), which vary based on the specific fact sheet type.
Display Name: The display name is the complete name shown in the fact sheet header, incorporating parent-child relationships. Display names are important for accurately referencing fact sheets when importing relations via Excel files.
| Fact Sheet Type | Full Name | Display Name |
|---|---|---|
| Application | [name] [Release] | [Parent 1] / [Parent n] / [Full Name] |
| Business Capability | [name] | [Parent 1] / [Parent n] / [Full Name] |
| Business Context | [name] | [Parent 1] / [Parent n] / [Full Name] |
| Data Object | [name] | [Parent 1] / [Parent n] / [Full Name] |
| Initiative | [name] | [Parent 1] / [Parent n] / [Full Name] |
| Interface | [name] [Release] | [Parent 1] / [Parent n] / [Full Name] |
| IT Component | [Provider] [Name] [Release] | [Parent 1] / [Parent n] / [Full Name] |
| Platform | [name] | [Parent 1] / [Parent n] / [Full Name] |
| Objective | [name] | [Parent 1] / [Parent n] / [Full Name] |
| Organization | [name] | [Parent 1] / [Parent n] / [Full Name] |
| Provider | [name] | [Parent 1] / [Parent n] / [Full Name] |
| Tech Category | [name] | [Parent 1] / [Parent n] / [Full Name] |
Using Forward Slashes in Fact Sheet Names
If you need to use a forwarded slash
/in the name of a fact sheet itself, you can use the/without a space before and after.
Cloning a Fact Sheet
Cloning fact sheets is particularly useful when you need to create a successor fact sheet or when you are creating multiple similar fact sheets in the initial stage of populating your workspace. For example, multiple similar IT components with different release versions. While cloning, you can already establish the new fact sheet's relationship to the current one as a successor or predecessor.
A cloned fact sheet includes the following data from the original fact sheet:
- All attributes
- All relations, except one-to-one relations (to avoid exceeding defined limits)
- All attached documents and resources
Comments, surveys, and metrics are not included in the clone.
Note
You can clone a fact sheet only if you have the appropriate CRUD (Create, Read, Update, Delete) permissions for fields and fact sheets.
To clone a fact sheet, follow these steps:
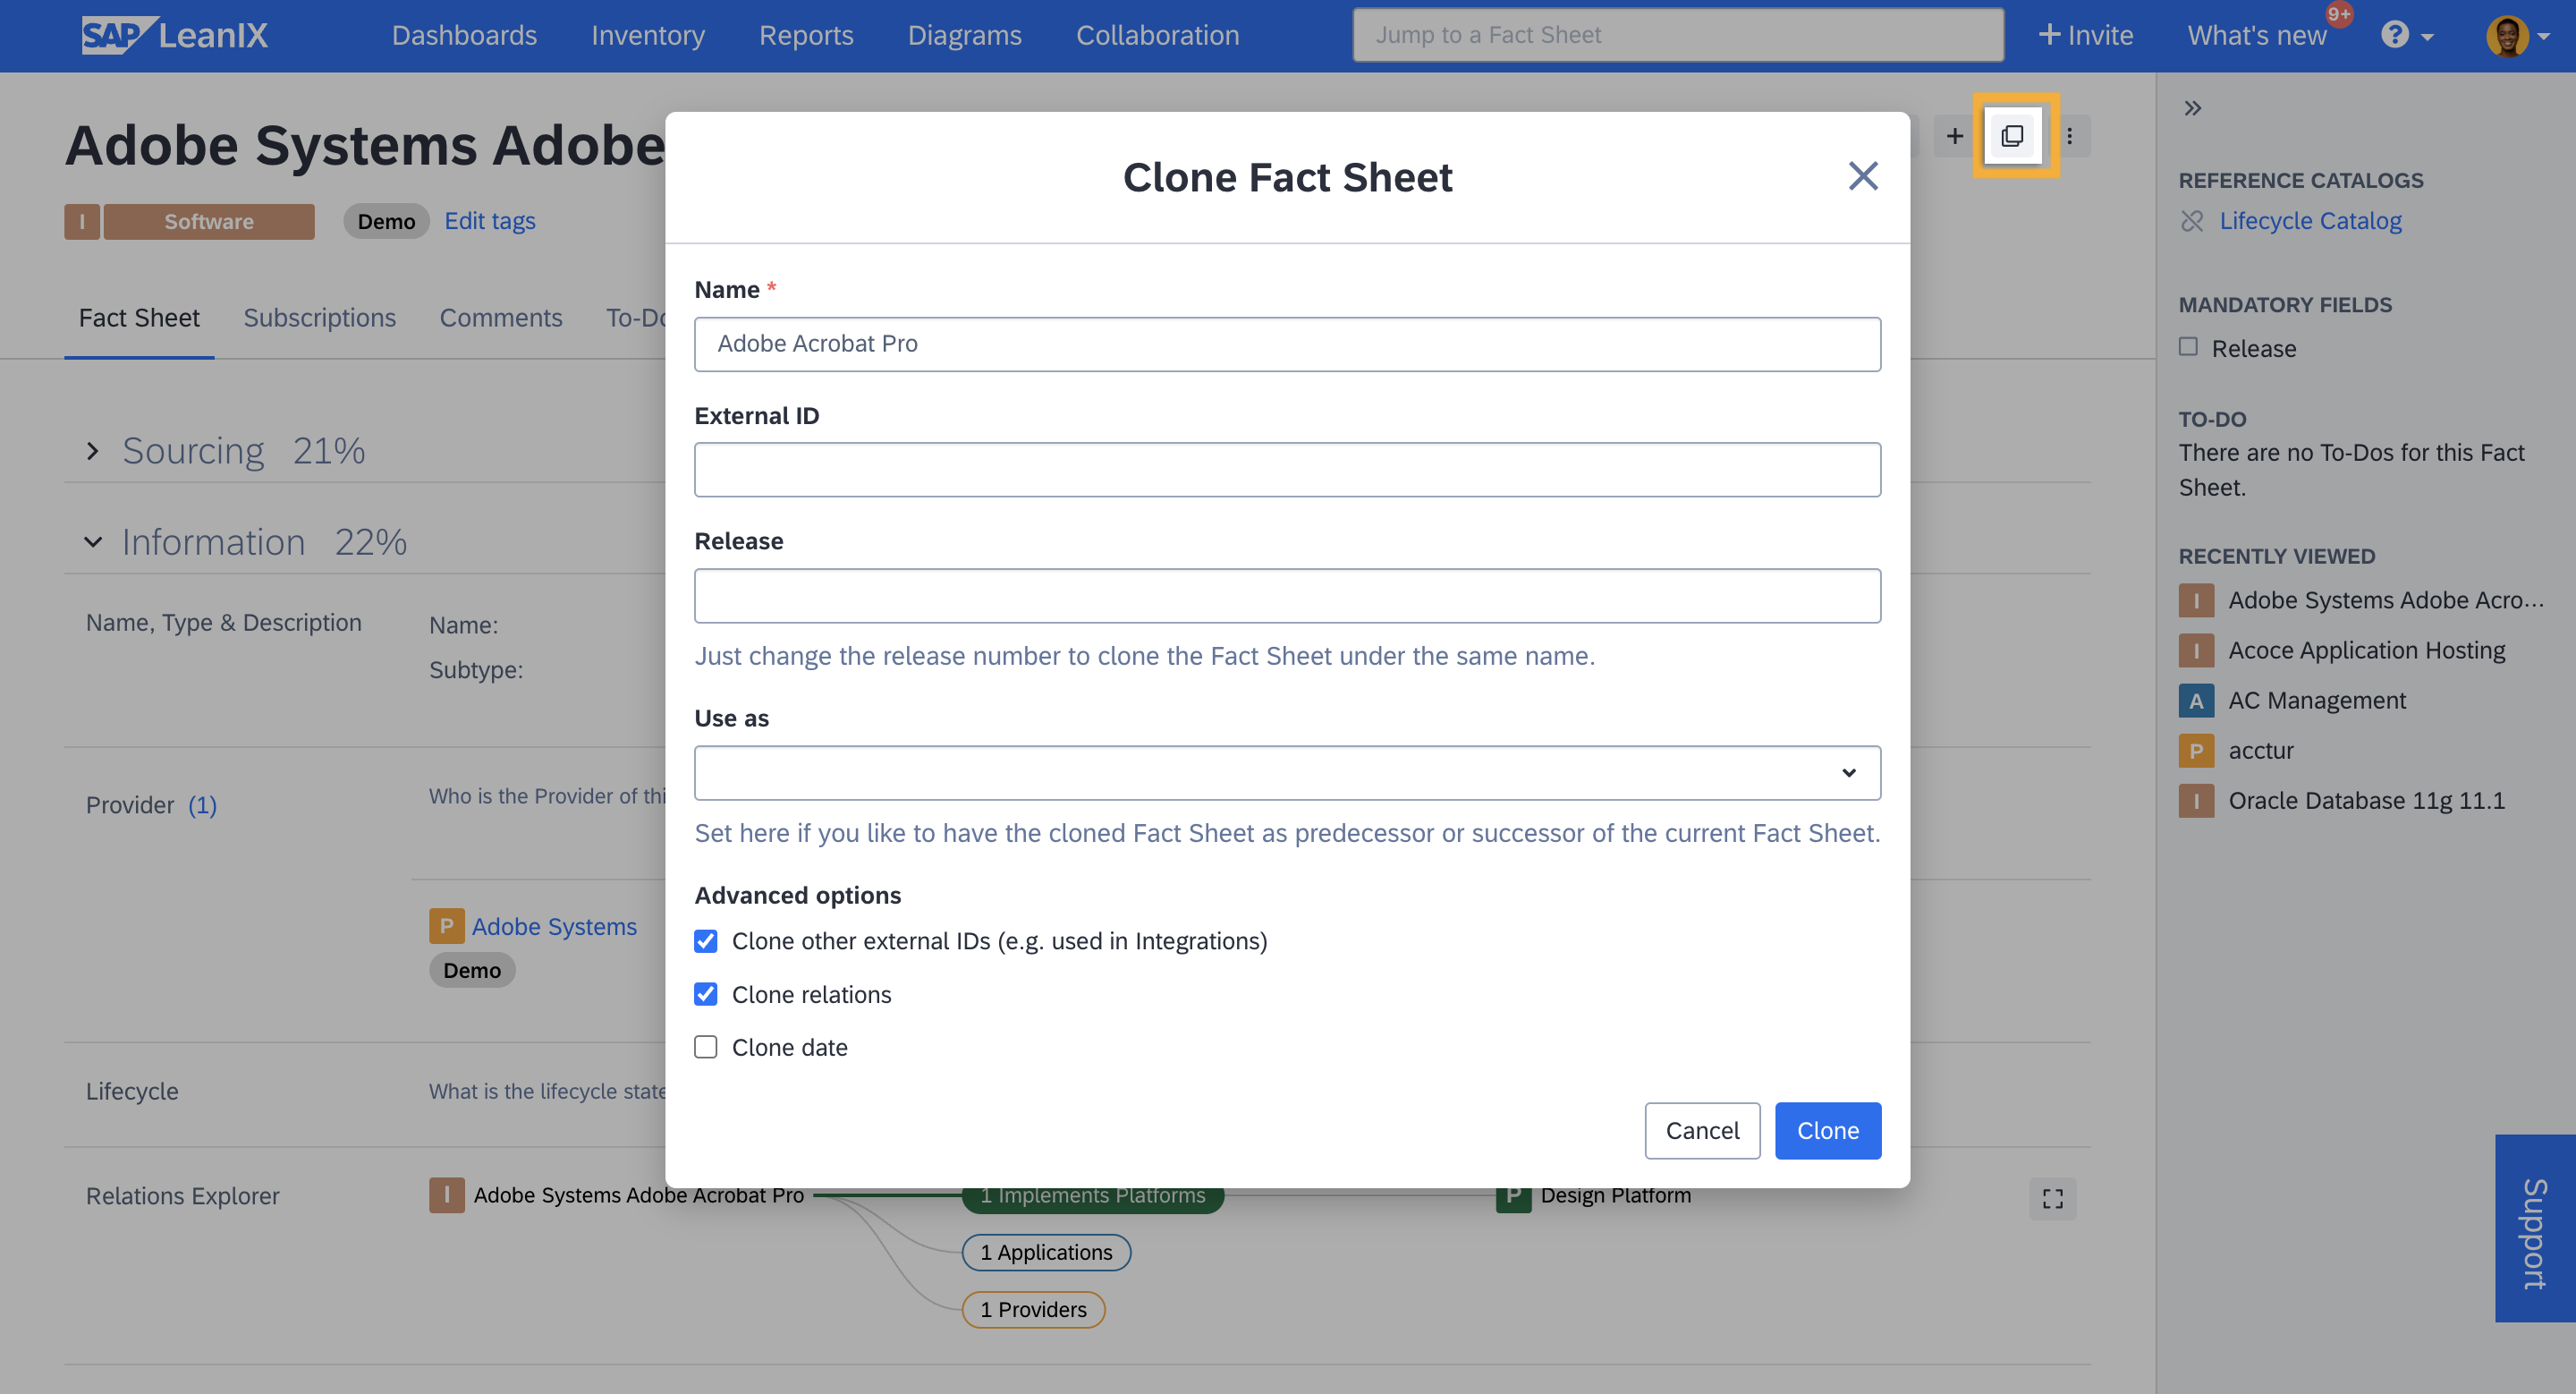
- In the top right of the fact sheet, click the clone icon.
- In the resulting overlay, provide the name of the new fact sheet and fill in other fields as needed.
- Click Clone.

Cloning a Fact Sheet
Updated 23 days ago
