
Importing Fact Sheet Data Through Excel File
SAP LeanIX’s import feature enables efficient bulk updates, including adding, updating, and archiving fact sheets. This guide provides formatting rules, error handling, and step-by-step guidance for importing data through an Excel file.
Introduction
SAP LeanIX’s import feature allows users to efficiently add, update, and delete fact sheet data through an Excel file. Making use of the export functionality, you can create a template file with columns for each needed fact sheet attribute, fill or update them and import the file back. Import functionality allows you to bulk update seamlessly, ensuring that all necessary fact sheet fields are populated and up-to-date.
Using the import function, you can do the following:
- Update existing fact sheet values
- Delete fact sheet values
- Populate empty attributes of fact sheets
- Create new fact sheets
- Archive fact sheets
Limitations
The import feature has the following limitations:
| Limitation | Detail |
|---|---|
| File type | Only .xlsx files are supported. |
| File size | Import files can contain up to 10,000 rows. |
| Limitations while importing subscriptions and relations | Including subscriptions or multiple relations per fact sheet can significantly increase processing time. To mitigate this, it is recommended to import fewer than 500 fact sheets per file when relations or subscriptions are included in the file. We also recommend not to import subscriptions and relations in the same file. |
| Unsupported data | The following data can not be imported: - Milestones - Comments - Resources - To-Dos |
| Fact sheet type per import | Only one fact sheet type can be imported per import. Including multiple fact sheet types in a single import file will lead to errors. |
| Existence of attributes is a prerequisite | Fact sheet attributes must already exist before the values can be successfully added or modified through the import process. New attributes cannot be created by merely adding a column in the spreadsheet. However, tags are an exception to this rule and can be created directly through Excel file import, provided on-the-fly creation is enabled for tags. |
The rest of this guide walks you through the process of importing data, covering best practices, formatting rules, and common issues that might cause import errors while also offering solutions for addressing those issues.
Step 1: Create an Import Template
Using the export functionality, create a template with columns for each needed fact sheet attribute. This template, with properly formatted column titles, ensures a smooth and accurate data import process.
To learn how to create an import template, see Creating Template for Import.
ReadMe Sheet in Template
The template also includes an additional sheet titled ReadMe. This sheet provides detailed instructions for each column, specifying which columns are read-only, the type of input required, possible values for single-select or multi-select fields, mandatory columns required for a successful import, forbidden characters, and what can and cannot be imported. Be sure to review the ReadMe sheet of the exported Excel file.
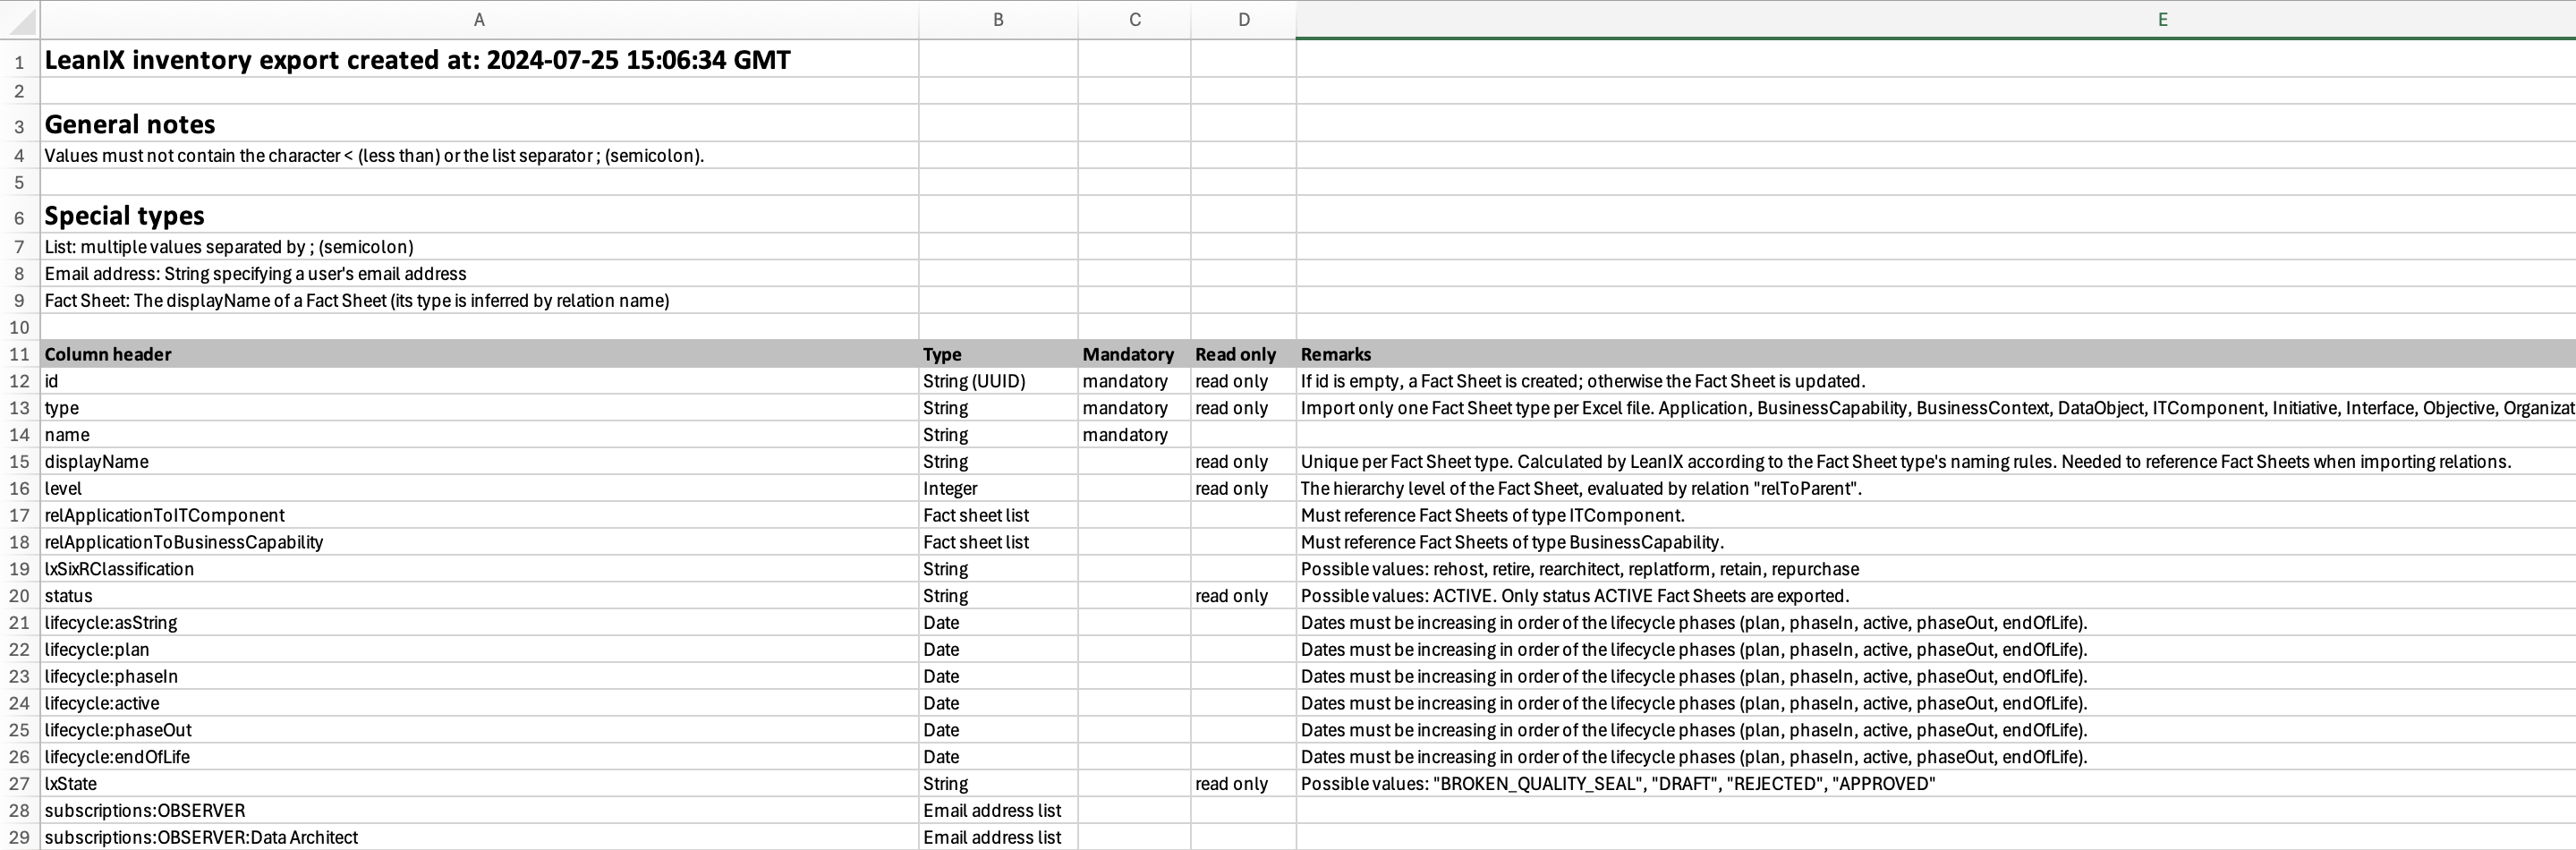
ReadMe Sheet in the Import Template
Note
The import function only reads the first sheet of the workbook. Therefore, ensure that the order of the sheets remains unchanged. You may also delete the ReadMe sheet before importing.
Step 2: Update the Data in the Spreadsheet
In the spreadsheet, each row corresponds to a fact sheet, and each column corresponds to a fact sheet attribute. The first row of each column contains the technical key of the attribute, and the second row contains its translation. It is important to use the correct technical keys and their translations in these rows for successfully mapping input data to the inventory.
Tip
Technical keys and translations for fact sheet attributes can be found in the fact sheet configuration. For more information, see Attribute Key and Translations.
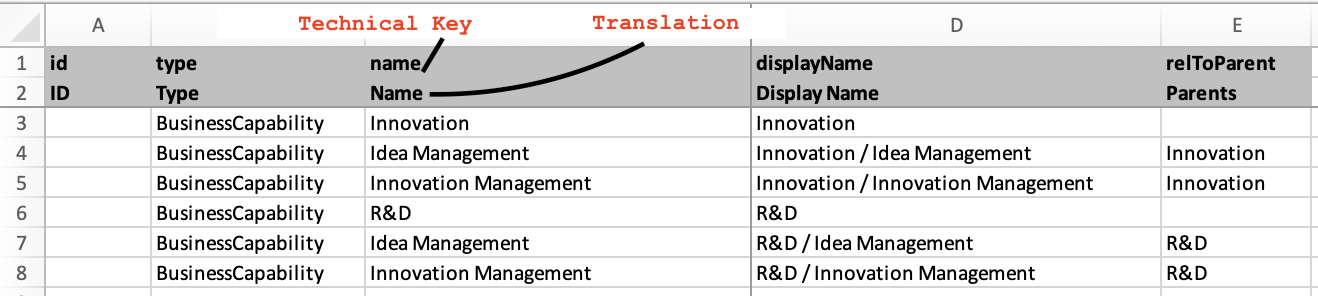
Technical Keys and Translations of Fact Sheet Attributes in the Top Rows
Though the fact sheet ID is the only field used to identify a fact sheet, fact sheet type and name are a requirement for a successful import. Hence, these 3 columns are mandatory columns in the spreadsheet.
Complete or update the rest of the spreadsheet according to the formatting rules and the dependencies and overwrite principles detailed in the Key Concepts and Formatting Rules. Make sure you are familiar with these guidelines before making any updates.
Updating the cells can have the following outcomes when the file is imported:
- Update existing fact sheet values: If you update existing values in the spreadsheet, the corresponding fact sheet attributes will be updated.
- Delete fact sheet values: If you remove values from the cells, the corresponding values will be deleted from the fact sheet.
- Populate empty attributes of fact sheets: Filling in empty cells in the spreadsheet will populate the empty fact sheet fields.
- Create new fact sheets: If the fact sheet ID column is empty but the fact sheet type and name columns are completed, new fact sheets will be created. While filling the fact sheet type column, make sure that the exact technical key of the fact sheet type is used. Additionally, of course, you can include and fill any other columns as needed.
- Archive fact sheets: To archive fact sheets, add a column with action as the technical key in the first row and Action as the translation in the second row. Fill the column with the value Archive against the fact sheets that need to be archived and import the spreadsheet. For detailed instructions, see Archiving Fact Sheets in Bulk.
Key Concepts and Formatting Rules
Understanding essential concepts and formatting rules is crucial for ensuring a smooth and accurate data import process. Proper formatting and adherence to guidelines help correctly map data to the inventory and prevent errors.
Overwrite Principle
In general, the import feature follows the overwrite principle, meaning existing data for fact sheets is always replaced with the data provided in the import file. For fields with multiple values, such as multi-select fields, relations, or tags, make sure you include both existing and new values in the import file to retain the existing ones while updating or adding new data.
An exception to the overwrite principle is when fields on relations display name column is involved. For details, see Fields on Relation.
Read-Only Fields
Certain fields are read-only and cannot be modified through the import process. These fields are automatically generated by SAP LeanIX and cannot be edited in the workspace. Changes to these fields in the spreadsheet will not affect their values in the fact sheet.
The current read-only fields are:
updatedAtcreatedAtidtypecompletiondisplayName
An exception is the id field: if this field is removed from the spreadsheet, new fact sheets will be created, provided there is no name conflict.
General Formatting Rules
| Rule | Details |
|---|---|
| Character encoding | Supports UTF-8 character encoding for string fields. However, values themselves cannot contain “<" (less than) or ";" (semicolon). A semicolon is used to separate values in a cell. |
| Date format | Enter dates as: yyyy-mm-dd |
| Number format | Use points (“.”) for decimals (e.g., 1.7 = one point seven) Use commas (“,”) for thousands (e.g., 1,700 = one thousand seven hundred) |
| Case sensitivity | Values are case-sensitive, so ensure the correct case. |
Single- and Multi-Select Fields
For single- and multi-select fields, ensure you enter the exact technical keys for a successful import. Separate different values with a semicolon (;), and avoid spaces before or after the semicolon.
Tip
When you have included single- and multi-select fields as columns in the import template, you can find the exact technical keys in the ReadMe sheet of the template.
Relations
To add or create a relation, use the exact display name of the target fact sheet. By default, the display name of a fact sheet is composed of the full names of the parent fact sheets, separated by a forward slash (/), followed by the full name of the child fact sheet. Ensure there is a space before and after the forwarded slash (/). Learn about fact sheet naming conventions to ensure accurate referencing. For more details, see Fact Sheet Naming Convention.
If you need to use a forwarded slash (/) in the name of a fact sheet itself, you can use the / without a space before and after.
If you are adding or creating multiple relations, separate the display names with a semicolon (;), without spaces before or after the semicolon.
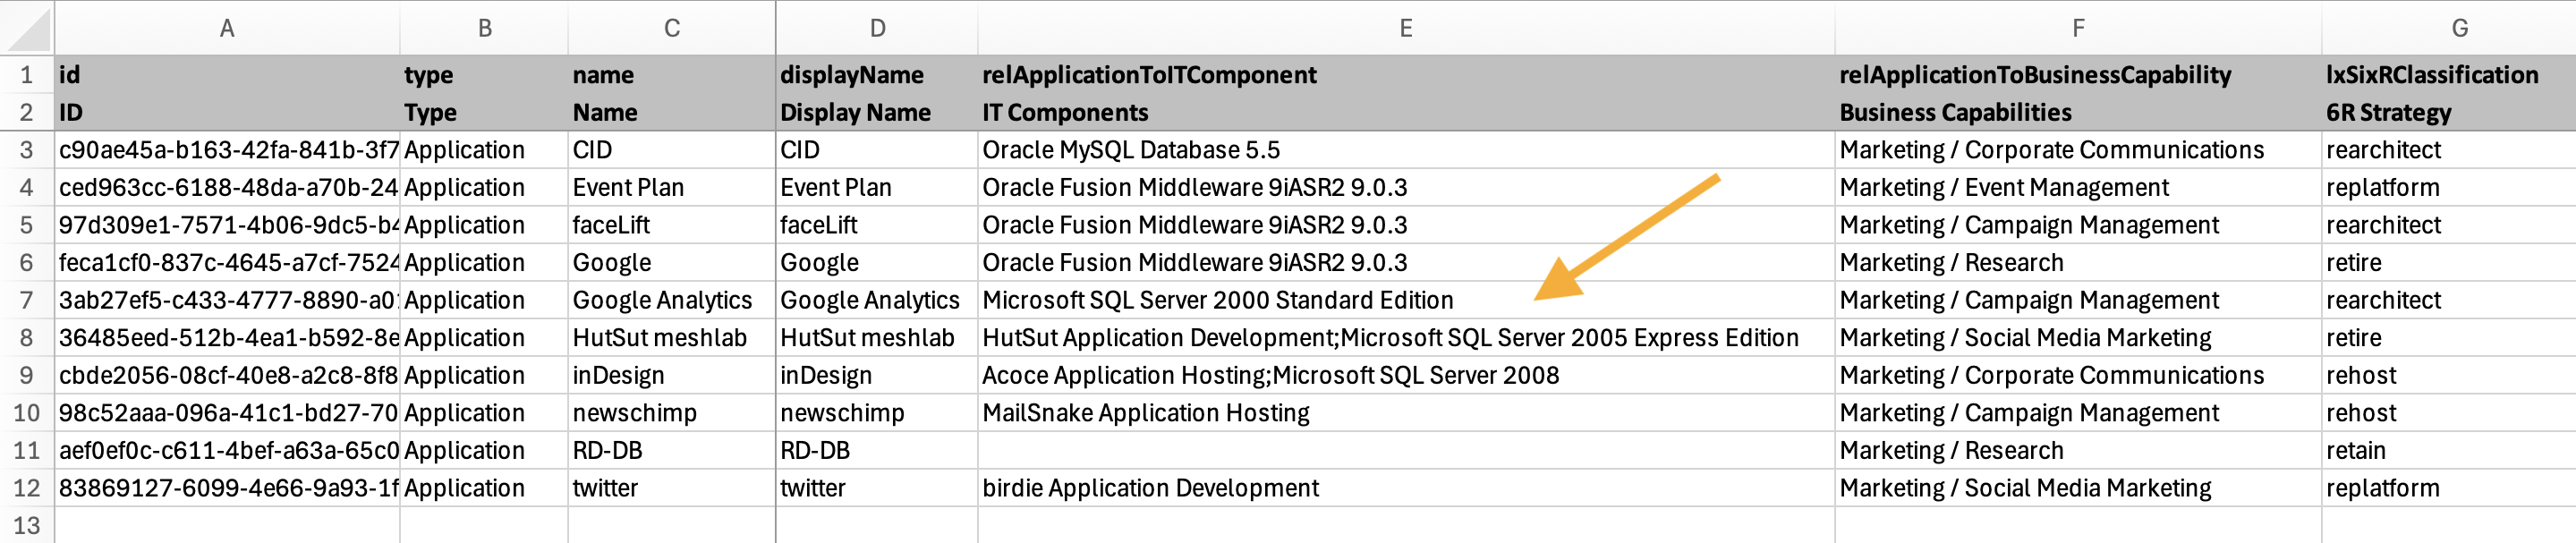
Multiple IT Components Related to an Application Separated by Semicolon
Empty Relations
When you create import templates with relation columns, some of the cells may contain the value
Empty. These are relations that are intentionally left empty in the fact sheet by using the Leave Empty option. To learn more, see Leaving a Relation Empty.You can intentionally set or unset a relation as empty through Excel import as well by entering or removing
Emptyin the cell.
Data Deletion Risk in Virtual Workspaces
In virtual workspaces, users have access to a limited number of fact sheets based on their Access Control Entitiy (ACE). When you create import templates with relation columns, only those fact sheets accessible to you are included in the relation columns. As a result, when you import the data back, all other unmentioned relations get unlinked due to the overwrite principle.
For example, if App1 is related to ITC1, ITC2, and ITC3, but you have access only to ITC1 and ITC2, the template created with App1 will include only ITC1 and ITC2 in the IT components relations column. Upon re-importing, the system will delete the relation between ITC3 and App1.
Data Import Sequence and Dependencies
Information in the spreadsheet is processed row by row from the top, and corresponding updates are made in the workspace before moving on to the next row. Therefore, if you modify values for the same fact sheet multiple times in different rows, the latest value will be reflected in the workspace after the import is completed.
In the example below, the same application is referenced in different rows, and the functional fit is first updated to appropriate and then to insufficient, the final value in the fact sheet will be insufficient.

Sequential Data Processing
For the same reason, if you are creating and relating a fact sheet in the same import, you must create the fact sheet first and only then relate it to other fact sheets in subsequent rows. In the example below, the Corporate Services fact sheet is created first, and then in subsequent rows, it is related to other fact sheets as a parent.

Creation of Fact Sheet Before Relating it to Others
Additionally, the relation between two fact sheets does not need to be defined for each fact sheet more than once. For example, for parent and child relations, you can provide the relevant information in either the parents or the children column.
Fields on Relation
To update fields on a relation, along with the columns for the fields on relation you want to update, you must include the field on relation display name column to identify or establish the target relation.
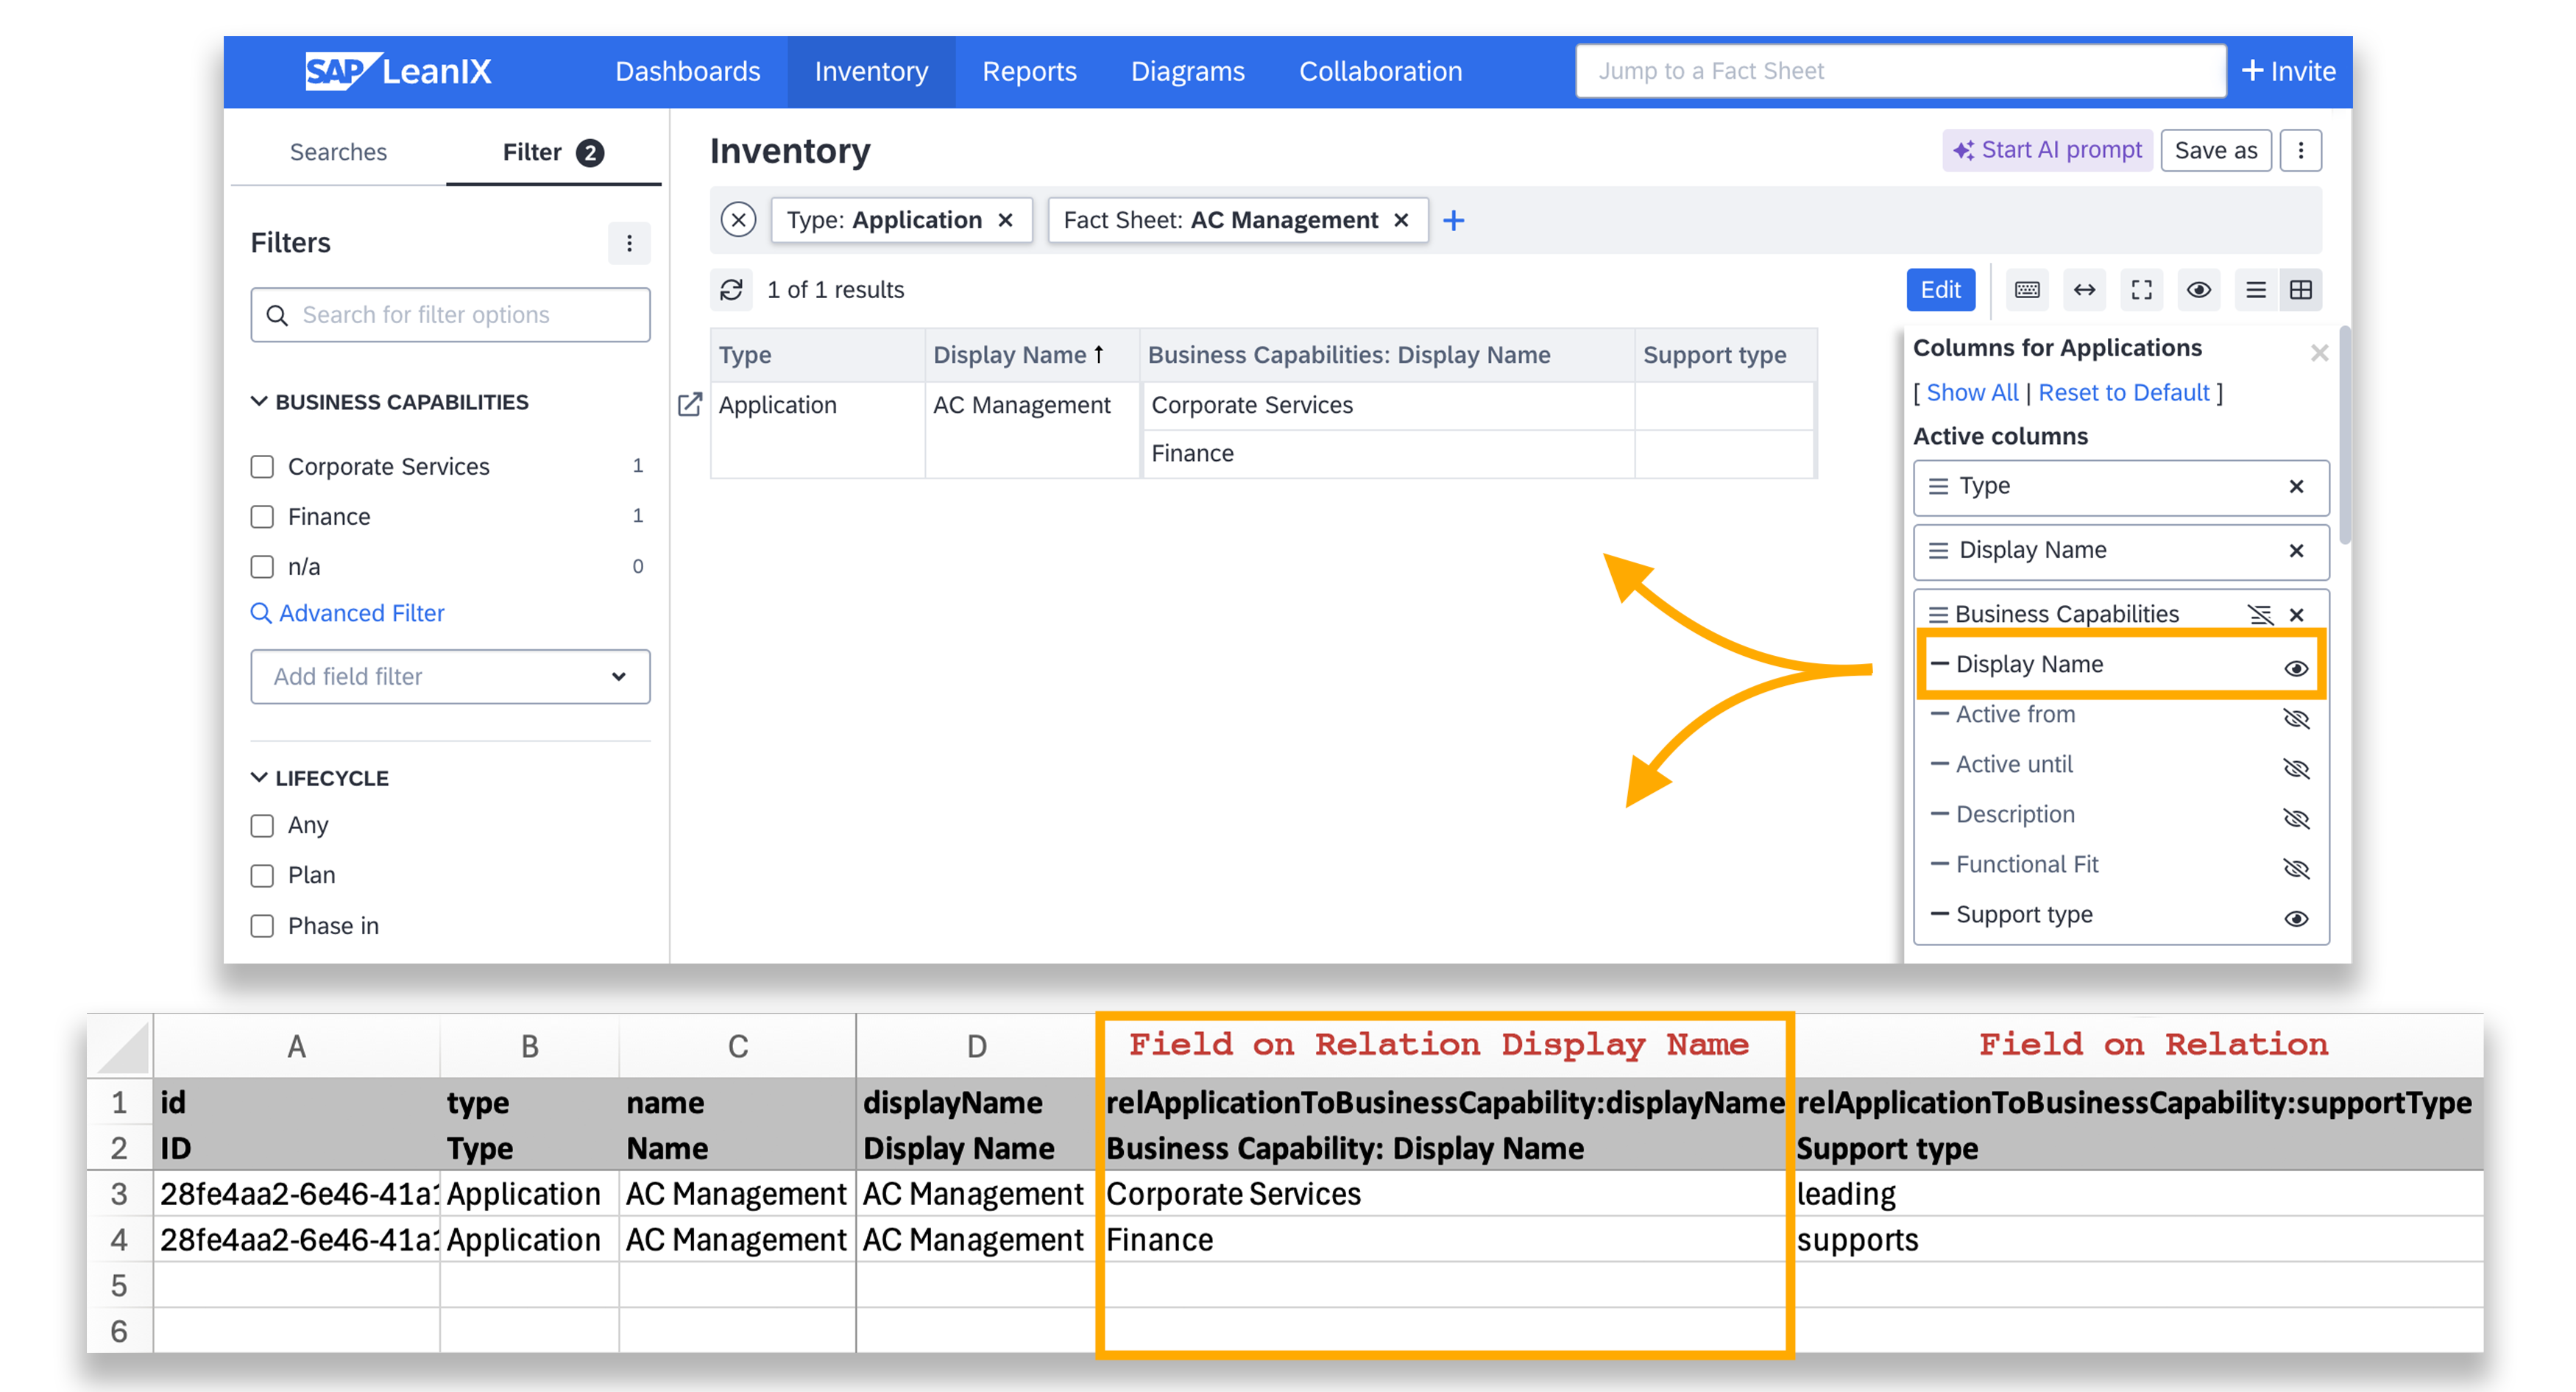
Field on Relation Display Name Column
The overwrite principle does not apply to the field on relation display name columns, meaning existing relations not mentioned in these columns will not be deleted.
In the example above, even though AC Management has relations to both Corporate Services and Finance business capabilities, you can mention only one business capability in each row without removing the other existing relations from the AC Management fact sheet.
Note
The general overwrite principle still applies to values in all other columns. See Overwrite Principle.
You can also update the field on relation for multiple relations by including several target fact sheets in one cell of the field on relation display name column. Target fact sheet names should be separated by semicolons.

Including Several Target Fact Sheets in One Cell
Subscriptions
When subscription roles are defined in your workspace, you can add or remove subscribers only under the specific subscription role columns. Adding or removing subscribers under the subscription type columns—accountable, responsible, or observer—will not result in any changes in the workspace when imported. This applies even when selecting a subscription role is not made mandatory in subscriptions settings. To learn more about this setting, see Enforcing Mandatory Selection of a Subscription Role.
Step 3: Upload the File, Review, and Correct Errors
To upload the file:
-
Go to the Inventory.
-
Expand the dropdown next to the Add Fact Sheet button, and choose Excel Import.

-
Drag and drop the file into the import overlay, or click Browse to select a file. SAP LeanIX will check the file and generate a preview.
-
Review the import preview, and choose Download Summary Report if you're satisfied with the result.
-
Choose Import to complete the upload.
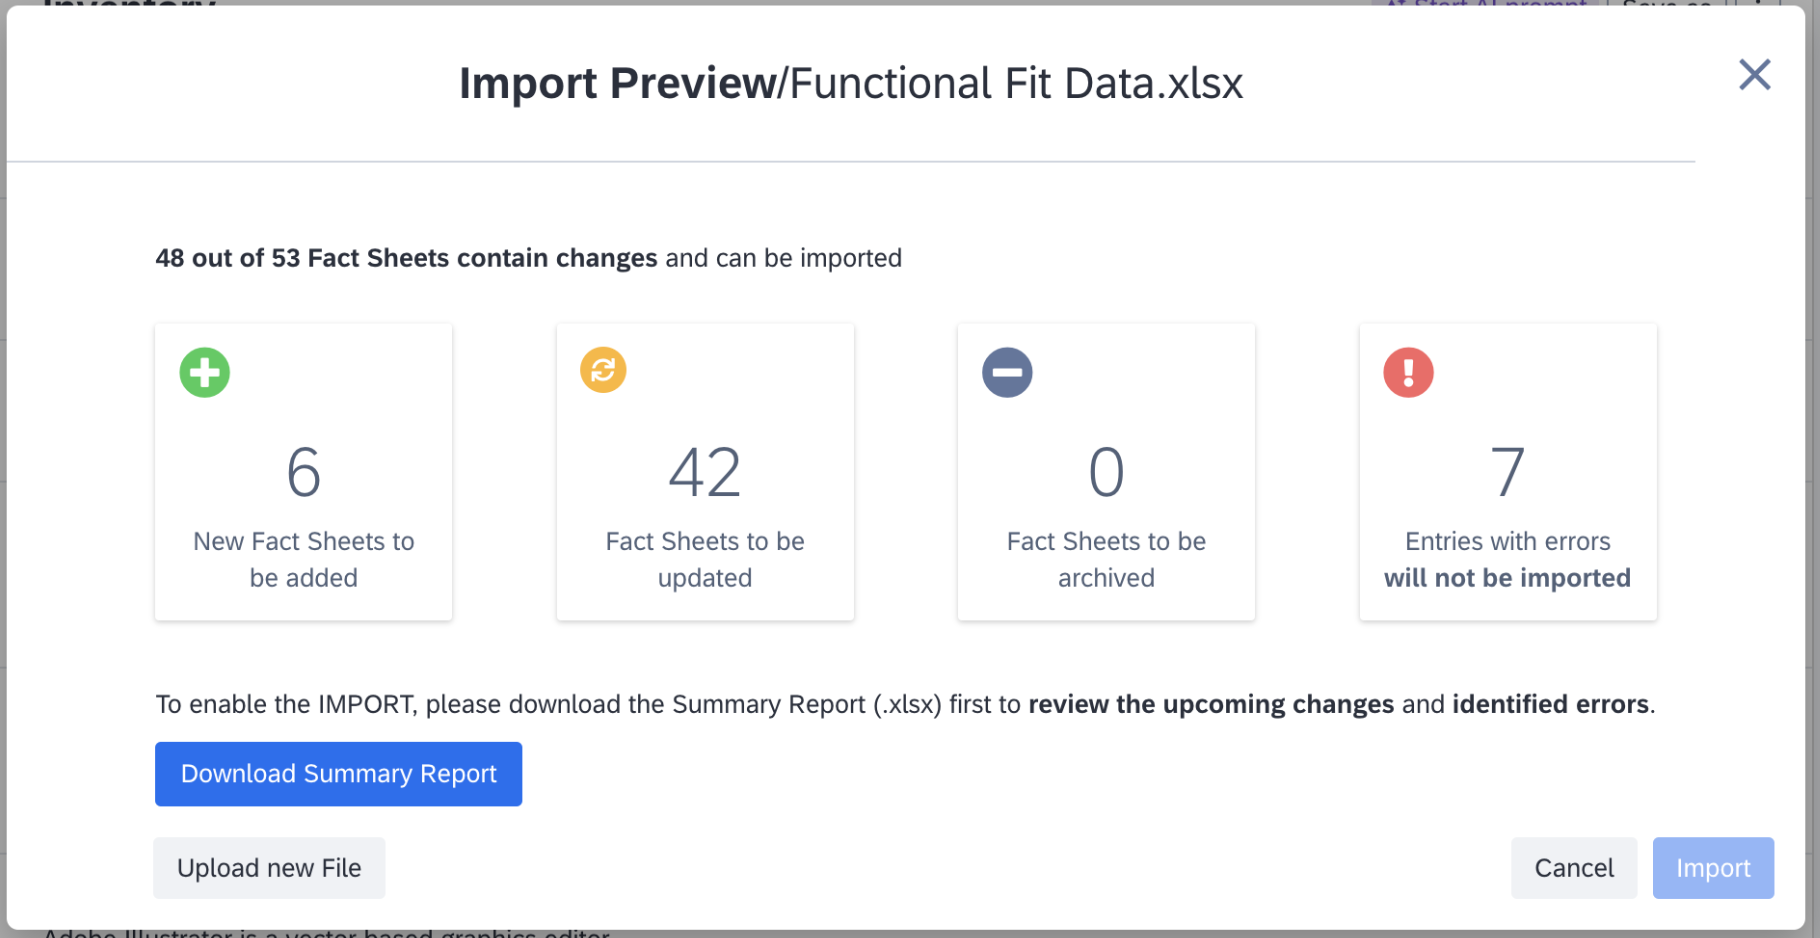
Preview of import overlay
An overview of errors is also provided if there are any. You need to resolve these errors before you can import the file. To review and identify the errors, download the summary report. The summary report details the changes being made to the fact sheets and the details of the errors row by row.
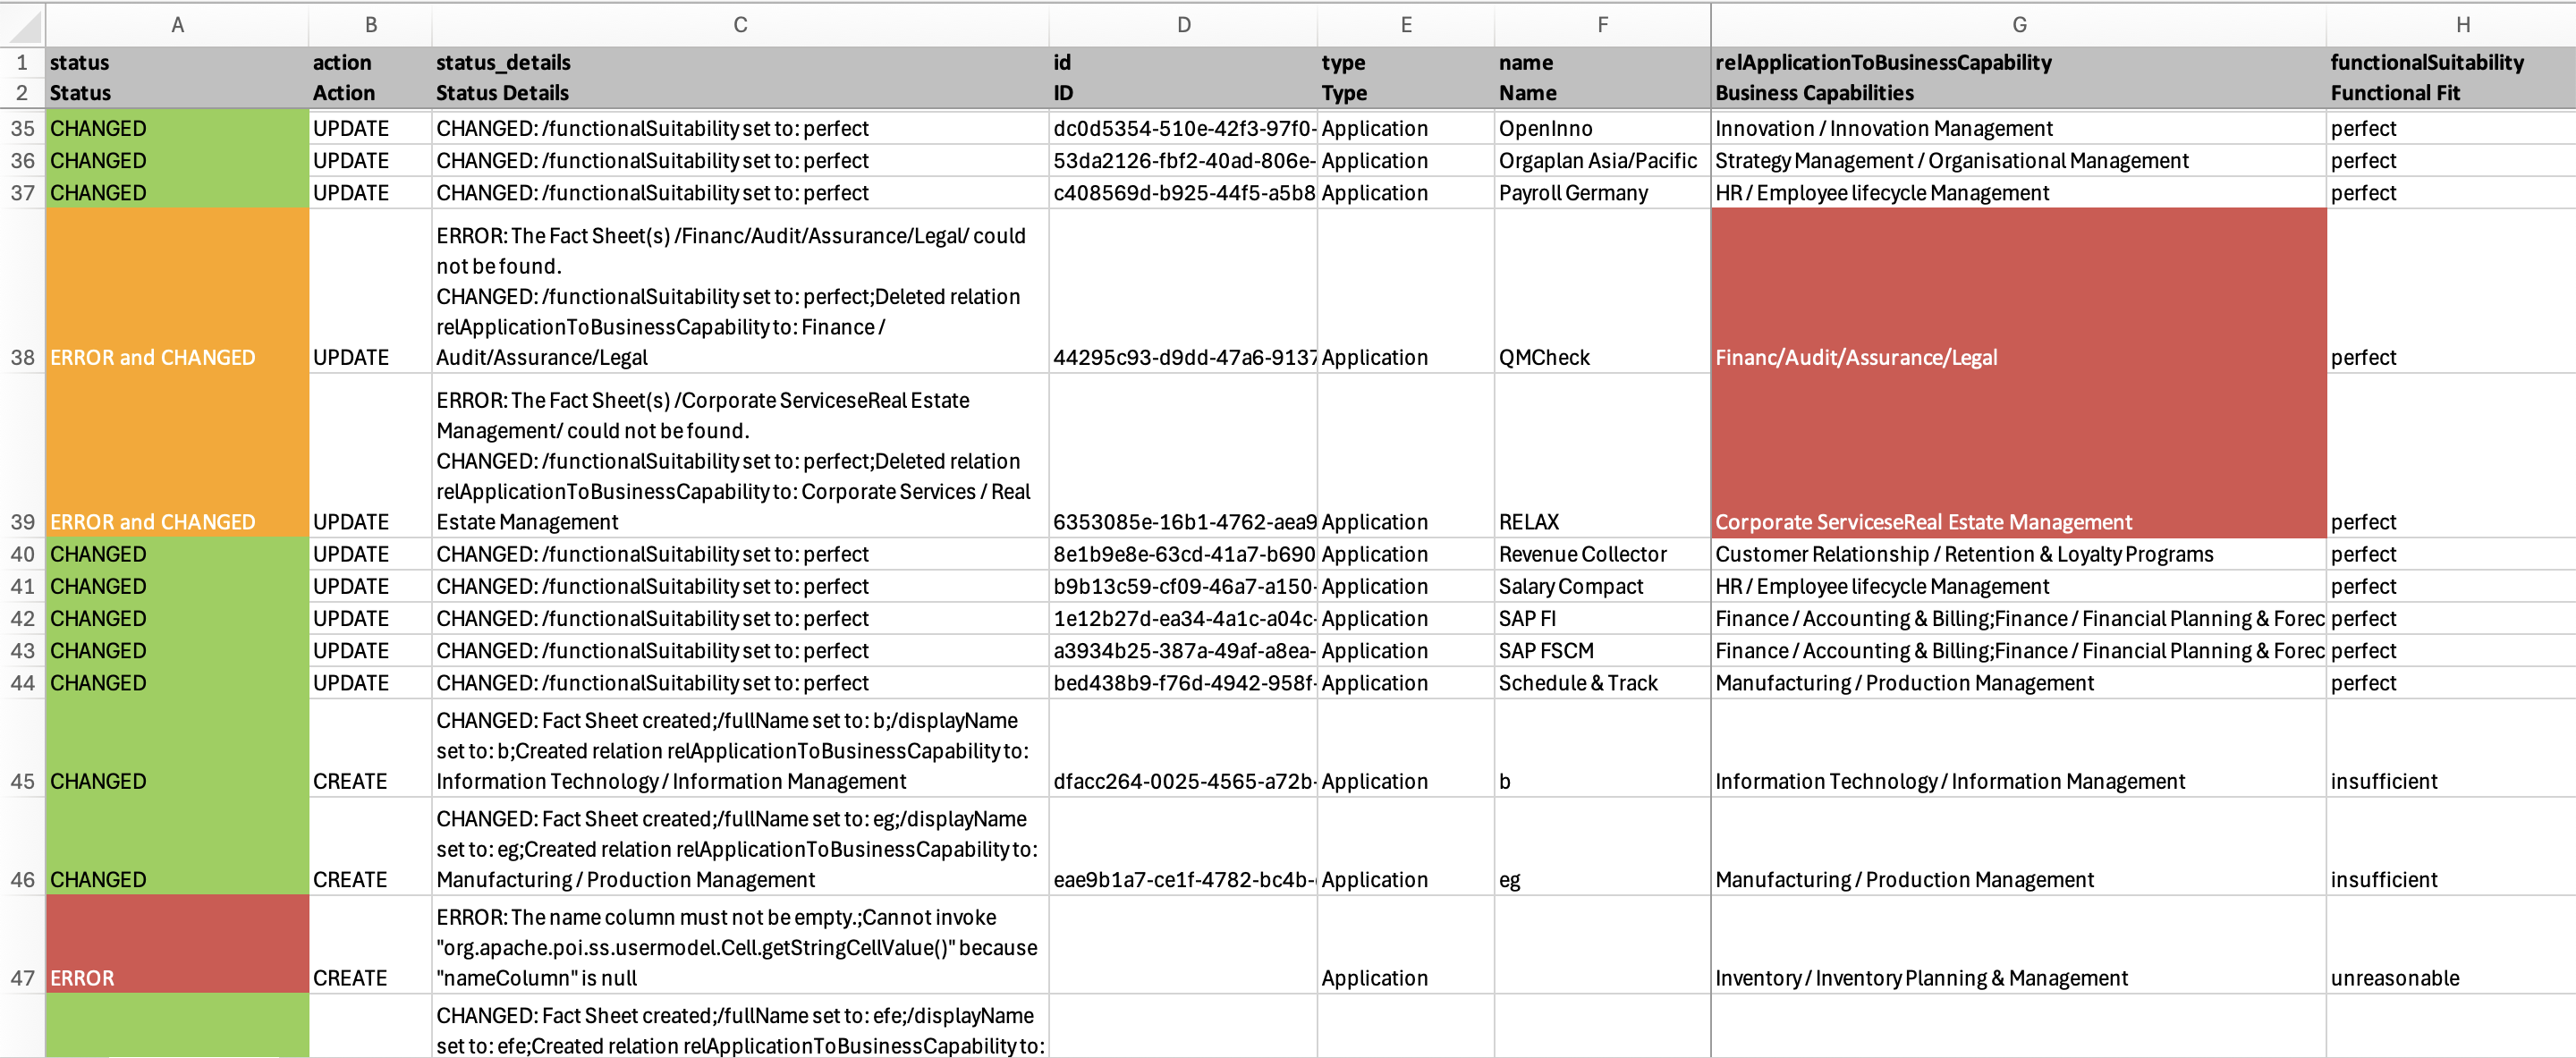
Summary Report Detailing the Changes Being Made to the Fact Sheets and the Details of the Errors
Troubleshooting
Errors can occur at different stages, as listed in the table below:
| Type | Description | Possible Errors |
|---|---|---|
| File upload error | The selected file doesn't comply with the supported file type or size and cannot be opened. | File format other than .xlsx Files with more than 10k rows |
| Parsing error | The file is not formatted according to the formatting rules and cannot be parsed. | The file is missing the required columns: fact sheet ID, fact sheet type, and name. The column title does not contain the right technical key and translations. |
| Inline errors | The file could be opened and parsed, but there are invalid entries at the row or cell level. | Values do not follow general formatting rules Referring to non-existent fact sheets and relations Mistakenly using translations instead of technical keys for single-select or multi-select values |
| Post confirmation errors | In very rare cases, errors can occur after the Import button is clicked. The error message will tell you the cause of the error. | Invalid entries in subscription role columns |
Requesting Support
If you cannot resolve the error yourself, contact support using the support functionality on the screen. Alternatively, you can reach out through this link: SAP LeanIX Support. If you're an SAP customer, submit a request from the SAP for Me portal.
Make the necessary changes in the import file, then upload it again after resolving the errors. Click Import to finish the process.
Reviewing Import History
Admin users can download the Changelog from the administration section. The changelog lists all the changes, including the changes made through importing. To download the changelog, do the following:
- In the administration area, open the Export section.
- Under the Create New Export tab, select Changelog.
- Provide the dates for which you need the changelog.
- Click Create and Download.
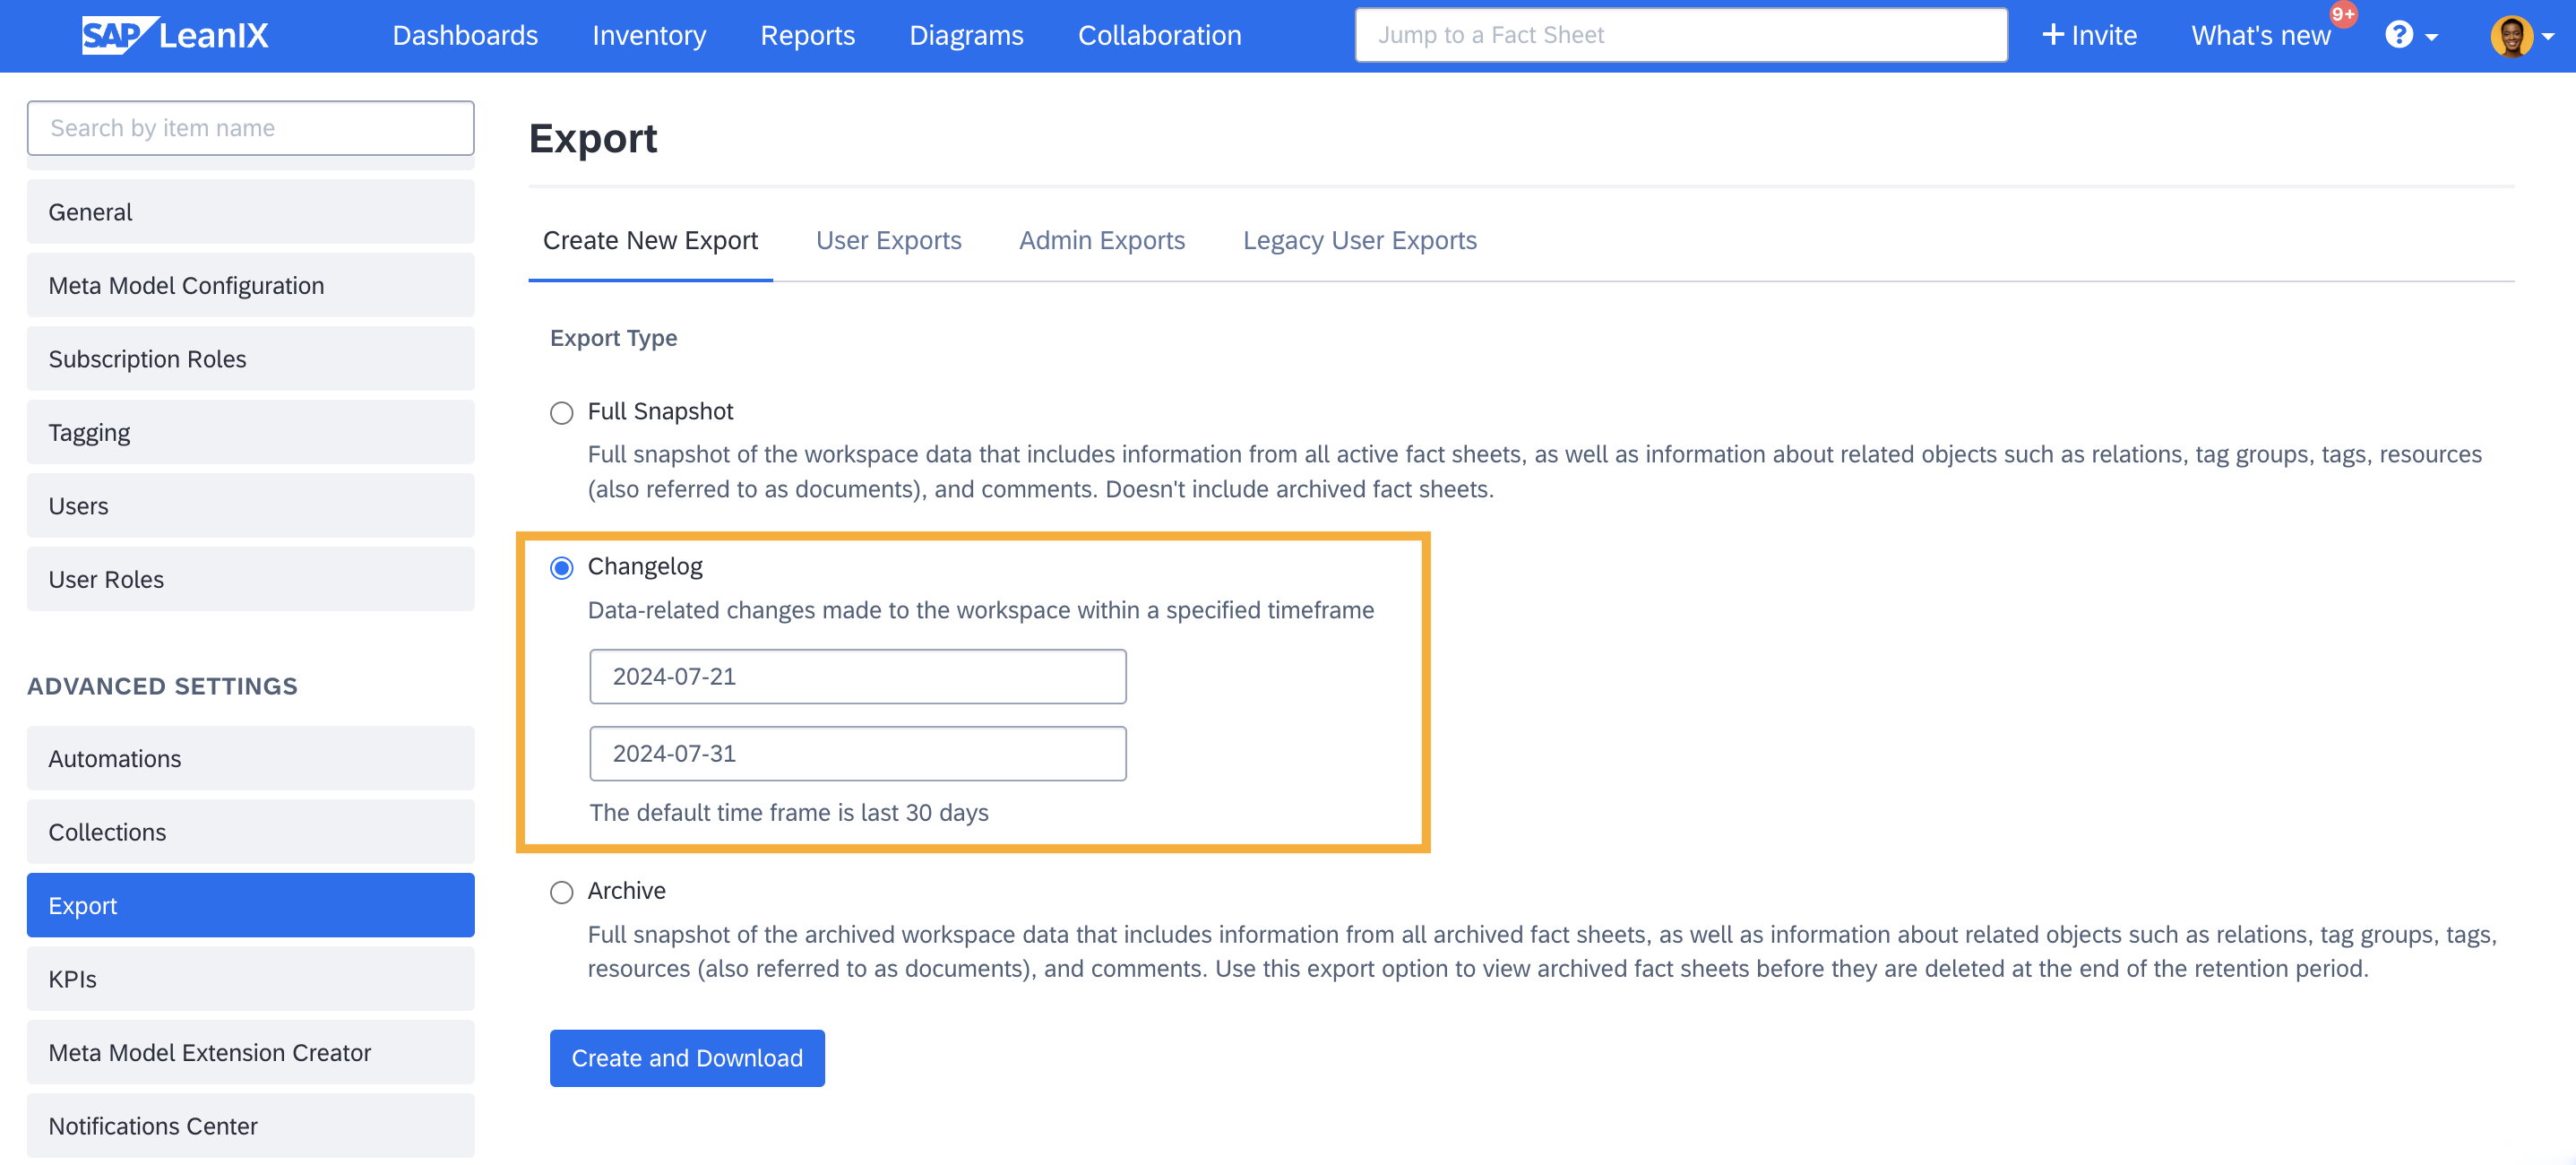
Downloading Changelog
Additionally, in the Last Update tab of the fact sheet, you can review the update log to see what changes have been made to a particular fact sheet. To learn more, see Reviewing the Fact Sheet Update Log.
We Value Your Feedback
How can we enhance the import feature for you? Vote on our roadmap and tell us what matters most to you: Import Roadmap.
Updated 29 days ago