
Configure Workspace for Meta Model v4
Learn how to configure your workspace to align with the Meta Model v4.
Before making any Meta Model configuration changes, make sure you have thoroughly assessed your current configuration and detected a clear use case for implementing the whole or parts of the Meta Model v4.
Overview
Admin users of a workspace with the Meta Model v3 can configure their Meta Model to align their workspace with Meta Model v4. Broadly, you do the following changes to align with Meta Model v4:
- Rename existing Fact Sheet type names: Rename User Group, Project, and Process Fact Sheet types to Organization, Initiative, and Business Context, respectively.
- Introduce new Fact Sheet type: Create a new Fact Sheet type named Platform and define its relationships with other Fact Sheet types.
- Add Fact Sheet subtypes: Add new Fact Sheet subtypes to Organization, Initiative, Business Context, Application, and Interface and additional subtypes to IT Component.
- Introduce new subsections and fields: Add a new subsection and the necessary fields to the Business Capability Fact Sheet to capture the business capabilities' current and target maturity levels.
- Standardize Fact Sheet color and order: Align the colors following SAP LeanIX standards and arrange Fact Sheets in the recommended order. This standardization helps all workspace users follow SAP LeanIX standard documentation and instructions effectively.
In the following sections, detailed instructions for implementing the aforementioned changes will be provided. To have an overview of key changes from Meta Model v3, see Delta to Meta Model v3.
Rename Three Existing Fact Sheet Types
A few of the existing Fact Sheet types need to be renamed to align with Meta Model v4.
They are:
- User Group → Organization
- Project → Initiative
- Process → Business Context
Note
Renaming happens in the translations of the Fact Sheet. Therefore, there will be no impact on the existing integrations.
To rename the Fact Sheet types, follow these steps:
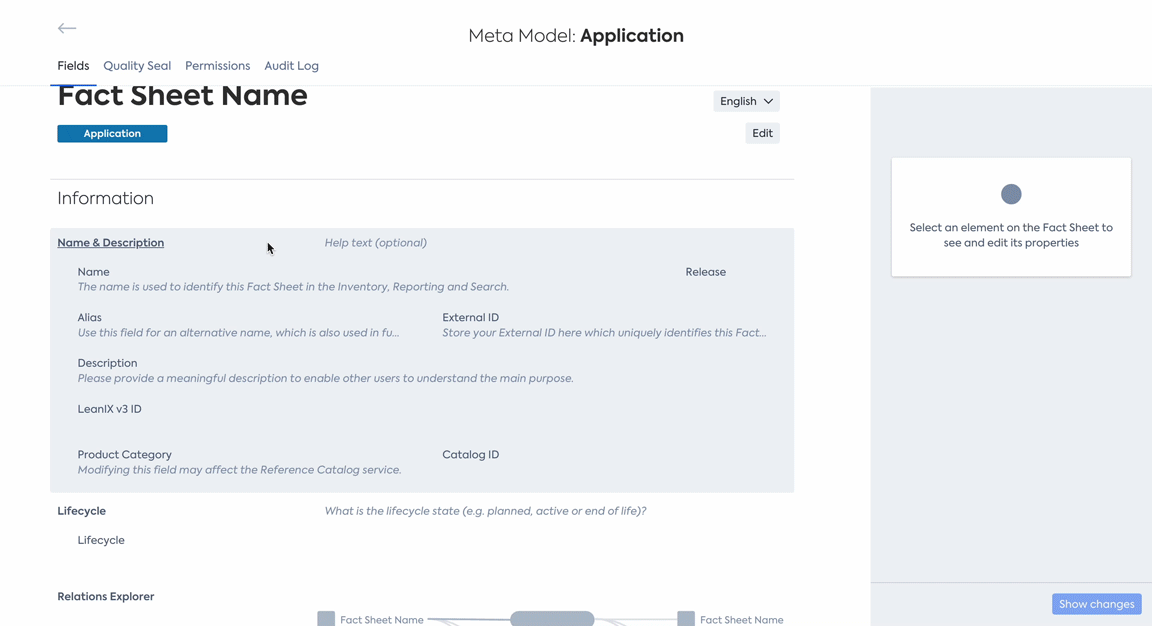
- Navigate to Administration > Meta Model Configuration, and choose the Fact Sheet type you want to rename.
- Click Edit at the top right corner of the page to reveal the right-side panel.
- On the right-side panel, click on the Manage Translation tab indicated with the globe icon.
- Depending on the Fact Sheet that is being renamed, fill in the following values in the Singular and Plural fields. Also, add Help text for better context.
| User Group | Project | Process | |
|---|---|---|---|
| Help text (Optional): | Who is using which Application, how many users are using an Application? | Which Initiatives are currently changing the IT landscape? | Which Business Contexts are affecting the IT landscape? |
| Singular: | Organization | Initiative | Business Context |
| Plural: | Organizations | Initiatives | Business Contexts |
- Click Show changes, and then Apply. The Fact Sheet type is renamed.
Renaming existing Fact Sheet type
Introduce New Fact Sheet Type - Platform
In the Meta Model v4, Platform is a new Fact Sheet type. To introduce the new Fact Sheet type, summarily, you do the following:
- Create a new Fact Sheet type named Platform.
- Add sections for Strategic Support and Implementation in the newly created Platform Fact Sheet.
- In the Strategic Support section, create relations to the Business Capability, Initiative, and Objective Fact Sheet types and fill in the necessary fields.
- In the Implementation section, create relations to the Application and IT Component Fact Sheet types and fill in the necessary fields.
Note to users using the optional Tech Platform Fact Sheet in Meta Model v3.
If you are using the optional Tech Platform Fact Sheet type in Meta Model v3, the simplest way to transition to Meta Model v4 is by editing the existing Tech Platform Fact Sheet type.
By following the instructions detailed in the sections below, add the necessary relations to other Fact Sheet types. You can retain the "Tech Platform" title; there's no obligation to change the name, especially if your organization is accustomed to the previous terminology.
Comprehensive Walkthrough for Each Step:
1. Create a New Fact Sheet Type
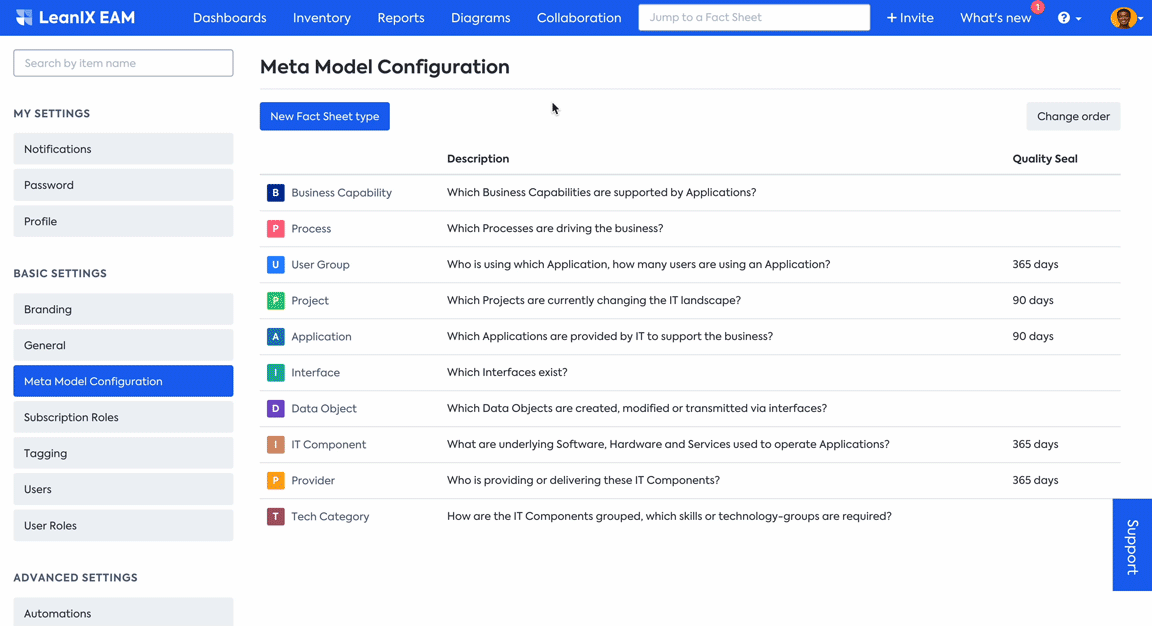
i. Navigate to Administration > Meta Model Configuration, and click on New Fact Sheet type.
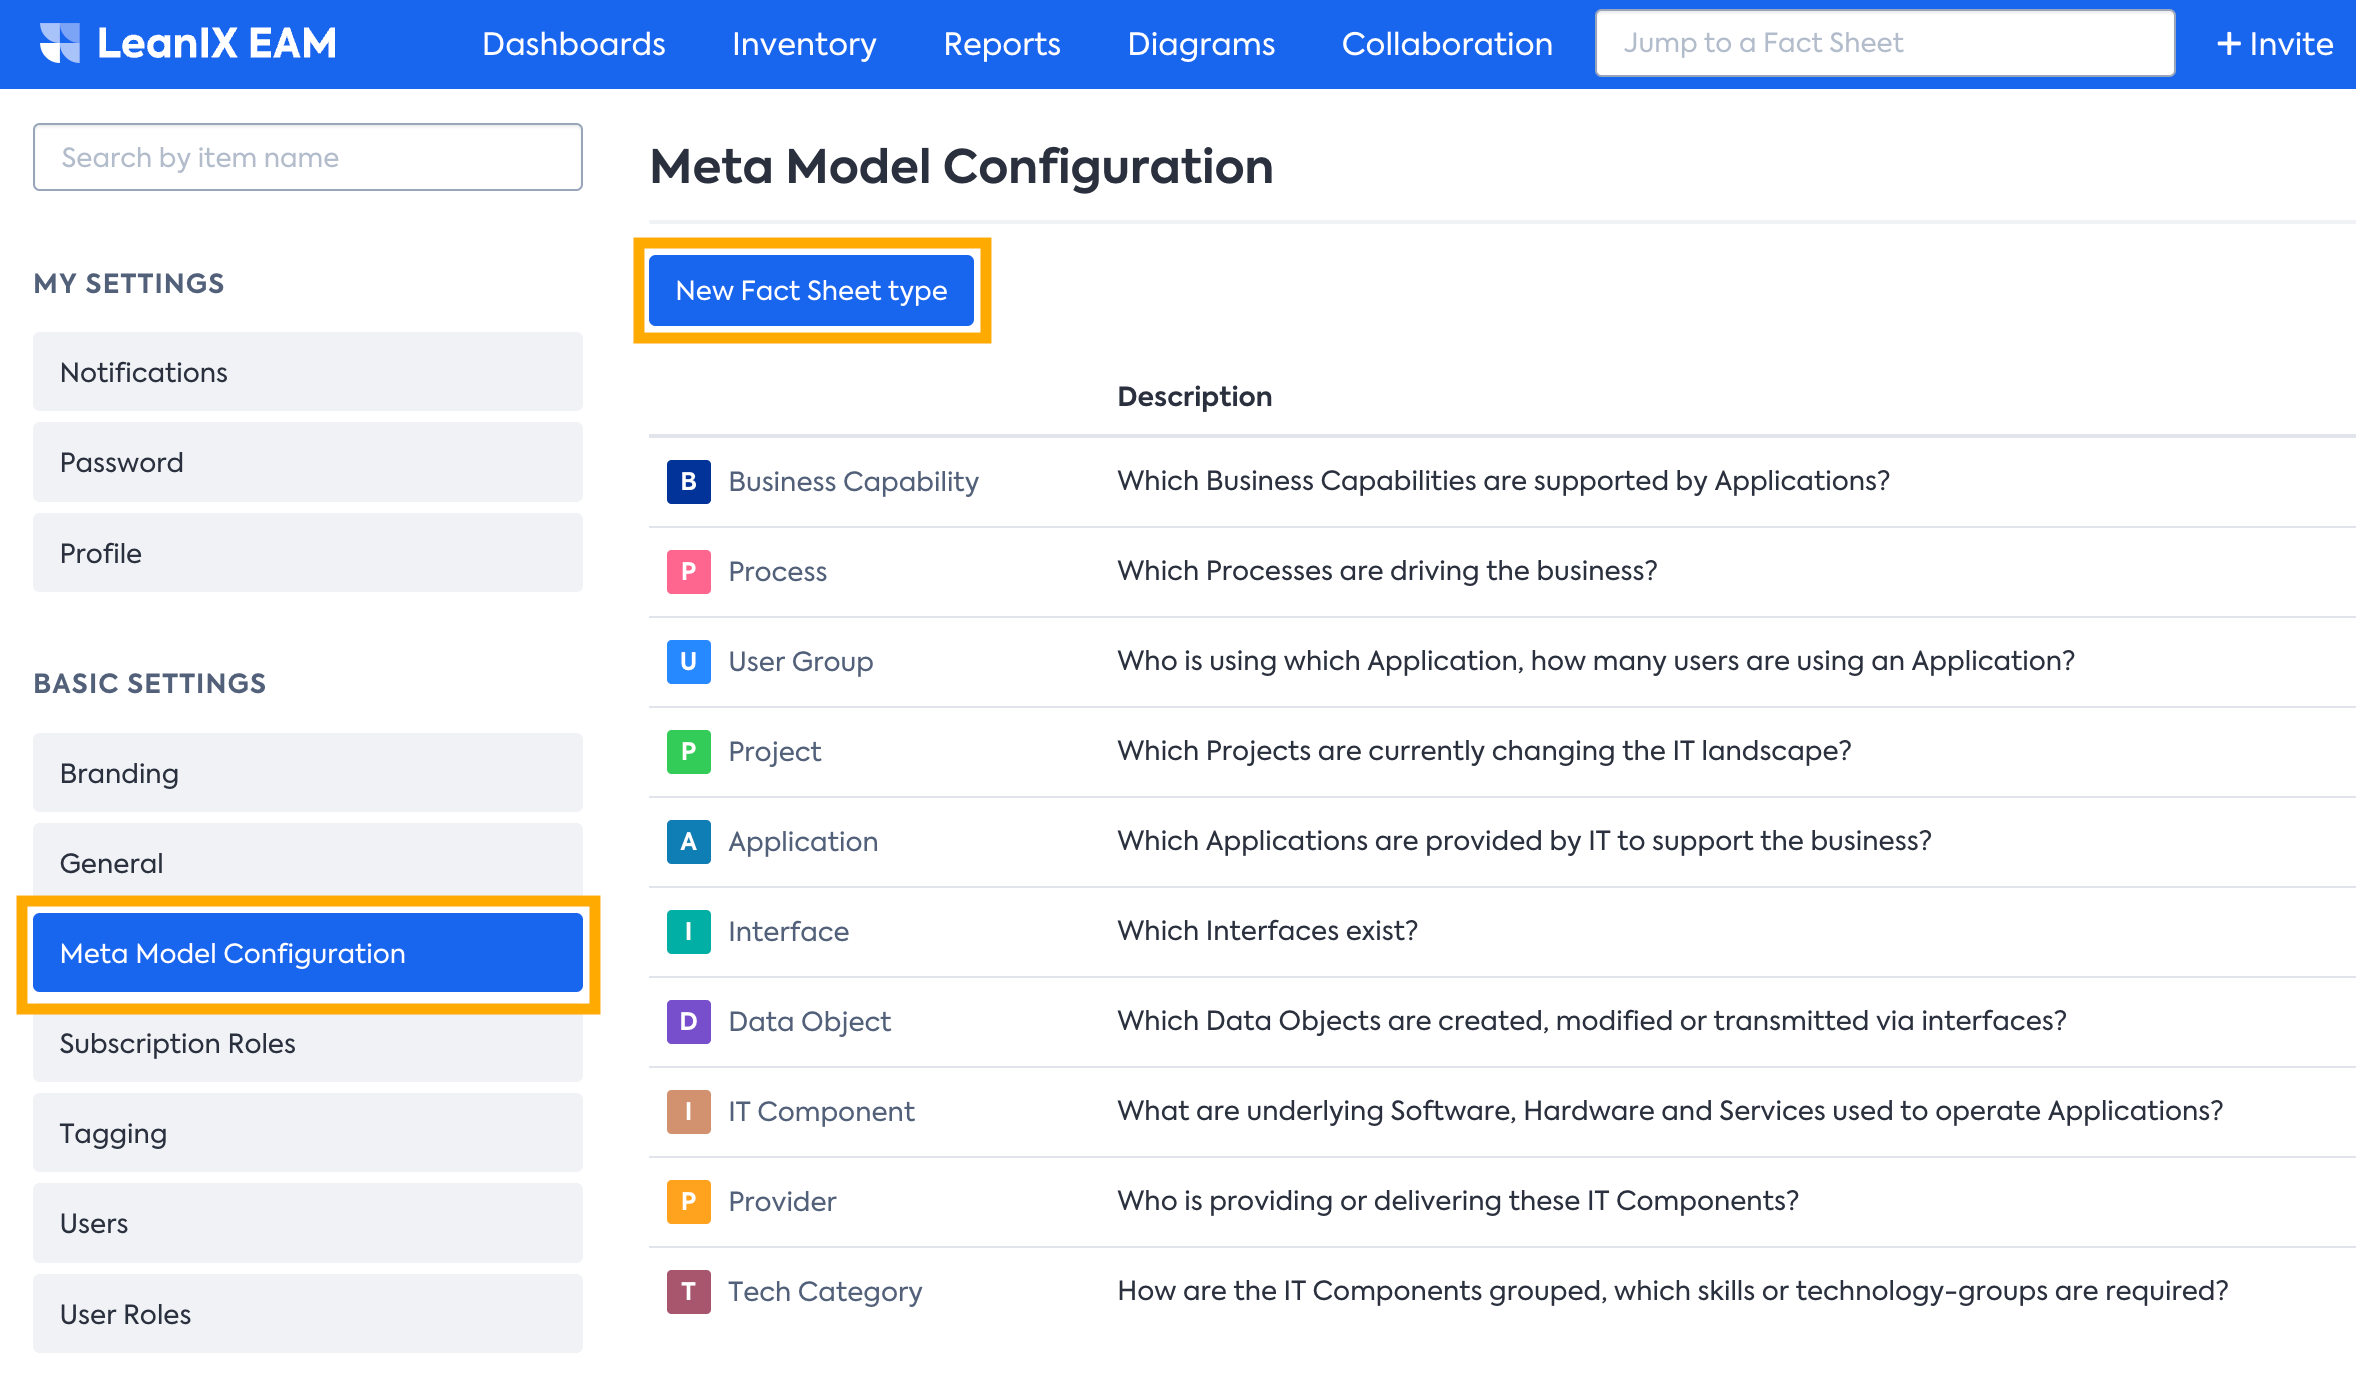
Meta Model Configuration - Create a New Fact Sheet type
ii. Fill in the Fact Sheet details using the provided values below:
| Fields | Values |
|---|---|
| Internal Name: | Platform |
| Singular: | Platform |
| Plural: | Platforms |
| Description: | Which Platforms are supporting the business? |
iii. Click Create,
A new Fact Sheet type named Platform is created.
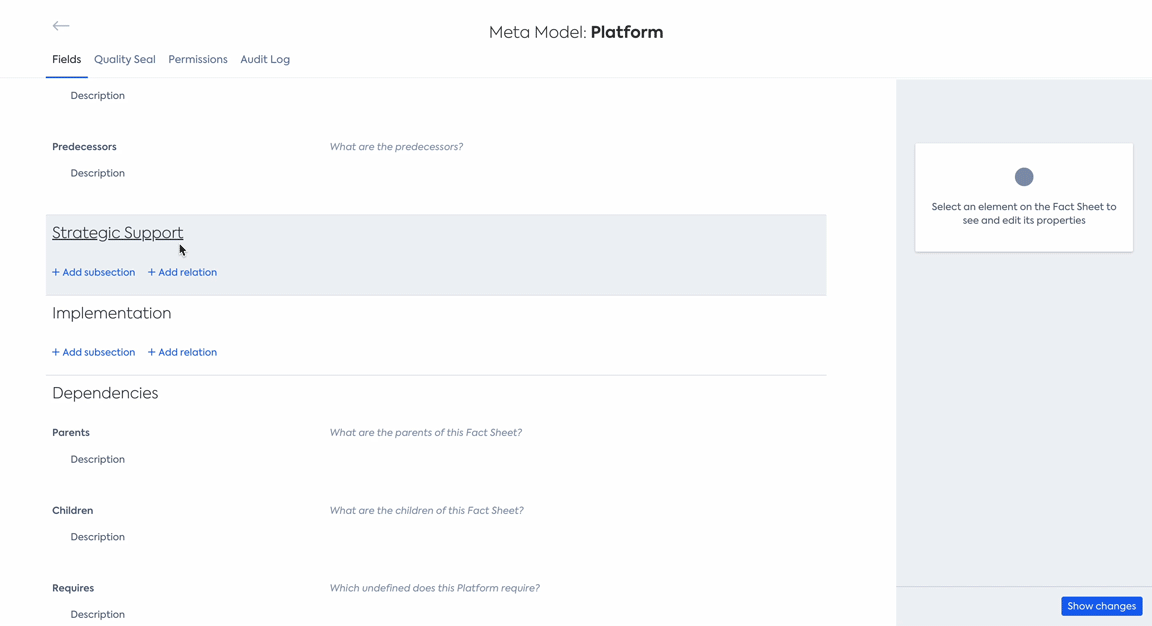
2. Add Sections - Strategic Support and Implementation
Add new sections - Strategic Support and Implementation in the newly created Fact Sheet.
i. Upon selecting any existing section, the + Add section button will appear; click on it.
ii. On the right-side panel, for the field Key, fill in the relevant unique ID depending on the section type you are creating, and click Create:
| Strategic Support | Implementation | |
|---|---|---|
| Key: | strategicSupport | implementation |
iii. Go to the Manage Translation tab (Glob icon) on the right-side panel. Under the field Label, fill in the relevant value depending on the section type you are creating:
| Strategic Support | Implementation | |
|---|---|---|
| Label: | Strategic Support | Implementation |
Adding Strategic Support Section
iv. Click Show changes and Apply.
The Strategic Support and Implementation sections are added to the Platform Fact Sheet.
3. Create Relations to Business Capability, Initiative, and Objective
i. In the newly created Strategic Support section, click on the + Add relation button.
ii. Depending on the Fact Sheet type to which the relation is being established, on the right-side panel, fill in the following values to the corresponding fields:
| Target Fact Sheet type: | Business Capability | Initiative | Objective |
| Multiplicity: | Many to many | Many to many | Many to many |
| Section in target Fact Sheet type: | Demand Management | Project Environment | Planning |
iii. Click Create
iv. Go to the Manage Translation tab (Globe icon) on the right-side panel, and depending on the Fact Sheet type to which the relation is being established, fill in the following values to the Label and Help Text fields:
| Business Capability | Initiative | Objective | |
|---|---|---|---|
| Label: | Supports {{targetFactSheets}} | Affected by {{targetFactSheets}} | Supports {{targetFactSheets}} |
| Help Text (Optional): | Which {{targetFactSheets}} does this {{factSheet}} support? | Which {{targetFactSheets}} are affecting this {{factSheet}}? | Which {{targetFactSheets}} does this {{factSheet}} support? |
v. After entering the values, click Show changes, and then Apply to apply the changes.
Creating relationship to Business Capability Fact Sheet type.
Relations to Business Capability, Initiative, and Objective Fact Sheet types are created.
4. Create Relations to Application and IT Component
i. In the newly created Implementation section, click on the + Add relation button.
ii. Depending on the Fact Sheet type to which the relation is being established, fill in the following values to the corresponding fields on the right-side panel:
| Target Fact Sheet type: | Application | IT Component |
| Multiplicity: | Many to many | Many to many |
| Section in target Fact Sheet type: | Business Support | Sourcing |
iii. Click Create
iv. Go to the Manage Translation tab on the right-side panel, and depending on the Fact Sheet type to which the relation is being established, fill in the following values to the Label and Help Text fields:
| Application | IT Component | |
|---|---|---|
| Label: | Runs {{targetFactSheets}} | Implemented by {{targetFactSheets}} |
| Help Text (Optional): | Which {{targetFactSheets}} does this {{factSheet}} run? | Which {{targetFactSheets}} implement this {{factSheet}}? |
v. After entering the values, click Show changes, and then Apply to apply the changes.
Relations to Application and IT Component Fact Sheet types are created. With this, you have successfully added the new Platform Fact Sheet type.
Add Fact Sheet Subtypes to Several Fact Sheet Types
Introduce new Fact Sheet subtypes to Organization, Initiative, Business Context, Application, and Interface and additional subtypes to IT Component. Not all subtypes are necessary; evaluate their implementation based on compelling use cases and your organization's specific needs.
To introduce Fact Sheet subtypes, follow these steps:
- Navigate to Administration > Meta Model Configuration, and select the relevant Fact Sheet type for which subtype is being added.
- Select the Name & Description section, and click on the + Add field button.
- In the Key field, enter “category” as the unique ID.
- Set the appropriate field width from the Width drop-down field. As a best practice, using M (4/12) is recommended.
- In the Values field, enter the unique ID for the subtype being created. For the unique ID values, refer to Fact Sheet Subtype Unique IDs and Translations. You can create multiple subtypes at once by clicking '+' icon and adding additional fields.
Unique IDs of Application Subtypes
When creating optional application subtypes, such as microservice and deployment, it's important to use the correct unique IDs to avoid them being counted as application for pricing purposes.
Custom application subtypes could be counted as an application, potentially affecting pricing.
- Click Create to add the field.
Adding subtypes to Fact Sheet type Application
- Head to the Manage Translation tab (Globe icon) on the right-side panel. In the Label field, enter “Subtype.”
- Input the appropriate subtype translations into the Field values. Subtype translations for all the subtypes are provided in the table below.
- After entering the values, click Show changes, and then Apply to apply the changes.
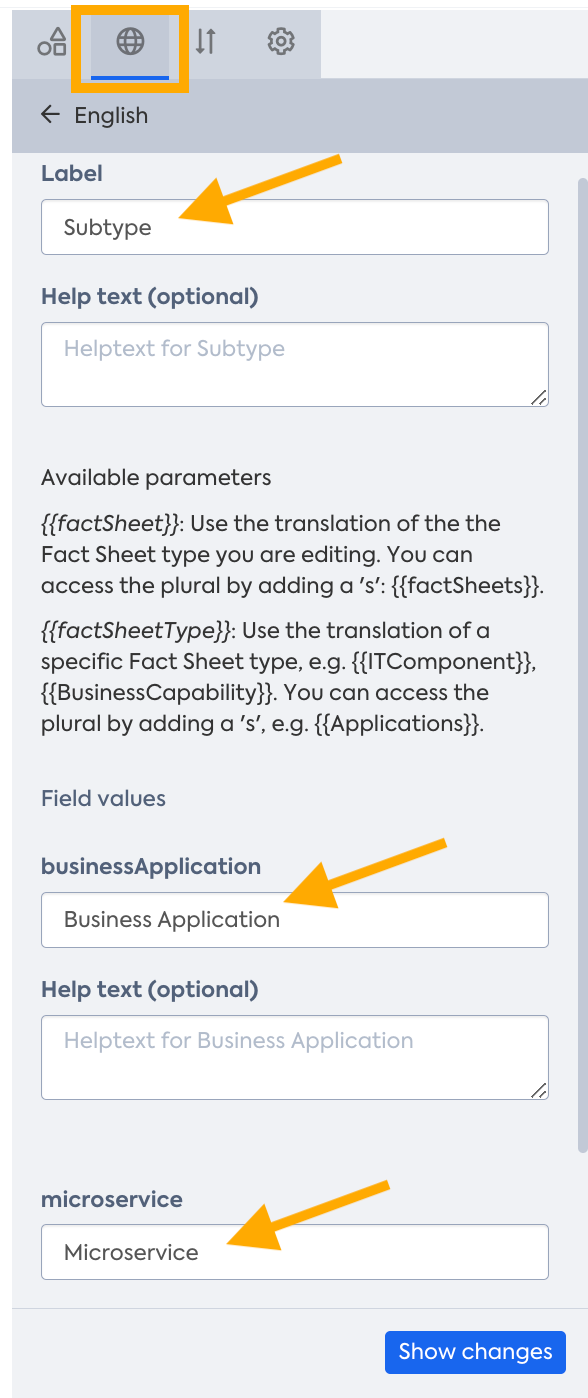
Adding subtypes to Fact Sheet type Application
Fact Sheet Subtype Unique IDs and Translations
Note
In the default meta model v4, the organization's subtype "Region" has the unique ID "country", which is in conflict to the translation. We're planning to resolve this conflict in the future. In the meantime, please don't deviate from our best practice by introducing or changing the unique ID "country".
| Fact Sheet type | Subtype Unique ID | Subtype Translation | Subtype status |
|---|---|---|---|
| Application | businessApplication deployment microservice | Business Application Deployment Microservice | Optional Optional Optional |
| Initiative | idea program project epic | Idea Program Project Epic | Default Default Default Default |
| Organization | businessUnit customer region legalEntity team | Business Unit Customer Region Legal Entity Team | Default Default Default Default Default |
| Business Context | customerJourney process businessProduct valueStream esgCapability | Customer Journey Process Business Product Value Stream ESG Capability | Default Default Default Default Optional |
| Interface | api logicalInterface | API Logical Interface | Default Default |
| IT Component (new additional) | iaas paas saas | IaaS PaaS SaaS | Default Default Default |
You might already be using “category” as a unique ID in some of your Fact Sheet types. In such cases, simply identify the field and add additional subtype values. At the same time, rename the field to “Subtype“ from the Manage Translation tab of the right-side panel.

Unique ID already in use
It's recommended to create a direct relation between Business Applications and other subtypes through a self-referencing relation. This relation will help to model how Microservices and Deployments indirectly support Business Capabilities through Business Applications. For more information, see Self-Referencing Relations.
Introduce New Subsections and Fields to Business Capability
In the Meta Model v4, a new subsection called Maturity has been introduced to capture the business capabilities' current and target maturity levels. To add the new subsection to your Meta Model v3, summarily, do the following:
- Add a subsection named “Maturity” and provide the necessary translations.
- Within the newly created subsection, introduce new Fact Sheet fields for Current Maturity, Target Maturity, Strategic Importance, and Maturity Description.
1. Add the Subsection for Maturity in the Business Capability Fact Sheet
To add a new subsection, follow these steps:
i. Navigate to Administration > Meta Model Configuration, and choose the Business Capability Fact Sheet.
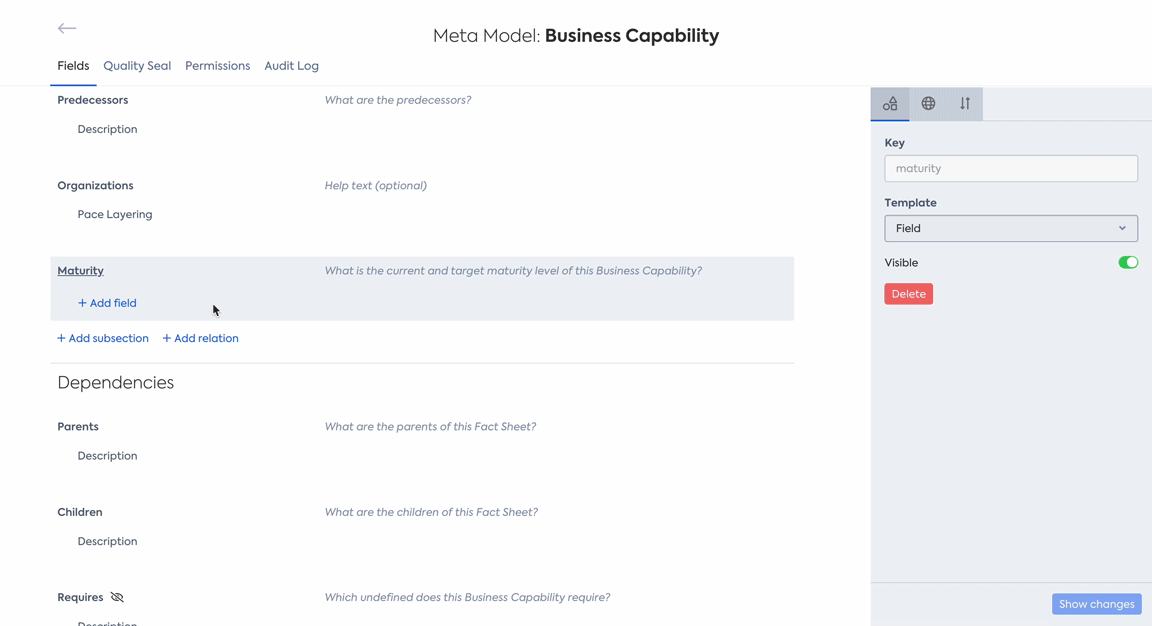
ii. Select the Information section in the Fact Sheet. Once selected, a + Add subsection button will appear; click on it.
iii. On the right-side panel, fill in “maturity” as the unique ID for the field Key and click Create.
iv. Go to the Manage Translation tab (Globe icon) on the right-side panel. Fill in the following values to the Label and Help Text fields:
| Field | Value |
|---|---|
| Label: | Maturity |
| Help Text (Optional): | What is the current and target maturity level of this {{factSheet}}? |
Adding new subsection to Business Capability Fact Sheet.
v. Click Show changes and then Apply.
The new subsection ‘Maturity’ is created.
2. Add New Fact Sheet Fields in the Maturity Subsection
In the Maturity subsection, introduce four new fields - Current Maturity, Target Maturity, Strategic Importance, and Maturity Description.
To add new fields in the Maturity subsection, follow these steps:
i. In the newly created Maturity subsection, click on the + Add field button.
ii. Depending on the Fact Sheet field you are creating, on the right-side panel, fill in the following values to the corresponding fields:
| Current Maturity | Target Maturity | Strategic Importance | Maturity Description | |
|---|---|---|---|---|
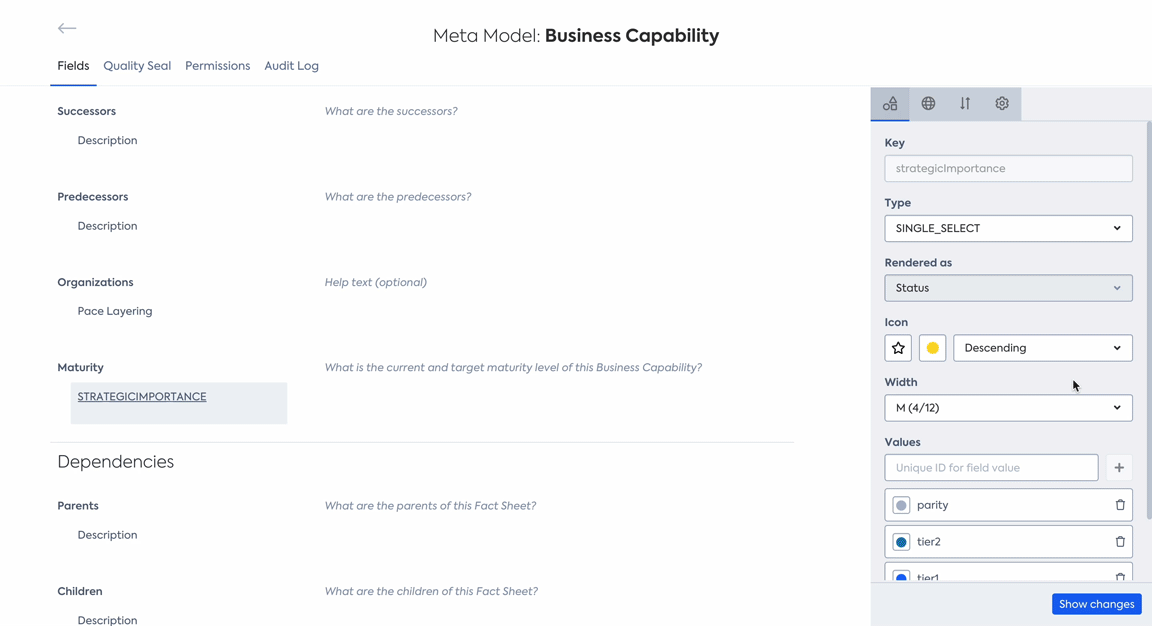
| Key: | currentMaturity | targetMaturity | strategicImportance | maturityDescription |
| Type: | SINGLE_SELECT | SINGLE_SELECT | SINGLE_SELECT | STRING |
| Width: | M (4/12) | M (4/12) | M (4/12) | XXL (12/12) |
| Values: | adhoc repeatable defined managed optimized | adhoc repeatable defined managed optimized | parity tier2 tier1 |
Adding Fact Sheet field - Strategic Importance
iii. For the Current Maturity, Target Maturity, and Strategic Importance fields, choose an appropriate icon and color, and set the icon display order to Ascending.
iv. Click Create to create the field.
v. Go to the Manage Translation tab (Globe icon) on the right-side panel. Depending on the Fact Sheet field you are creating, refer to the tables below and fill in the appropriate values to the Label, Field values, and Help text:
For the Current Maturity field, refer to the table below.
| Values | Help text values | |
|---|---|---|
| Label: | Current Maturity | |
| adhoc: | Level 1 - Ad-hoc | Processes are largely manual and inconsistent. Success often depends on individual heroics. |
| repeatable: | Level 2 - Repeatable | Basic and consistent processes are established and can be repeated for similar projects. |
| defined: | Level 3 - Defined | Processes are automated and integrated across all processes for the organization. |
| managed: | Level 4 - Managed | Processes are automated and measured for success. |
| optimized: | Level 5 - Optimized | Processes yield consistent results and are continually optimized. |
For the Target Maturity field, refer to the table below.
| Values | Help text values | |
|---|---|---|
| Label: | Target Maturity | |
| adhoc: | Level 1 - Ad-hoc | Processes are largely manual and inconsistent. Success often depends on individual heroics. |
| repeatable: | Level 2 - Repeatable | Basic and consistent processes are established and can be repeated for similar projects. |
| defined: | Level 3 - Defined | Processes are automated and integrated across all processes for the organization. |
| managed: | Level 4 - Managed | Processes are automated and measured for success. |
| optimized: | Level 5 - Optimized | Processes yield consistent results and are continually optimized. |
For the Strategic Importance field, refer to the table below.
| Values | Help text values | |
|---|---|---|
| Label: | Strategic Importance | |
| parity: | Commodity | {{factSheet}} maintains commodity and operational needs, but does not provide any competitive advantage. |
| tier2: | Differentiation | {{factSheet}} is important to achieve excellence in order to compete with and differentiate from others. |
| tier1: | Innovation | {{factSheet}} is critical to competitive advantage. |
For the Maturity Description field, refer to the table below.
| Values | Help text values | |
|---|---|---|
| Label: | Maturity Description | Describes the result of the maturity analysis. |
Adding Translations to Fact Sheet Field - Strategic Importance
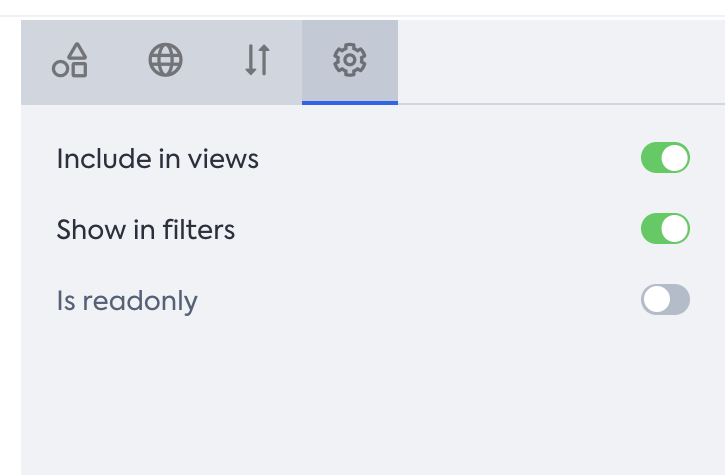
vi. In the final tab of the right-side panel, toggle Include in views and Show in filters for the Current Maturity, Target Maturity, and Strategic Importance fields. To learn more about these options, see Showing Fields in Views and Showing Fields in Filters.
vii. Click Show changes, and then Apply to finish adding the new Fact Sheet field.
Standardize Fact Sheet Colors and Order
It is recommended to align the colors following SAP LeanIX standards and also arrange Fact Sheets in the given order. This standardization helps all workspace users follow SAP LeanIX standard documentation and instructions effectively. To learn more about the standard fact sheet order and colors in the meta model v4 and how to change them, see Fact Sheet Order and Colors.
Updated about 1 month ago