
Configuring the Integration
Learn how to configure authentication for the SAP Signavio integration, including the necessary SAP Signavio user permissions required for proper setup and synchronization.
Setup in SAP Signavio
To configure the integration, you need a user account in SAP Signavio with appropriate read and write permissions. These credentials are entered into SAP LeanIX for authentication during setup.
We recommend creating a dedicated user account with an 'API Edition' license. This license enables seamless integration with SAP Signavio's API by bypassing the Single Sign-On (SSO) login process. A dedicated account also ensures proper access management and continuity.
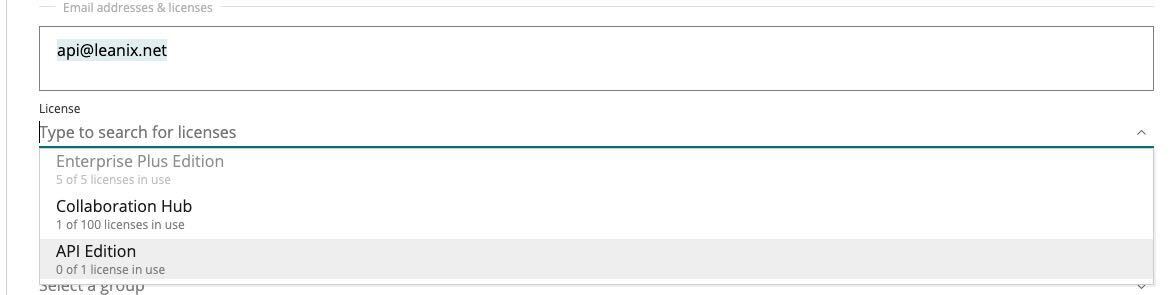
Choosing the API Edition License for User Account
If the 'API Edition' license is not available in your SAP Signavio workspace, you can request one by opening a support ticket with SAP Signavio. Be sure to include your tenant ID in the support request to help expedite the process. This license is provided at no additional cost.
Note that accounts with this license cannot access the SAP Signavio application through the user interface.
Minimum Access Rights for Integration
If you do not have admin rights in SAP Signavio, you require certain minimum access rights to effectively set up the integration and ensure proper synchronization of data between the two systems.
- For process mapping:
- In general, Hub and Read access are needed to view and retrieve information from the relevant processes.
- For top-down synchronization, Hub and Read access to the Shared Document Folder (the SAP Signavio root folder) is required to retrieve information.
- For bottom-up synchronization, you require Hub and Read access to the relevant SAP Signavio folder selected for process searching and syncing.
Note
Top-down and bottom-up synchronization are modes of syncing which you can choose while mapping process hierarchy. To learn more, see Configuring the Process Synchronization Hierarchy.
- For fact sheet and dictionary item mapping:
- If SAP LeanIX is the source, then View, Write, and Delete access rights are needed for all dictionary categories involved in the mapping.
- If SAP Signavio is the source, then at least View access is needed for the relevant dictionary categories.
Note
Granting View, Write, and Delete access rights for all dictionary categories may lead to sync runs running on duplicates with entries in unrelated categories. To avoid this, you can use the forceWrite settings. However, if duplicates only occur in irrelevant categories, you can resolve the issue by restricting access rights to only the relevant categories.
Setup in SAP LeanIX
In SAP LeanIX, you configure the SAP Signavio integration by providing user credentials for authentication. Then, you map fact sheets with SAP Signavio processes and dictionary items along with their attributes. Only users with admin rights can complete this setup in SAP LeanIX.
To configure the integration, follow these steps:
- In the Administration area, select Integrations. This opens the integrations area, where you can view existing integrations and add new ones.
- Click Add integrations. All available integrations that you can add are shown on the resulting page.
- Click Configure on SAP Signavio.
- Click New Configuration at the top of the page to open the integration configuration page for SAP Signavio.
- On the integration configuration page, enter the SAP Signavio user credentials to set up authentication. For a detailed guide, see Setting Up Authentication.
- Click Next to proceed to the Basic Configuration tab. In the Basic Configuration tab, define how the data should be synced by mapping fact sheets with SAP Signavio processes and dictionary items along with their attributes. For detailed guides, see Mapping SAP Signavio Processes to Fact Sheets and Mapping Fact Sheets and Dictionary Items.
- Click Save to save the configuration, and click Sync Now to run the synchronization.
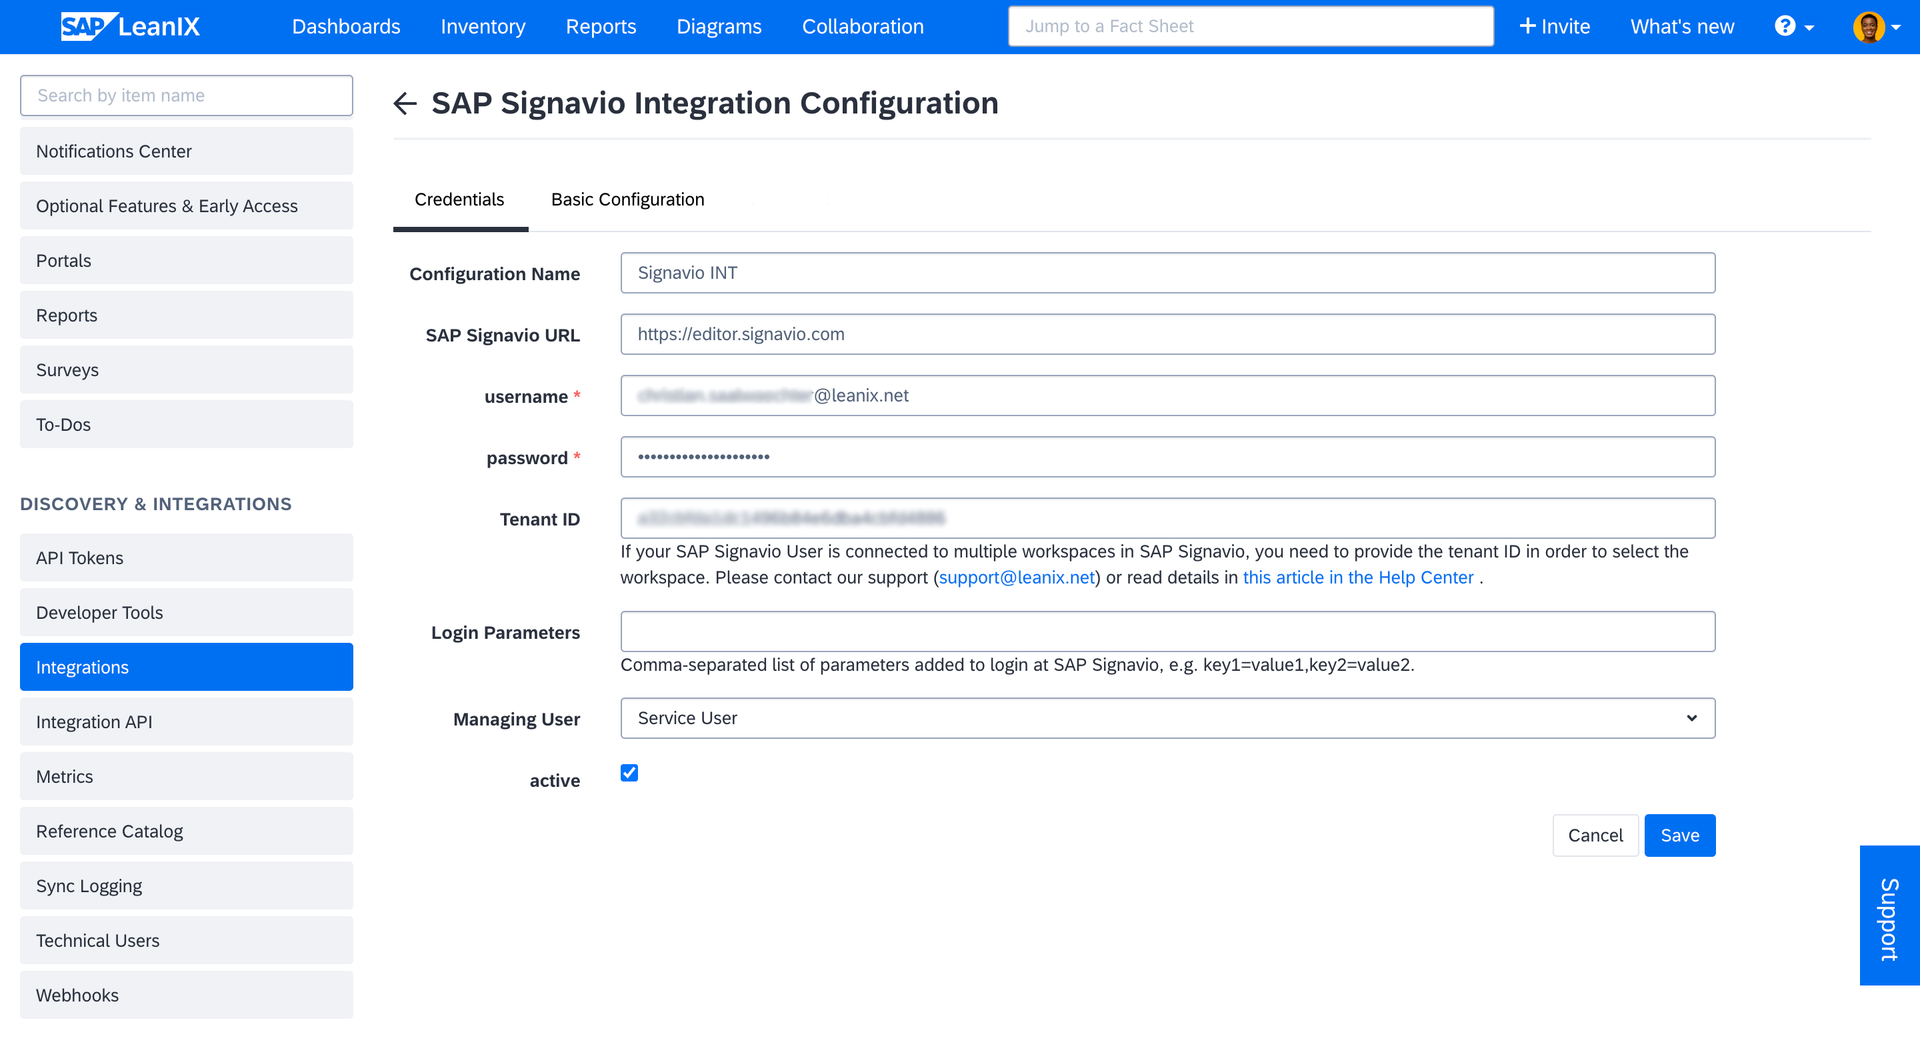
Setting Up Authentication
On the Credentials tab of the configuration page, enter the user credentials needed to authenticate SAP LeanIX and enable communication with your SAP Signavio instance.
Setting up Authentication
Find the needed explanations below for each field, along with instructions on how to configure them and the impact these settings have on the overall integration.
Configuration Name
Give your configuration a clear and descriptive name. It helps you easily identify and manage different integrations, especially if you are setting up integrations for multiple tenants of SAP Signavio.
SAP Signavio URL
For the SAP Signavio SaaS offering, the URL depends on the instance you're using:
- Europe -
https://editor.signavio.com - United States -
https://app-us.signavio.com - Australia -
https://app-au.signavio.com - Japan -
https://app-jp.signavio.com - Canada -
https://app-ca.signavio.com - Singapore -
https://app-sgp.signavio.com - South Korea -
https://app-kr.signavio.com
Username and Password
Enter the credentials for the SAP Signavio user account for authenticating the integration. We recommend having a dedicated user account with an ‘API Edition’ license for the integration.
Ensure that this user has the necessary permissions, such as the ability to read processes or create dictionary items. To learn more, see Minimum Access Rights for Integration.
Tenant ID
If the user credentials you provided have access to multiple SAP Signavio workspaces, specify the tenant ID of the workspace you want to integrate with. If the credentials are associated with only one workspace, you can leave this field blank.
If the field is left empty, the integration will attempt to retrieve the tenant ID automatically from SAP Signavio using the provided credentials. If successful, the tenant ID will be filled in for you.
You can find the tenant ID in Workspace information under the Help section of SAP Signavio workspace.
Login Parameters
If your SAP Signavio instance requires additional login parameters, you can specify them as a comma-separated list, e.g., key1=value1, key2=value2. This allows you to include any extra details needed for successful authentication.
Managing User
By default, changes to your workspace are made by the integration's service user account, and these changes will appear in the sync log under the username 'integration-signal.' If you prefer to have more specific control over permissions or want to use different usernames for various SAP Signavio integration configurations, you can select any of your technical users from the drop-down list.
After setting up authentication, click Next to proceed to the Basic Configuration tab.
Updated 3 months ago