
Meta Model Configuration
Configure the meta model to adjust it to your requirements.
Overview
The meta model in SAP LeanIX is a conceptual model that defines the structure, relationships, and semantics of fact sheets, providing a framework for documenting and managing enterprise architecture. As an admin, you can adjust the configuration of the meta model for your workspace in the Meta Model Configuration section of the administration area. To learn more about the meta model and specific fact sheets included in it, see Meta Model.
Fact sheets are the primary objects in the meta model that hold information about the various elements in your IT landscape. You can customize them to suit your organization's specific data requirements. If needed, you can also create custom fact sheet types and subtypes.
This guide explains how to configure a fact sheet and provides an overview of fact sheet settings. To learn how to configure specific settings, such as relations, permissions, conditional attributes, and more, browse relevant topics in this section.
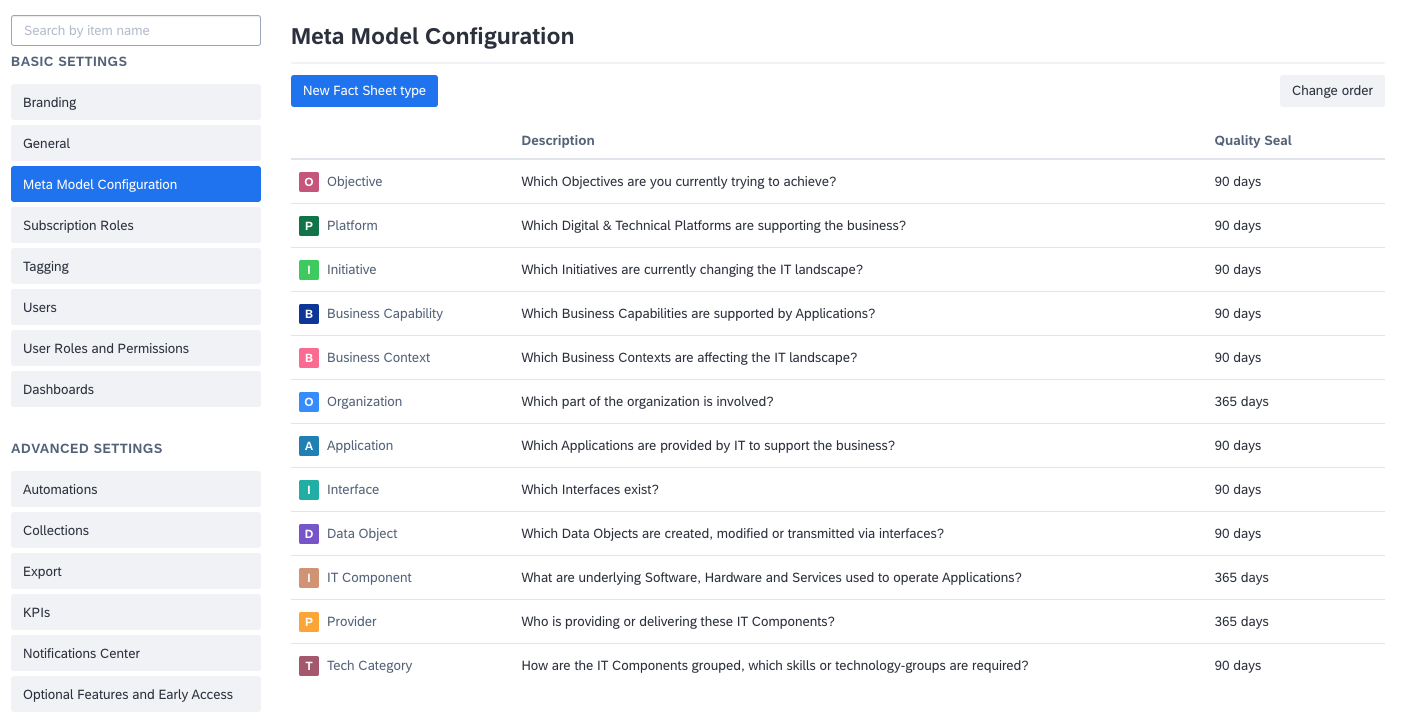
Meta Model Configuration Section in the Administration Area
Best Practices
Recommendation
The meta model is fully customizable, but customization adds complexity for end users. It also impacts modeling best practices, reporting, and more. This can lead to limitations for future use cases that aren't easily resolved in a standard and efficient way. When making changes, proceed with caution and consider the possible implications.
- Add translations and help texts to fields: Enhance the user experience by adding translations and help texts to every entity you create, such as sections, subsections, fields, and relation values.
- Group related attributes: Group related attributes into new subsections to reduce noise for those who don't consume or contribute to those specific attributes. You can copy links to specific sections or subsections and share them with users who contribute information.
- Use conditional attributes: Use conditional attributes to reduce noise and minimize the information scope when attributes are only relevant for a specific fact sheet subtype or specific sets of fact sheets. For more details, see Conditional Attributes.
Configuring a Fact Sheet
Follow these steps:
-
Navigate to the fact sheet configuration page in one of the following ways:
- In the Meta Model Configuration section of the administration area, select a fact sheet type.
- In the inventory, select a fact sheet of the type that you need. On the fact sheet page, in the upper-right corner, click More actions (three-dot icon) > Configuration.
-
On the fact sheet configuration page, adjust the configuration as needed. To learn more about specific settings, see Fact Sheet Settings.
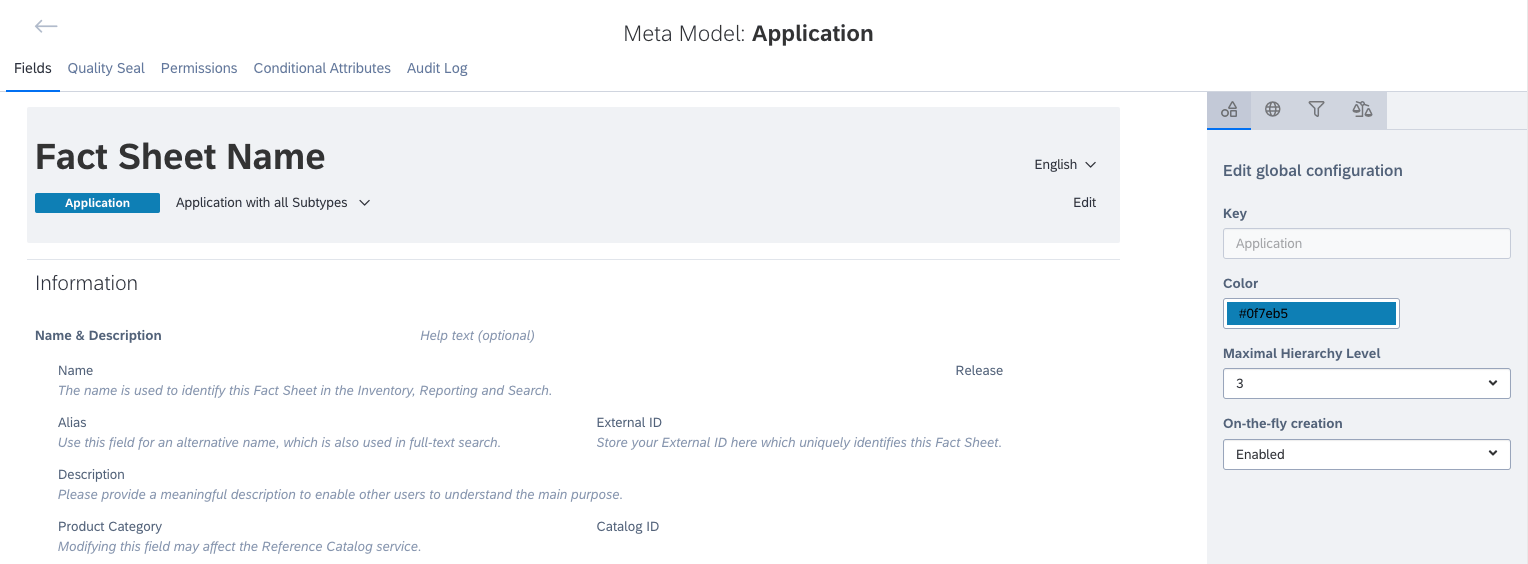
Configuring the Application Fact Sheet
-
Save the changes. If prompted, review the changes before saving them.
Recommendation
To minimize disruption to user workflows, consider making significant changes to the meta model configuration outside of regular business hours. You can temporarily enable maintenance mode to prevent non-admin users from accessing the workspace. For more information, see Maintenance Mode.
Fact Sheet Settings
The following table provides an overview of fact sheet settings, explaining the purpose of each setting and where to configure it. For additional information, refer to the relevant documentation topics.
| Setting | Details | Where to Configure | Additional Information |
|---|---|---|---|
| Name and description | You can modify the fact sheet names and descriptions, along with their translations into other languages. The fact sheet key, which is a unique fact sheet identifier, can not be modified. To streamline the translation process, use AI capabilities. | On the Fields tab of the fact sheet configuration page, select the fact sheet header, then go to the Translations tab on the right-side panel. | Fact Sheet Description AI-Supported Translation |
| Basic parameters | Basic (global) parameters include the fact sheet color, maximum hierarchy level, and the possibility to create fact sheets on the fly. | On the Fields tab of the fact sheet configuration page, select the fact sheet header, then adjust these settings on the Configuration tab on the right-side panel. | Fact Sheet Order and Colors |
| Default inventory filters | You can define the default filters to be displayed on the filter panel in the inventory. Users can customize their displayed filters. Once custom filters are set, the default filters configured on the fact sheet no longer apply. | On the Fields tab of the fact sheet configuration page, select the fact sheet header, then go to the Filter tab on the right-side panel. | Displaying and Hiding Filters |
| Completion weights | The fact sheet completion score measures how much of the required data has been filled out for a fact sheet. You can define how the completion score is calculated by configuring completion weights. | On the Fields tab of the fact sheet configuration page, select the fact sheet header, then go to the Completion weights tab on the right-side panel. | Fact Sheet Completeness |
| Fields | Fields are specific data points within a fact sheet that store individual pieces of information about the entity it represents. | Go to the Fields tab on the fact sheet configuration page and configure fields in the fact sheet body. | Fact Sheet Fields |
| Relations | Relations represent the connections or relationships between different fact sheets, showing how they interact or relate to each other. | Go to the Fields tab on the fact sheet configuration page and configure relations in the fact sheet body. | Fact Sheet Relations |
| Quality seal | Quality seal is a mechanism to ensure the overall integrity and quality of data on fact sheets. | Go to the Quality Seal tab on the fact sheet configuration page. | Quality Seal |
| Permissions | Permissions enable you to control access and edit rights for specific data on fact sheets. You can define permissions for non-admin user roles. | Go to the Permissions tab on the fact sheet configuration page. | Fact Sheet Permissions |
| Conditional attributes | Conditional attributes allow fields and relations in fact sheets to be visible based on related field values. | Go to the Conditional Attributes tab on the fact sheet configuration page. | Conditional Attributes |
Fact Sheet Description
You can modify the descriptions of fact sheet types and their translations into other languages. These descriptions help users, especially those who use the application infrequently, understand the differences between fact sheet types and how to use each one. You can include organization-specific details in the descriptions to provide additional context.
To modify a fact sheet description, follow these steps:
- On the fact sheet configuration page, go to the Fields tab.
- Select the fact sheet header, or click Edit on the header.
- On the right-side panel, go to the Translations tab.
- Modify the description in the Help text (optional) field as needed. You can generate descriptions and translate them into other languages using AI capabilities. For more information, see AI-Supported Translation.
- Save the changes.
Fact Sheet Structure
The fact sheet body's structure is determined by the order of elements on the Fields tab of the fact sheet configuration page. Sections serve as larger containers, housing subsections. Subsections store fact sheet fields. To learn how fact sheets appear in the inventory, see Fact Sheet Layout.
In the following image, Information is a section, Name & Description is a subsection, and Name and Alias are fields.
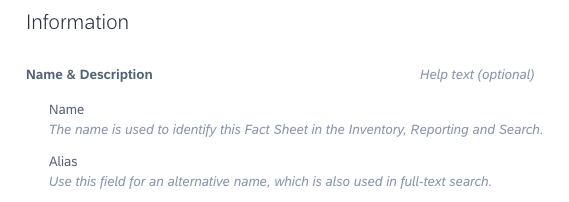
Section, Subsection, and Fields on a Fact Sheet
You can reorder, add, and modify sections and subsections to adjust the fact sheet structure to your needs. Additionally, you can change the order of fields within subsections.
You can only delete empty sections and subsections. When deleting non-empty elements, they’re moved to the Unused Fields and Relations section, becoming hidden for users. For additional information, see Unused Fields and Relations.
Adding Sections and Subsections
Adding custom sections and subsections to a fact sheet provides structure for new fields and enables you to arrange data in a specific order, enhancing readability and organization.
Here’s how you can add these elements:
- To add a custom section, select an existing section, click Add section, then configure section parameters on the right-side panel.
- To add a custom subsection, select an existing section or subsection, click Add subsection, then configure subsection parameters on the right-side panel.

Adding Sections and Subsections to a Fact Sheet
Tip
You can create sections and subsections as hidden before making them visible to users. This enables you to configure attributes without exposing them, ensuring optimal user experience. To manage the visibility of these elements, use the Visible toggle on the right-side panel.
Reordering Sections and Subsections
You can define the order in which sections and subsections appear on a fact sheet. To do that, select a section or subsection, navigate to the Change position tab on the right-side panel, adjust the order as needed, then save the changes.
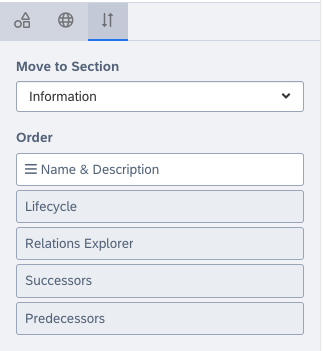
Adjusting the Position of a Subsection on a Fact Sheet
Hiding Sections and Subsections
You can hide specific sections or subsections to limit the scope of displayed information. To to that, select a section or subsection, turn off the Visible toggle on the right-side panel, then save the changes.
Fact Sheet Attributes
Within the fact sheet body, you can configure specific fact sheet attributes such as fields and relations. For more information, refer to:
Tip
When creating or editing fact sheet attributes, you can use AI capabilities to generate labels, help texts, and translations. To learn more, see AI-Supported Translation.
Adding Custom Attributes
You can add custom attributes to fact sheets to tailor the meta model configuration to your needs. For details, refer to:
Attribute Key
Each fact sheet attribute is uniquely identified by an attribute key, also known as the technical name. These keys are crucial when setting up integrations and working with data through APIs. For more information on available APIs, see SAP LeanIX APIs.
When creating custom attributes, such as fields and relations, use meaningful key names. This practice enhances readability and understanding, particularly when multiple team members or systems are interacting with the data. Note that the key name must begin with a letter.
To find the attribute key, select an attribute on the Fields tab, then view the Key value on the right-side panel.
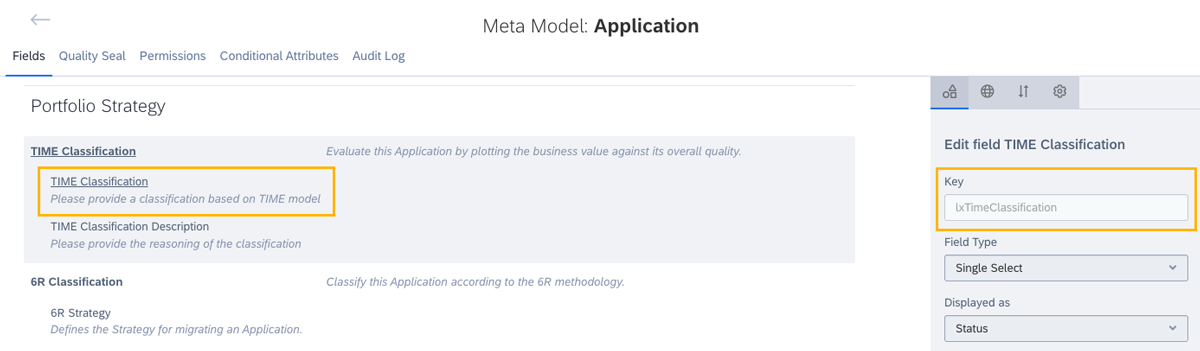
"TIME Classification" Field and Its Key
Unused Fields and Relations
If a field or relation becomes irrelevant, you can hide it instead of deleting. This approach enables you to declutter your workspace without losing any data, allowing stakeholders to focus on important information.
Hidden attributes appear in the Unused Fields and Relations section on the Fields tab of the fact sheet configuration page. Despite being hidden, these attributes are still accessible through APIs.
Any data stored in these hidden attributes remains intact and can be made visible at any time. To make a hidden attribute visible, select it, then move it to a different section using the Move to Subsection list on the right-side panel.
Translations
To view translations for a specific item (such as subsection, relation, or field), select it, then go to the Translations tab on the right-side panel. You can edit translations for labels and help text (if applicable). To streamline the translation process, use AI-supported translation. For more information, see AI-Supported Translation.
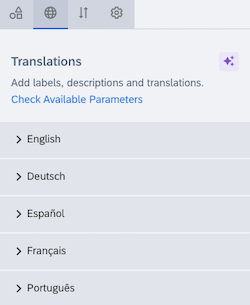
"Translations" Tab on the Configuration Panel
Configuration Changelog
On the Audit Log tab of the fact sheet configuration page, you can view a comprehensive record of all changes made to the fact sheet configuration.
Additionally, you can retrieve the history of changes made to the meta model through the Pathfinder REST API by sending a GET request to the following endpoint:
https://{SUBDOMAIN}.leanix.net/services/pathfinder/v1/models/metaModel/actionBatches
Notifications of Configuration Changes
Whenever significant changes are made to the meta model configuration by an admin, an email notification is sent to all workspace admins, including the user who made the changes. This is important for audit trails and maintaining transparency across all administrative actions.
Updated 4 months ago