
Configuring SSO with Okta
Instructions for configuring single sign-on (SSO) with Okta as an identity provider.
Prerequisites
Before you start, do the following:
- Submit a ticket to SAP LeanIX Support to request setting up SSO for your organization. If you're an SAP customer, submit a request from the SAP for Me portal.
- Learn about the SSO configuration process in SSO Configuration Process.
For additional information, visit the Okta website.
Step 1: Create an Application for SSO
Follow these steps:
-
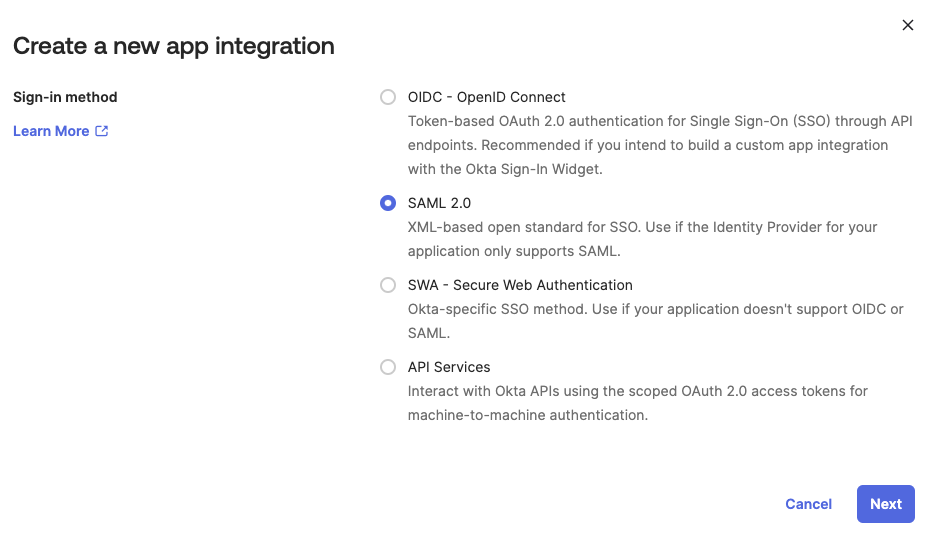
In the Okta admin dashboard, in the Applications section, click Create App Integration.
-
In the overlay that appears, select SAML 2.0 as the sign-in method.
Selecting SAML 2.0 as the Sign-In Method for an SSO Application in Okta
-
Enter a name for your application, then click Next.
Step 2: Configure SAML Settings
Follow these steps:
-
In the SAML Settings section of the application, specify the following:
-
Single sign-on URL:
https://{SUBDOMAIN}.leanix.net/Shibboleth.sso/SAML2/POST -
Audience URI (SP Entity ID):
https://{SUBDOMAIN}.leanix.net/Shibboleth.ssoNote
Replace
{SUBDOMAIN}in the URLs with your custom subdomain that you specified in the SSO request form (for example,https://your-company.leanix.net). -
Name ID format: Select EmailAddress.
-
Application username: This parameter depends on your Okta implementation. If the Okta username matches the SAP LeanIX email, select Okta username.

Configuring General SAML Settings for an SSO Application
-
-
In the Attribute Statements section, specify attributes to be added to the SAML assertion as shown in the following table. All fields are case-sensitive. The first four objects in the table are values that already exist on the user object. The
roleobject will be added when assigning user groups to the application.Name Name Format Value Description firstnameURI Reference user.firstNameThe first name of the user. lastnameURI Reference user.lastNameThe last name of the user. uidURI Reference user.emailThe unique ID of the user in the email format.
We recommend using an ID that is different from the user's email address.mailURI Reference user.emailThe email address of the user. roleURI Reference appuser.roleThe role to be assigned to the user. Possible values: ADMIN,MEMBER, orVIEWER.
If you submit multiple values separated with commas, the role with the highest level of privileges is assigned.
If you're managing roles within SAP LeanIX, you can omit this attribute.
To learn more, see Managing User Roles with SSO.customerRolesURI Reference appuser.customRoleThe custom role to be assigned to the user.
Use this attribute only for custom roles, otherwise omit it.
To learn more, see Custom User Roles.entryACIURI Reference appuser.entryACIThe ID of the Access Control Entity (ACE) of a Virtual Workspace.
Use this attribute only when configuring access to a Virtual Workspace, otherwise omit it.
To learn more, see SSO Configuration.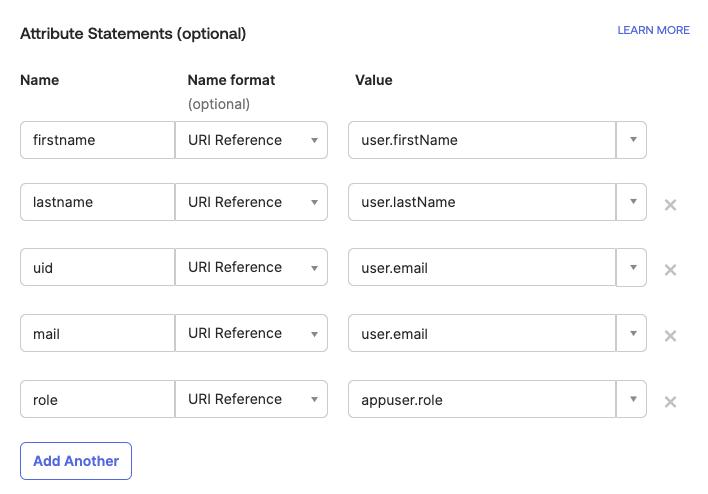
Configuring Attribute Statements for an SSO Application
-
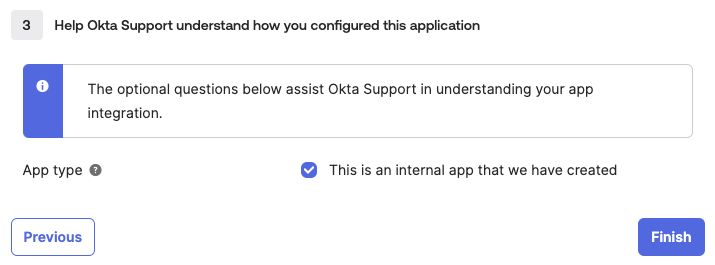
In the Feedback section, specify that the app is internal, then click Finish.
Specifying the Type of an SSO Application
Step 3: Configure Attribute Mapping
Follow these steps:
-
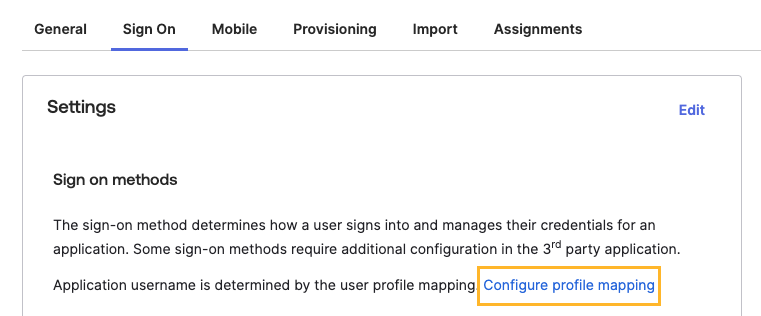
On the Sign On tab of your application, select Configure profile mapping.
Selecting the "Configure Profile Mapping" Link on the "Sign On" Tab of an SSO Application
-
In the overlay that appears, click Cancel.
-
In the Attributes section, click Add Attribute.
-
Specify the attribute details.
-
Data type: Select string.
-
Display name, Variable name, and External name: Enter
roleto match the attribute that you added to the SAML assertion. -
Enum: Select Define enumerated list of values and create a list of user roles that the Okta admin can select from. The values in the following table correspond to the SAP LeanIX standard roles, but you can adjust the list according to your needs.
Display Name Value ADMINADMINMEMBERMEMBERVIEWERVIEWER -
Attribute type: Select Group.
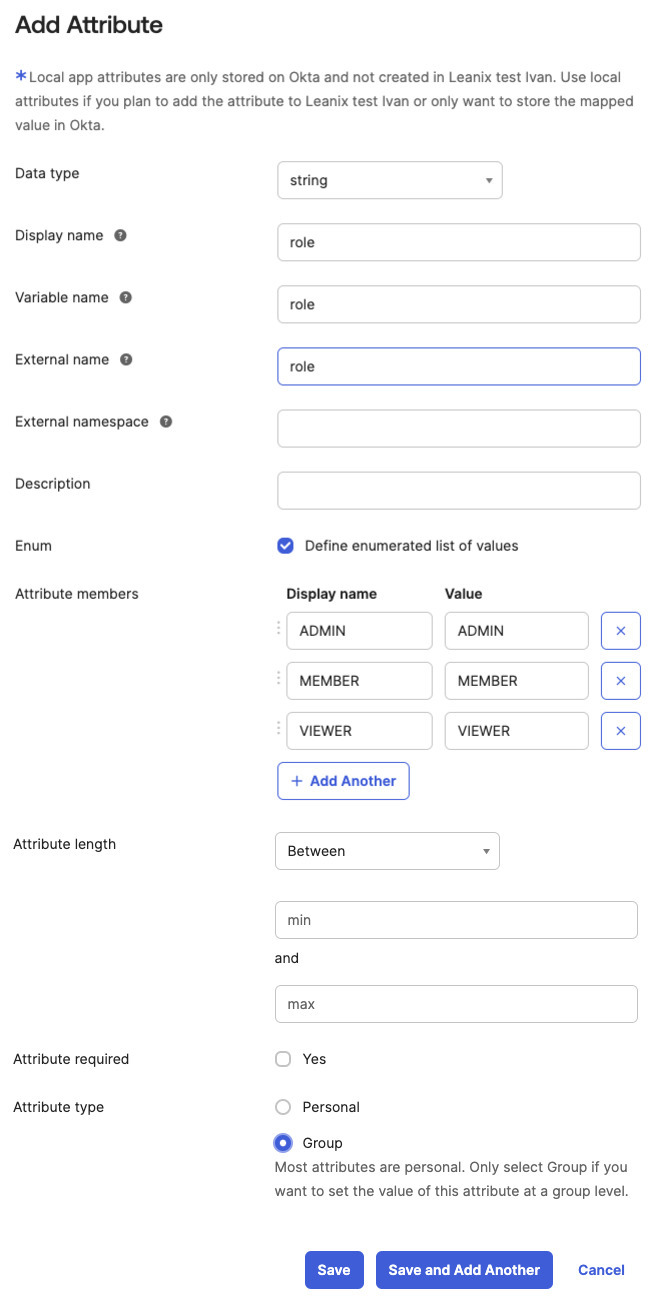
Adding an Attribute to a Profile in Okta
-
-
Save the changes.
Step 4: Assign Users to the Application
You can assign specific users or user groups to the SSO application.
Follow these steps:
-
On the Assignments tab of the application, click Assign > Assign to Groups.
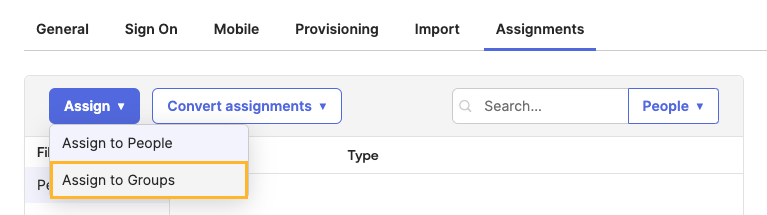
Selecting the "Assign to Groups" Option on the "Assignments" Tab of an SSO Application
-
In the overlay that appears, select a user group to assign to the application.
-
In the role list, select an SAP LeanIX role to be assigned to users in this group.

Selecting a Role to Be Assigned to Users of an SSO Application
-
Optional: If needed, modify other attributes, then save the configuration.
-
Optional: If needed, on the Sign On tab of the application, in the Sign On Policy section, specify rules for your sign-on policies, for example, multi-factor authentication.
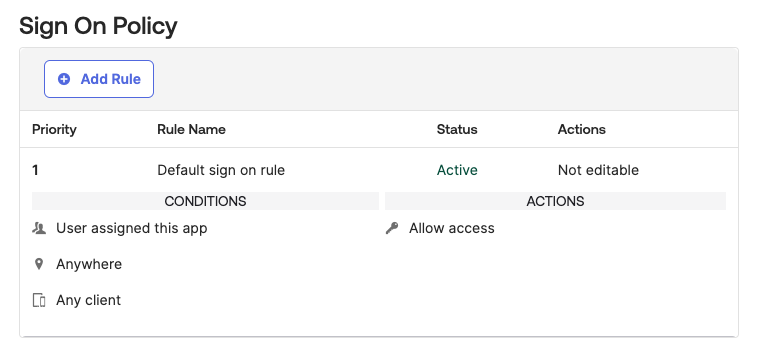
"Sign On Policy" Section on the "Sign On" Tab of an SSO Application
To verify your SSO configuration, first, access your workspace at https://{SUBDOMAIN}.leanix.net, then navigate to the SAML session page at https://{SUBDOMAIN}.leanix.net/Shibboleth.sso/Session. The following screenshot shows a session page with a list of required user attributes that appear under Attributes.
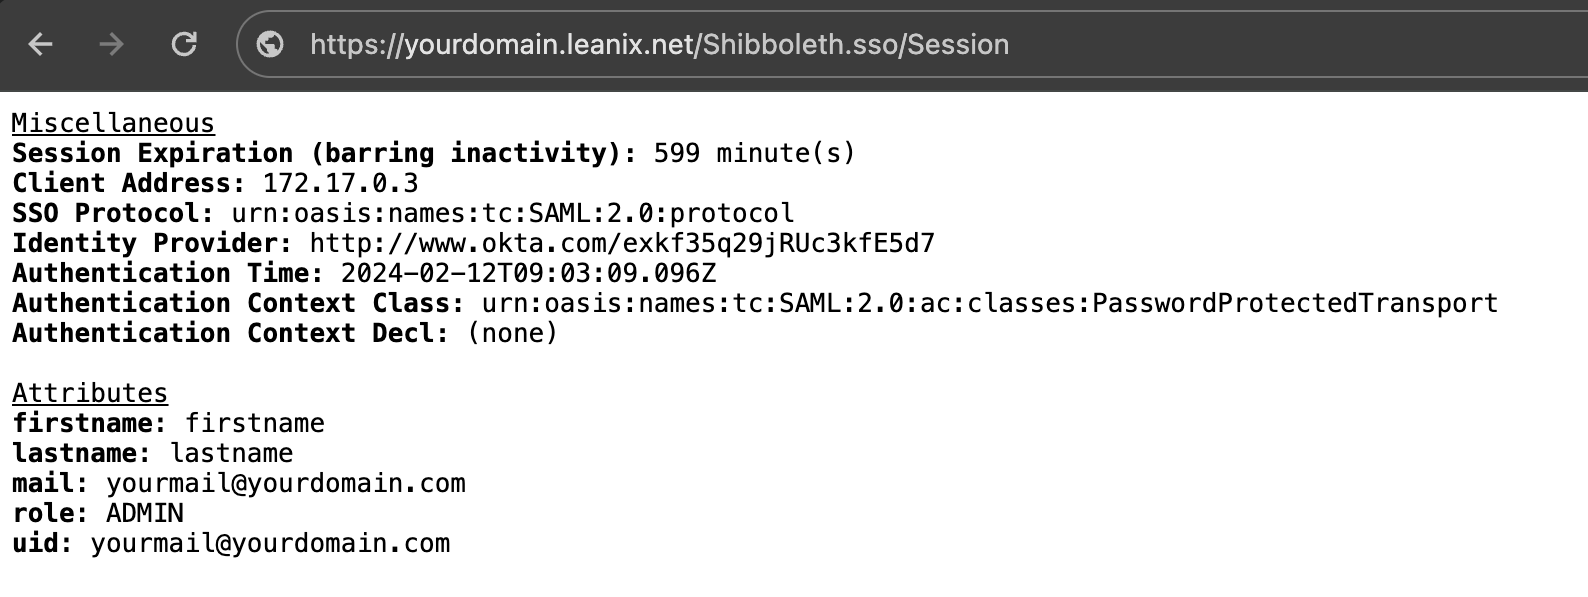
SAML Session Page
Updated about 1 month ago