
Automations Best Practices
Best practices and use cases for automations.
Selected Use Cases
This section highlights selected use cases for automations, explaining in detail how to configure them. Use these examples as a source of inspiration when creating your own automations.
Setting the Quality Seal upon Completing a Survey
This video tutorial shows how to to set the quality seal on a fact sheet to Approved upon completing a survey. This automation eliminates the need for users to navigate to a fact sheet to approve the quality seal after completing a survey.
The Quality Confirmation single-select field mentioned in the video is a custom filed. You can create custom fields on fact sheets in the meta model configuration. Set the field type to Single Select and create two options: Yes and No.
Setting the Quality Seal upon Completing a To-Do
This video tutorial shows how to set the quality seal on a fact sheet to Approved upon marking a to-do as complete. This automation removes the need for assignees to navigate to a fact sheet to approve the quality seal after completing a to-do.
Assigning To-Dos Created by Automations to Teams
This video tutorial shows how to assign to-dos created by automations to teams instead of individual fixed users. This approach helps avoid the manual maintenance required to ensure the accuracy of respective automation templates.
Concatenating To-Dos Sequentially
This video tutorial shows how to concatenate multiple to-dos created by automations sequentially. This ensures that a new to-do is only created after the previous one has been marked as complete.
Assigning the TIME Classification Value Based on the Functional and Technical Fit
To automate the assignment of the TIME Classification value to applications, we recommend using the calculations feature instead of automations. Activate a predefined calculation template to automatically populate the TIME Classification field based on the functional and technical fit. For more information, see Calculations.
Use Cases by Triggers
The use cases provided in this section are categorized based on the triggering event. Use these examples as inspiration when creating your own automations and modify them to meet your specific needs.
Fact Sheet Created
This section provides use cases for automations where the triggering event is fact sheet creation.
Creating Subscriptions for Specific Users on Newly Created Fact Sheets
This automation creates subscriptions for certain fixed users on new fact sheets. A common use case is subscribing specific users, such as enterprise architects, to new application fact sheets.
The following image shows the logic of the automation.
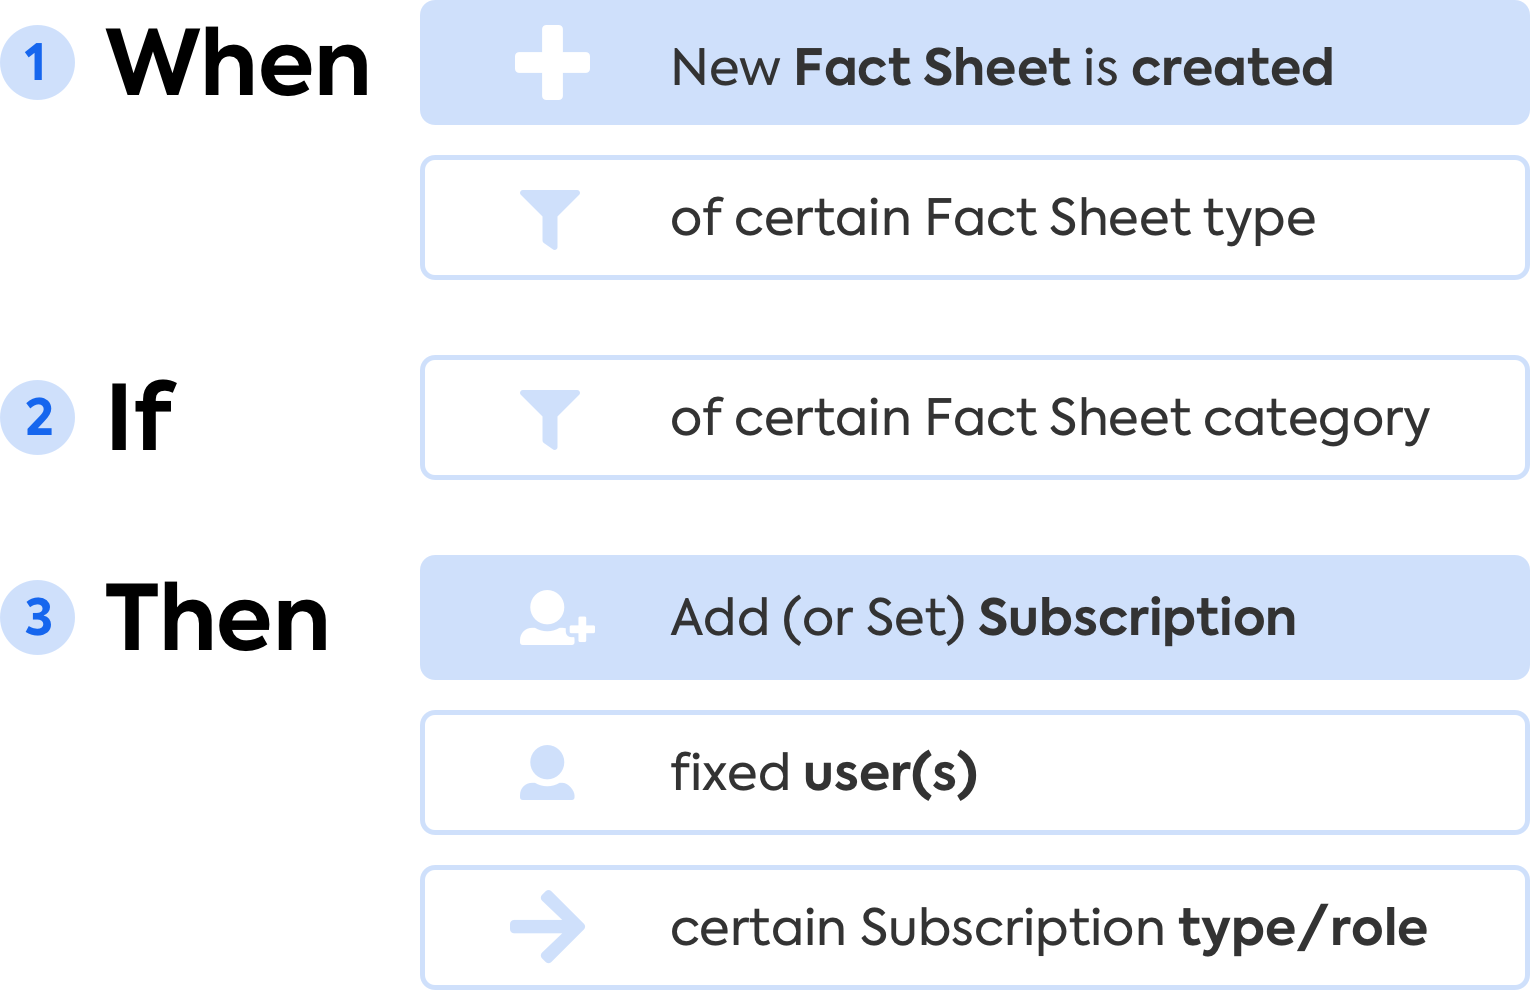
Automation: Creating Subscriptions for Specific Users on Newly Created Fact Sheets
To configure the automation, follow these steps:
- Enter a name and select an owner for the automation. Optionally, enter a description.
- In the When section, specify the trigger for the automation:
- In the Fact Sheet Type list, select a fact sheet type.
- In the Event list, select Fact Sheet is created.
- In the If section, specify conditions for the automation:
- Include or ignore fact sheets that are created by technical users.
- Optional: Add a condition for a specific fact sheet category to trigger the automation for.
- In the Then section, specify the action for the automation:
- Click Add Action, then select Add subscription (or Set subscription).
- In the New Subscriber list, select User, then select a user.
- Select a subscription type and, if applicable, one or more subscription roles to apply.
- If needed, repeat the process to add more users.
- Save the automation.
Creating Subscriptions for Fact Sheet Creators on Newly Created Fact Sheets
This automation assigns the creator of a fact sheet as the initial subscriber with a defined subscription type and role, such as "Observer — Creator." This not only prevents fact sheets from becoming orphaned but also ensures that creators are easily identifiable outside of the audit log.
Moreover, it provides an opportunity for additional user engagement, such as automatically sending ongoing surveys to the assigned fact sheet creator, especially when used in combination with an auto-assigned "New" tag.
The following image shows the logic of the automation.
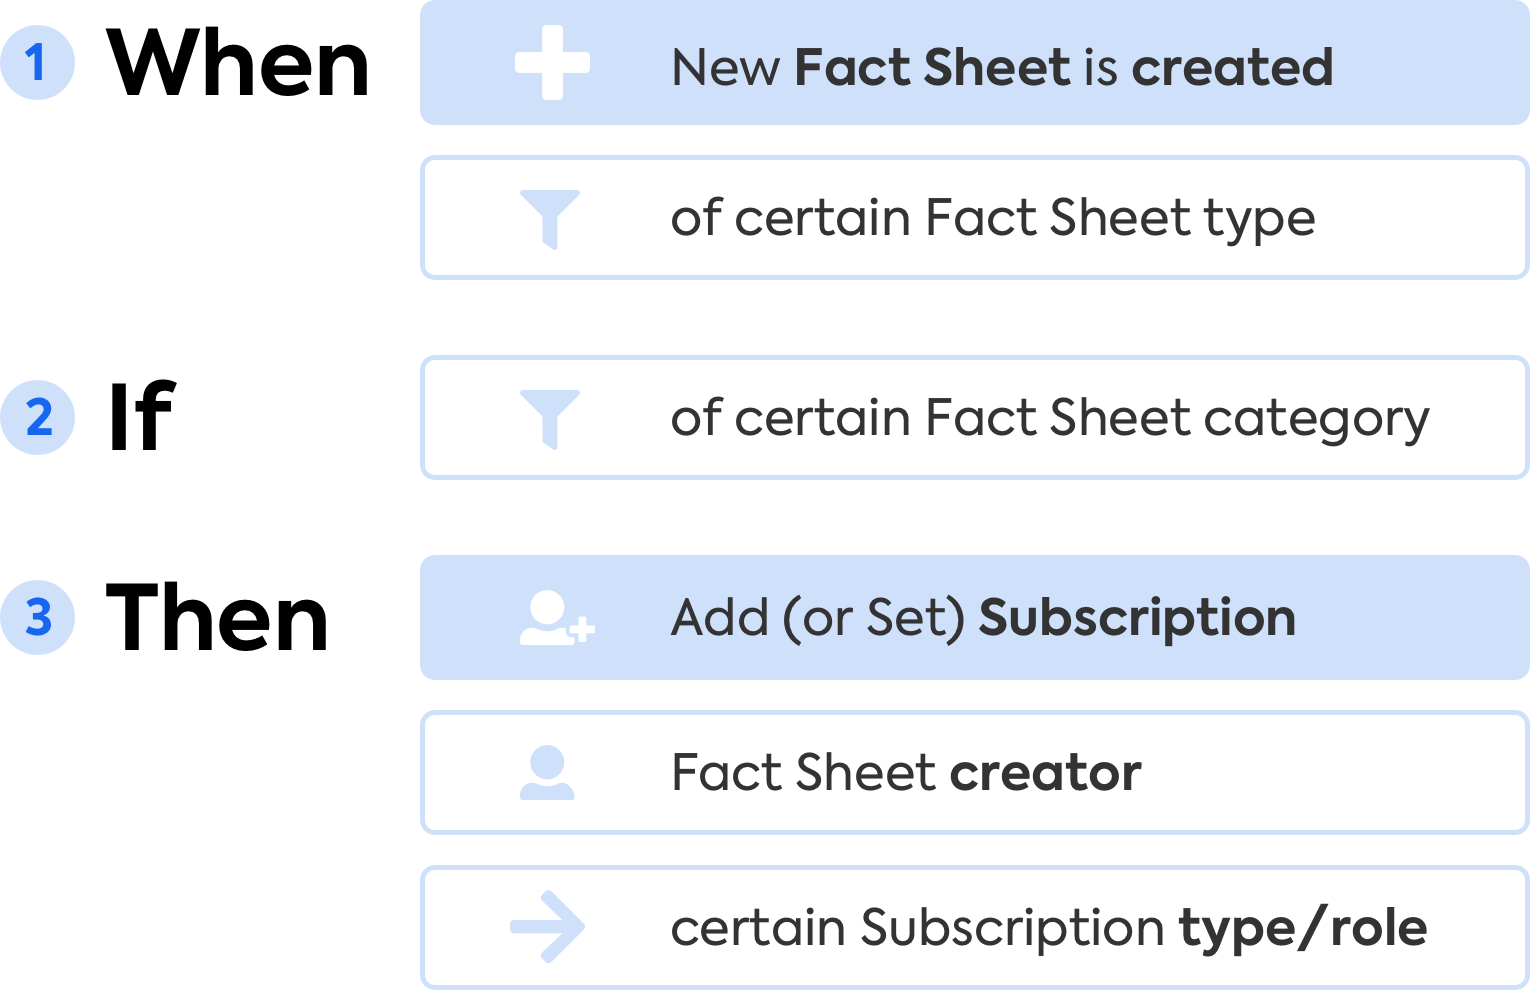
Automation: Creating Subscriptions for Fact Sheet Creators on Newly Created Fact Sheets
To configure the automation, follow these steps:
- Enter a name and select an owner for the automation. Optionally, enter a description.
- In the When section, specify the trigger for the automation:
- In the Fact Sheet Type list, select a fact sheet type.
- In the Event list, select Fact Sheet is created.
- In the If section, specify conditions for the automation:
- Include or ignore fact sheets that are created by technical users.
- Optional: Add a condition for a specific fact sheet category to trigger the automation for.
- In the Then section, specify the action for the automation:
- Click Add Action, then select Add subscription (or Set subscription).
- In the New Subscriber list, select Fact Sheet creator.
- Select a subscription type and, if applicable, one or more subscription roles to apply.
- Save the automation.
Creating an Action Item for Fact Sheet Creators on Newly Created Fact Sheets
This automation creates an action item (to-do) for fact sheet creators. In the to-do, you can include comprehensive instructions on what the fact sheet creator needs to do, such as filling mandatory fields, approving the fact sheet, or identifying the application owner. This guidance ensures a smooth and efficient approval process of new fact sheets.
The following image shows the logic of the automation.
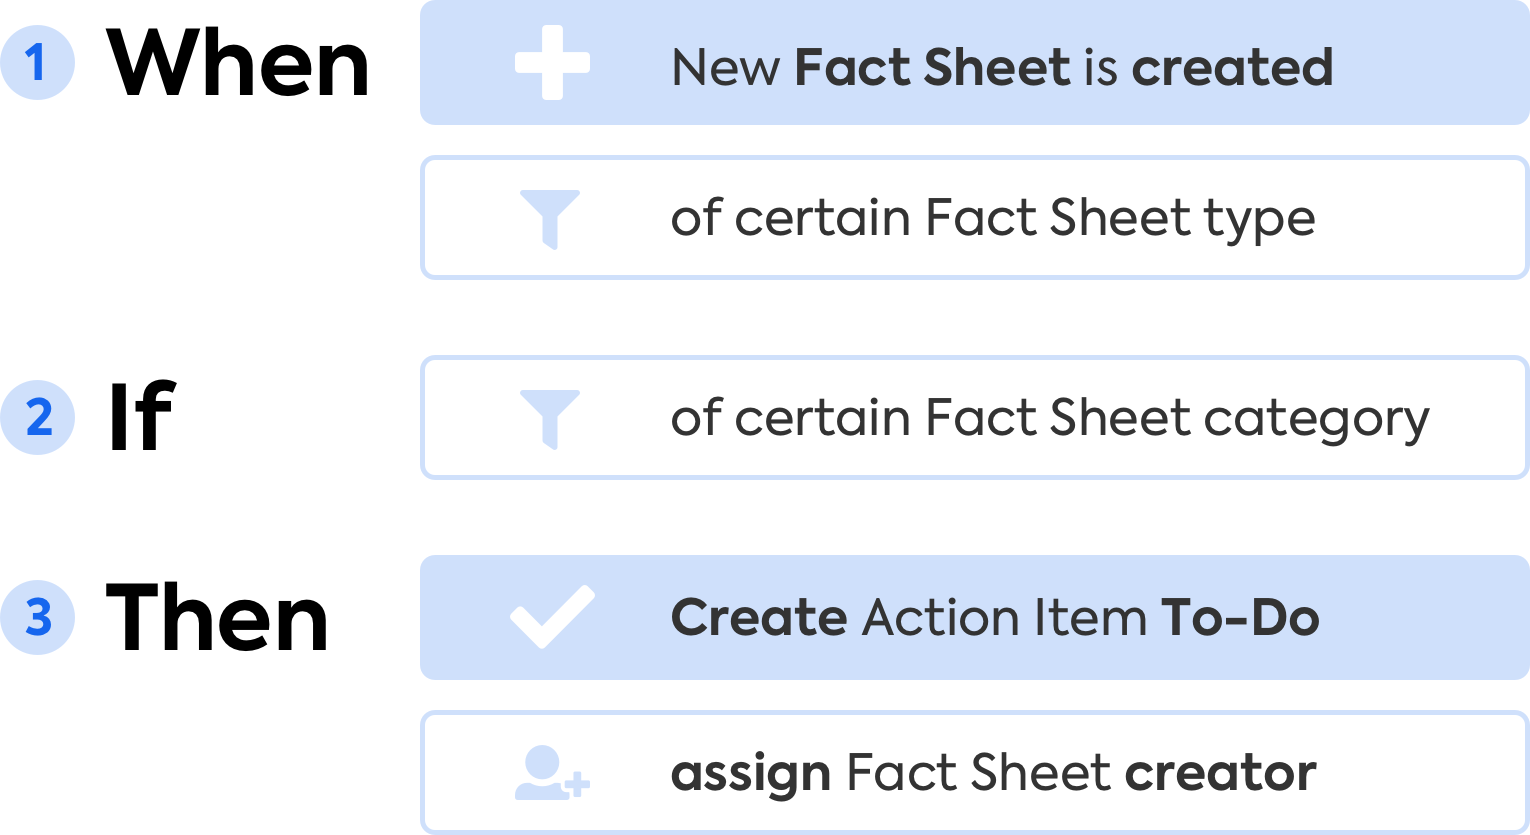
Automation: Creating an Action Item for Fact Sheet Creators on Newly Created Fact Sheets
To configure the automation, follow these steps:
- Enter a name and select an owner for the automation. Optionally, enter a description.
- In the When section, specify the trigger for the automation:
- In the Fact Sheet Type list, select a fact sheet type.
- In the Event list, select Fact Sheet is created.
- In the If section, specify conditions for the automation:
- Include or ignore fact sheets that are created by technical users.
- Optional: Add a condition for a specific fact sheet category to trigger the automation for.
- In the Then section, specify the action for the automation:
- Click Add Action, then select Create To-Do: Action Item.
- Enter a name for the action item and, optionally, a description.
- In the Assignee(s) list, select Fact Sheet creator.
- In the Due (in days) field, enter the number of days indicating when the to-do item is due.
- Save the automation.
Adding Tags or Setting Single-Select Field Values on Newly Created Fact Sheets
This automation pre-populates newly created fact sheets with initial tags, enhancing data quality and reducing manual effort. For example, you can automatically add a default tag "New" to new fact sheets.
Alternatively, you can set single-select fields to specific values on newly created fact sheets.
While our customer support team can set default values, this automation enables you to customize them yourself. An added advantage is that the user who creates a fact sheet doesn't need to have permissions to update the fact sheet.
The following image shows the logic of the automation.

Automation: Adding Tags on Newly Created Fact Sheets
To configure the automation, follow these steps:
- Enter a name and select an owner for the automation. Optionally, enter a description.
- In the When section, specify the trigger for the automation:
- In the Fact Sheet Type list, select a fact sheet type.
- In the Event list, select Fact Sheet is created.
- In the If section, specify conditions for the automation:
- Include or ignore fact sheets that are created by technical users.
- Optional: Add a condition for a specific fact sheet category to trigger the automation for.
- In the Then section, specify the actions for the automation:
- Click Add Action, select Add tag, then select a tag to add to fact sheets.
- If needed, repeat the process to add more actions for tags.
- Save the automation.
Fact Sheet Field Changed
This section provides use cases for automations where the triggering event is fact sheet field changes.
Note
Only single-select fact sheet fields are supported in automations. You can also use hidden fields, but the Obsolescence Risk fields that are technically required for risk calculation are not supported in automations.
Changing a Field Value Based on Another Field Value
This automation enables you to set the value of certain fact sheet fields based on the values of others. For example, if any single-select fields pertaining to the personal data of employees, suppliers, or customers are marked as "Yes," the automation can automatically set a read-only field, such as "Compliance Relevance," to "Yes." This reduces data inconsistency and eliminates the need for manual data clean-up efforts.
The following image shows the logic of the automation.

Automation: Changing a Field Value Based on Another Field Value
To configure the automation, follow these steps:
- Enter a name and select an owner for the automation. Optionally, enter a description.
- In the When section, specify the trigger for the automation:
- In the Fact Sheet Type list, select a fact sheet type.
- In the Event list, select Field changes.
- In the Field list, select a single-select field, then select values in the To and From lists.
- In the If section, specify conditions for the automation:
- Include or ignore fact sheets that are updated by technical users.
- Optional: Add conditions to trigger the automation for: fact sheet category, assigned tags, or single-select field values.
- In the Then section, specify the actions for the automation:
- Click Add Action, select Set field, select a single-select field, then select a value based on the value that you specified as trigger.
- If needed, repeat the process to add more actions for setting field values.
- Save the automation.
Creating an Action Item on a Field Change
This automation creates an action item (to-do) based on changes in single-select fact sheet fields. The automation is especially beneficial in the following scenarios:
- When a critical field value is modified, automatically create actions items for relevant users (either fixed users or subscriptions) to verify the legitimacy of the change.
- When a new critical field value is added, automatically create a check to determine if further actions are required.
For example, if an application's business criticality is set to Mission critical, or if the business criticality changes from Mission critical to another value, the automation generates an action item for the enterprise architecture team. This ensures that critical changes are promptly addressed.
The following image shows the logic of the automation.
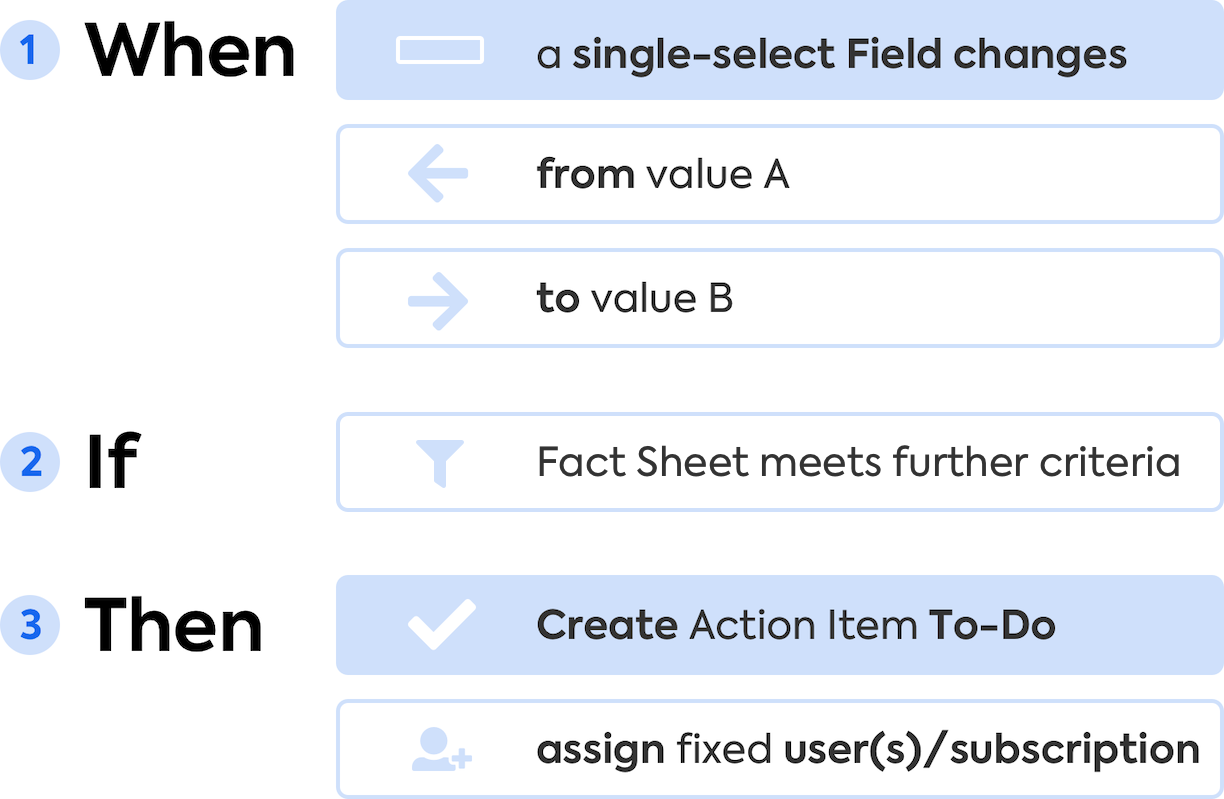
Automation: Creating an Action Item on a Field Change
To configure the automation, follow these steps:
- Enter a name and select an owner for the automation. Optionally, enter a description.
- In the When section, specify the trigger for the automation:
- In the Fact Sheet Type list, select a fact sheet type.
- In the Event list, select Field changes.
- In the Field list, select a single-select field, then select values in the To and From lists.
- In the If section, specify conditions for the automation:
- Include or ignore fact sheets that are updated by technical users.
- Optional: Add conditions to trigger the automation for: fact sheet category, assigned tags, or single-select field values.
- In the Then section, specify the action for the automation:
- Click Add Action, then select Create To-Do: Action Item.
- Enter a name for the action item and, optionally, a description.
- In the Assignee(s) list, select Users or Fact Sheet subscriptions. Depending on the option you selected, select specific users or subscription types and roles.
Instead of selecting a fixed list of users, you can use subscriptions from a fixed reference fact sheet of any type within the workspace. This could be a fact sheet of the organization type or a custom type representing team or organizational entities. This method minimizes manual maintenance and allows dynamic assignment. To implement this, in the Assignee(s) list, select Fixed Fact Sheet subscriptions, select a reference fact sheet, then select subscription types and roles. - In the Due (in days) field, enter the number of days indicating when the to-do item is due.
- Save the automation.
Lifecycle Phase Changed
This section provides use cases for automations where the triggering event is changes to lifecycle phases.
Notifications are automatically sent on lifecycle phase changes.
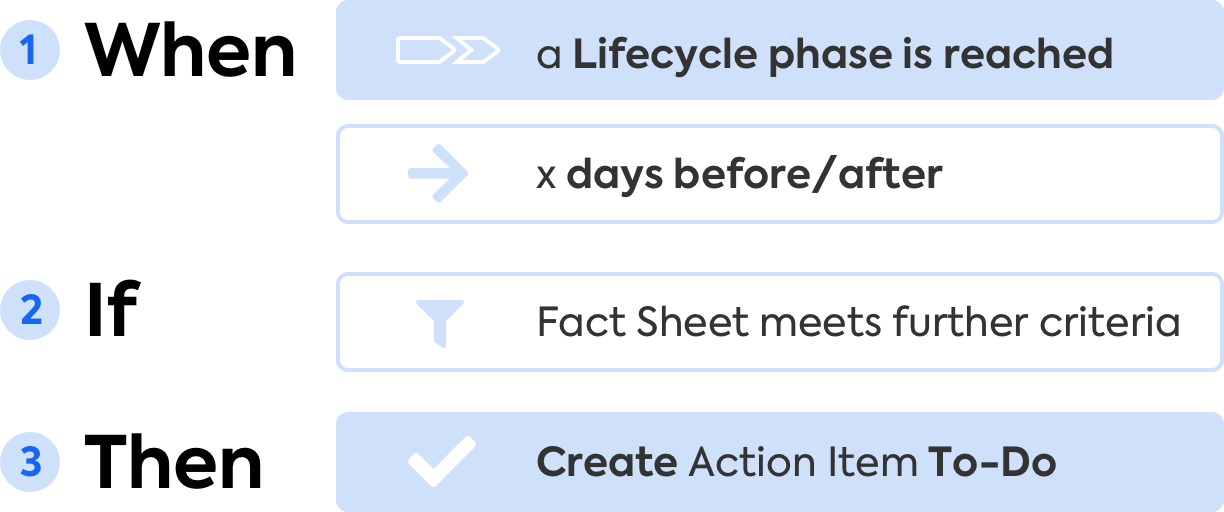
Assigning an Action Item to Subscriptions (Fixed Users) on Lifecycle Phase Changes
Responding to lifecycle phase changes significantly enhances actionability, especially when assigning to-dos to relevant users. The ability to specify the number of days before or after a specific lifecycle date, including custom lifecycle states, provides flexibility to align with your processes. This automation is particularly useful for milestone checks, such as approaching End of Life dates. For example, you can assign to-dos to your enterprise architecture team or the application owners when an End of Life date is approaching.
In the context of application rationalization, this automation can assist in coordinating with relevant stakeholders by creating to-dos 90 or 30 days before an anticipated phase change. This ensures timely communication and effective planning.
The following image shows the logic of the automation.
Automation: Creating an Action Item on Lifecycle Phase Changes
To configure the automation, follow these steps:
- Enter a name and select an owner for the automation. Optionally, enter a description.
- In the When section, specify the trigger for the automation:
- In the Fact Sheet Type list, select a fact sheet type.
- In the Event list, select Lifecycle phase change.
- In the Field list, select Lifecycle, then select a lifecycle phase.
- Optional: To define when the automation should be initiated (before or after the phase change date), click the Trigger before/after toggle and set the timing in days.
- Optional: In the If section, specify conditions for the automation: fact sheet category, assigned tags, or single-select field values.
- In the Then section, specify the action for the automation:
- Click Add Action, then select Create To-Do: Action Item.
- Enter a name for the action item and, optionally, a description.
- In the Assignee(s) list, select Users or Fact Sheet subscriptions. Depending on the option you selected, select specific users or subscription types and roles.
Instead of selecting a fixed list of users, you can use subscriptions from a fixed reference fact sheet of any type within the workspace. This could be a fact sheet of the organization type or a custom type representing team or organizational entities. This method minimizes manual maintenance and allows dynamic assignment. To implement this, in the Assignee(s) list, select Fixed Fact Sheet subscriptions, select a reference fact sheet, then select subscription types and roles. - In the Due (in days) field, enter the number of days indicating when the to-do item is due.
- Save the automation.
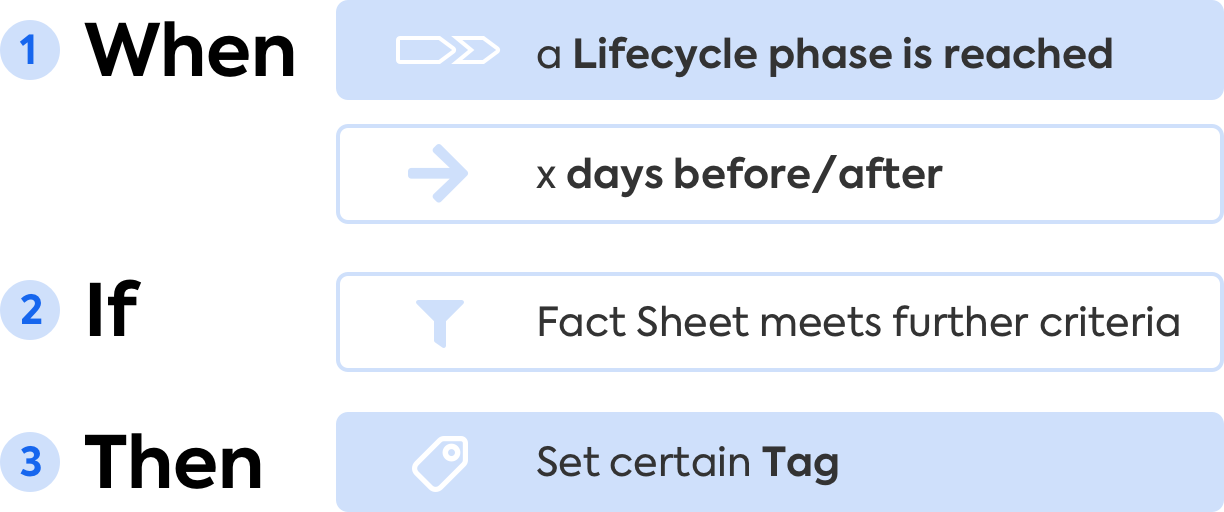
Adding or Removing a Tag on Lifecycle Phase Changes
This automation streamlines responses to lifecycle phase changes by automatically adding or removing tags. For example, you can automatically add tags such as "End of Life Reached" or "Archive" or remove tags from a fact sheet once a specific lifecycle phase is reached. This eliminates the need for manual data maintenance and enhances data quality.
The following image shows the logic of the automation.
Automation: Adding a Tag on Lifecycle Phase Changes
To configure the automation, follow these steps:
- Enter a name and select an owner for the automation. Optionally, enter a description.
- In the When section, specify the trigger for the automation:
- In the Fact Sheet Type list, select a fact sheet type.
- In the Event list, select Lifecycle phase change.
- In the Field list, select Lifecycle, then select a lifecycle phase.
- Optional: To define when the automation should be initiated (before or after the phase change date), click the Trigger before/after toggle and set the timing in days.
- Optional: In the If section, specify conditions for the automation: fact sheet category, assigned tags, or single-select field values.
- In the Then section, specify the action for the automation:
- Click Add Action, select Add tag, then select a tag to add to fact sheets.
- If needed, repeat the process to add more actions for adding tags.
- Save the automation.
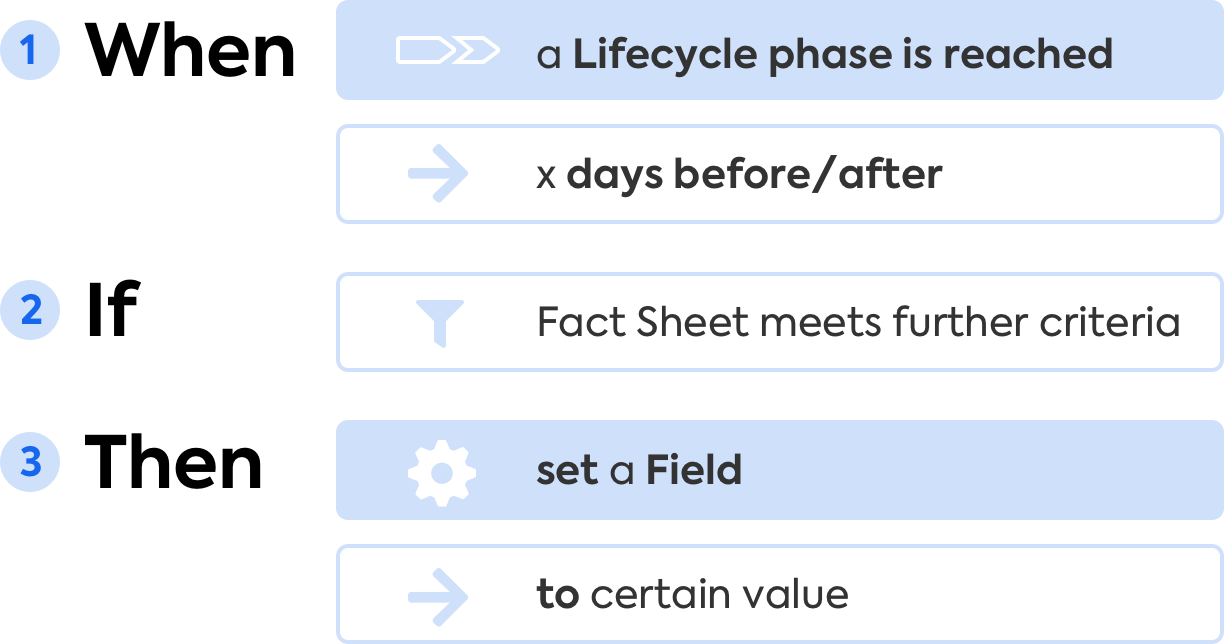
Setting a Single-Select Field on Lifecycle Phase Changes
This automation streamlines responses to lifecycle phase changes by automatically setting single-select field values on fact sheets. For example, you can automatically update a read-only field with the current lifecycle phase, which enhances visibility of the fact sheet state and simplifies filtering.
Additionally, you can map lifecycle states to other custom fields, such as "inactive" or "active." These single-select fields can then be used as conditions in other automations.
The following image shows the logic of the automation.
Automation: Setting a Single-Select Field on Lifecycle Phase Changes
To configure the automation, follow these steps:
- Enter a name and select an owner for the automation. Optionally, enter a description.
- In the When section, specify the trigger for the automation:
- In the Fact Sheet Type list, select a fact sheet type.
- In the Event list, select Lifecycle phase change.
- In the Field list, select Lifecycle, then select a lifecycle phase.
- Optional: To define when the automation should be initiated (before or after the phase change date), click the Trigger before/after toggle and set the timing in days.
- Optional: In the If section, specify conditions for the automation: fact sheet category, assigned tags, or single-select field values.
- In the Then section, specify the action for the automation:
- Click Add Action, select Set field, select a single-select field, then select a value based on the value that you specified as trigger.
- If needed, repeat the process to add more actions for setting field values.
- Save the automation.
Quality State Changed
This section provides use cases for automations where the triggering event is changes to the quality state on fact sheets.
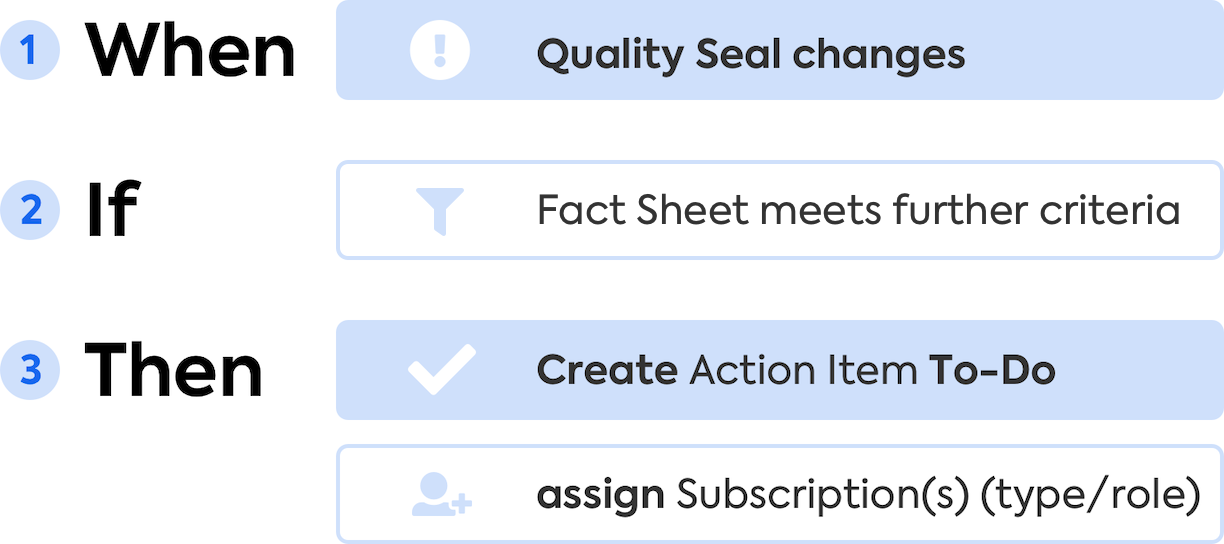
Assigning an Action Item to Subscriptions on Quality State Changes
This automation assigns an action item (to-do) to subscribers when the quality state on a fact sheet changes. This prompts subscribers, such as application and business owners, to review the changes in the audit log and reapply the quality seal.
The following image shows the logic of the automation.
Automation: Assigning an Action Item to Subscriptions on Quality State Changes
To configure the automation, follow these steps:
- Enter a name and select an owner for the automation. Optionally, enter a description.
- In the When section, specify the trigger for the automation:
- In the Fact Sheet Type list, select a fact sheet type.
- In the Event list, select Quality State changes to, then select a state (for example, Broken).
- In the If section, specify conditions for the automation:
- Include or ignore fact sheets that are updated by technical users.
- Optional: Add conditions to trigger the automation for: fact sheet category, assigned tags, or single-select field values.
- In the Then section, specify the action for the automation:
- Click Add Action, then select Create To-Do: Action Item.
- Enter a name for the action item and, optionally, a description.
- In the Assignee(s) list, select Fact Sheet subscriptions, then select subscription types and, if applicable, roles.
- In the Due (in days) field, enter the number of days indicating when the to-do item is due.
- Save the automation.
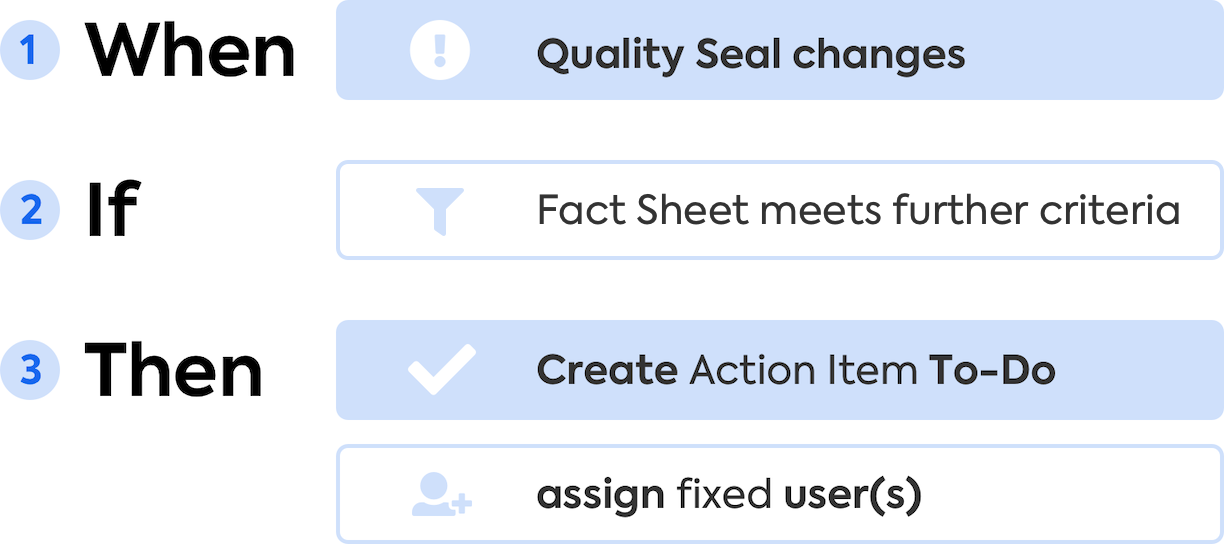
Assigning an Action Item to Specific Users on Quality State Changes
When the quality state changes, this automation assigns an action item (to-do) to fixed users, even if they're not subscribed to a fact sheet. This enables you to ensure that key users, such as enterprise architects or solution architects, are promptly notified when the quality seal on a mission-critical application is broken.
The following image shows the logic of the automation.
Automation: Assigning an Action Item to Specific Users on Quality State Changes
To configure the automation, follow these steps:
- Enter a name and select an owner for the automation. Optionally, enter a description.
- In the When section, specify the trigger for the automation:
- In the Fact Sheet Type list, select a fact sheet type.
- In the Event list, select Quality State changes to, then select a state (for example, Broken).
- In the If section, specify conditions for the automation:
- Include or ignore fact sheets that are updated by technical users.
- Optional: Add conditions to trigger the automation for: fact sheet category, assigned tags, or single-select field values.
- In the Then section, specify the action for the automation:
- Click Add Action, then select Create To-Do: Action Item.
- Enter a name for the action item and, optionally, a description.
- In the Assignee(s) list, select Users, then select users.
Instead of selecting a fixed list of users, you can use subscriptions from a fixed reference fact sheet of any type within the workspace. This could be a fact sheet of the organization type or a custom type representing team or organizational entities. This method minimizes manual maintenance and allows dynamic assignment. To implement this, in the Assignee(s) list, select Fixed Fact Sheet subscriptions, select a reference fact sheet, then select subscription types and roles. - In the Due (in days) field, enter the number of days indicating when the to-do item is due.
- Save the automation.
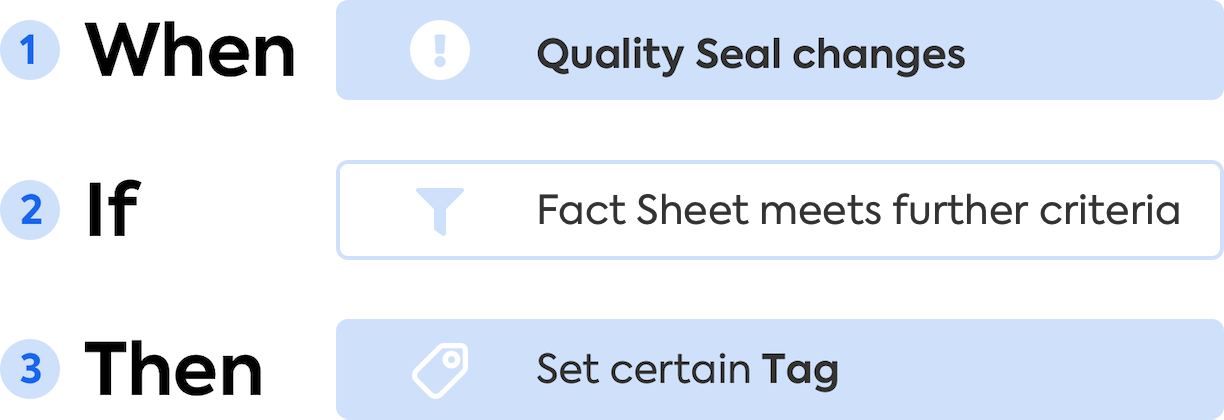
Adding a Tag or Setting a Single-Select Field Value on Quality Seal Changes
While the quality state is a standalone field on a fact sheet with various uses, associating a tag (from a designated single-select tag group with all states as tags) based on quality state changes can unlock additional opportunities. For example, it enables you to use these values in pie and bar charts with key performance indicators (KPIs).
Alternatively, you can use a single-select field for quality state changes.
The following image shows the logic of the automation.
Automation: Adding a Tag on Quality Seal Changes
In the following example, we add a tag and set a single-select field value on a fact sheet.
To configure the automation, follow these steps:
- Enter a name and select an owner for the automation. Optionally, enter a description.
- In the When section, specify the trigger for the automation:
- In the Fact Sheet Type list, select a fact sheet type.
- In the Event list, select Quality State changes to, then select a state (for example, Broken).
- In the If section, specify conditions for the automation:
- Include or ignore fact sheets that are updated by technical users.
- Optional: Add conditions to trigger the automation for: fact sheet category, assigned tags, or single-select field values.
- In the Then section, specify the action for the automation:
- Click Add Action, select Add tag, then select a tag to add to fact sheets.
- Click Add Action, select Set field, select a field, then select the field value to set on fact sheets.
- If needed, repeat the process to add more actions for tags and fields.
- Save the automation.
- Create automations for other quality states as described in this instruction. To streamline the process, you can copy an automation and make the necessary changes in the configuration.
Tag Added or Removed
This section provides use cases for automations where the triggering event is an added or removed tag.
Creating an Action Item for Subscriptions on Tag Addition or Removal
Tags are important for clustering and categorizing fact sheets. Changes to tags often necessitate actions from certain users. For example, when an "Eliminate" tag is added to an application, the application owner needs to follow a specific checklist. This automation assigns an action item (to-do) to fact sheet subscriptions, which ensures that users are notified and can take appropriate action.
The following image shows the logic of the automation.

Automation: Creating an Action Item for Subscriptions on Tag Addition or Removal
To configure the automation, follow these steps:
- Enter a name and select an owner for the automation. Optionally, enter a description.
- In the When section, specify the trigger for the automation:
- In the Fact Sheet Type list, select a fact sheet type.
- In the Event list, select Tag is added or Tag is removed, then select a tag.
- In the If section, specify conditions for the automation:
- Include or ignore fact sheets that are updated by technical users.
- Optional: Add conditions to trigger the automation for: fact sheet category, assigned tags, or single-select field values.
- In the Then section, specify the action for the automation:
- Click Add Action, then select Create To-Do: Action Item.
- Enter a name for the action item and, optionally, a description.
- In the Assignee(s) list, select Fact sheet subscriptions, then select subscription types and, if applicable, roles.
- In the Due (in days) field, enter the number of days indicating when the to-do item is due.
- Save the automation.
Creating an Action Item for Specific Users on Tag Addition or Removal
Tag changes often necessitate user action. For example, when an "Eliminate" tag is added to an application, enterprise architects should prepare for its retirement. This automation enables you to notify specific users with an action item (to-do).
The following image shows the logic of the automation.

Automation: Creating an Action Item for Specific Users on Tag Addition or Removal
To configure the automation, follow these steps:
- Enter a name and select an owner for the automation. Optionally, enter a description.
- In the When section, specify the trigger for the automation:
- In the Fact Sheet Type list, select a fact sheet type.
- In the Event list, select Tag is added or Tag is removed, then select a tag.
- In the If section, specify conditions for the automation:
- Include or ignore fact sheets that are updated by technical users.
- Optional: Add conditions to trigger the automation for: fact sheet category, assigned tags, or single-select field values.
- In the Then section, specify the action for the automation:
- Click Add Action, then select Create To-Do: Action Item.
- Enter a name for the action item and, optionally, a description.
- In the Assignee(s) list, select Users, then select users.
Instead of selecting a fixed list of users, you can use subscriptions from a fixed reference fact sheet of any type within the workspace. This could be a fact sheet of the organization type or a custom type representing team or organizational entities. This method minimizes manual maintenance and allows dynamic assignment. To implement this, in the Assignee(s) list, select Fixed Fact Sheet subscriptions, select a reference fact sheet, then select subscription types and roles. - In the Due (in days) field, enter the number of days indicating when the to-do item is due.
- Save the automation.
Adding a Subscription on Tag Addition or Removal
Certain tags may require higher visibility, such as the "Mission critical" tag on applications. As notifications about changes to fact sheets are typically sent to subscribers, it's beneficial to assign a primary responsible party, such as the Security Officer, as a subscriber to those fact sheets. This automation ensures that vital updates are promptly communicated to the appropriate party.
The following image shows the logic of the automation.

Automation: Adding a Subscription on Tag Addition or Removal
To configure the automation, follow these steps:
- Enter a name and select an owner for the automation. Optionally, enter a description.
- In the When section, specify the trigger for the automation:
- In the Fact Sheet Type list, select a fact sheet type.
- In the Event list, select Tag is added or Tag is removed, then select a tag.
- In the If section, specify conditions for the automation:
- Include or ignore fact sheets that are updated by technical users.
- Optional: Add conditions to trigger the automation for: fact sheet category, assigned tags, or single-select field values.
- In the Then section, specify the action for the automation:
- Click Add Action, then select Add subscription (or Set subscription).
- In the New Subscriber list, select User, then select a user.
- Select a subscription type and, if applicable, one or more subscription roles to apply.
- If needed, repeat the process to add more users.
- Save the automation.
Conditional Tagging
Tags can sometimes be interdependent. Using triggers on tag addition or removal, especially in combination with additional conditions, can help maintain data consistency in these scenarios. For example, when a tag from the "Region" tag group related to GDPR is applied, the "GDPR Relevant" tag can be automatically added. This automation eliminates the need to assign or remove tags based on other tags.
The following image shows the logic of the automation.

Automation: Adding a Tag on Tag Addition or Removal
To configure the automation, follow these steps:
- Enter a name and select an owner for the automation. Optionally, enter a description.
- In the When section, specify the trigger for the automation:
- In the Fact Sheet Type list, select a fact sheet type.
- In the Event list, select Tag is added (or Tag is removed), then select a tag.
- In the If section, specify conditions for the automation:
- Include or ignore fact sheets that are updated by technical users.
- Optional: Add conditions to trigger the automation for: fact sheet category, assigned tags, or single-select field values.
- In the Then section, specify the action for the automation:
- Click Add Action, select Add tag (or Remove tag), then select a tag.
- If needed, repeat the process to add more actions for tags.
- Save the automation.
Subscription Added or Removed
This section provides use cases for automations where the triggering event is an added or removed subscription.
Creating an Action Item for Subscriptions on Subscription Addition or Removal
Subscriptions play a crucial role in engaging users and collaborating on a fact sheet. Changes to subscriptions often necessitate action from other users. For example, if an Accountable or Responsible role is added or removed from an application, other subscribers need to ensure a replacement is found or understand why the person was removed. To facilitate this, you can create an automation to notify subscribed users with a to-do.
The following image shows the logic of the automation.

Automation: Creating an Action Item for Subscriptions on Subscription Addition or Removal
To configure the automation, follow these steps:
- Enter a name and select an owner for the automation. Optionally, enter a description.
- In the When section, specify the trigger for the automation:
- In the Fact Sheet Type list, select a fact sheet type.
- In the Event list, select Subscription is added (or Subscription is removed).
- Select a subscription type and, if applicable, subscription role.
- In the If section, specify conditions for the automation:
- Include or ignore fact sheets that are updated by technical users.
- Optional: Add conditions to trigger the automation for: fact sheet category, assigned tags, or single-select field values.
- In the Then section, specify the action for the automation:
- Click Add Action, then select Create To-Do: Action Item.
- Enter a name for the action item and, optionally, a description.
- In the Assignee(s) list, select Fact Sheet subscriptions.
- Select a subscription type and, if applicable, one or more subscription roles to assign the to-do item to.
- In the Due (in days) field, enter the number of days indicating when the to-do item is due.
- Save the automation.
Creating an Action Item for Fixed Users on Subscription Addition or Removal
Subscription changes often require attention from specific user groups. For example, when an Accountable user is removed from a fact sheet, it's important for enterprise architects to be informed. You can create an automation to notify specific users of subscription changes with a to-do.
The following image shows the logic of the automation.

Automation: Creating an Action Item for Fixed Users on Subscription Addition or Removal
To configure the automation, follow these steps:
- Enter a name and select an owner for the automation. Optionally, enter a description.
- In the When section, specify the trigger for the automation:
- In the Fact Sheet Type list, select a fact sheet type.
- In the Event list, select Subscription is added (or Subscription is removed).
- Select a subscription type and, if applicable, subscription role.
- In the If section, specify conditions for the automation:
- Include or ignore fact sheets that are updated by technical users.
- Optional: Add conditions to trigger the automation for: fact sheet category, assigned tags, or single-select field values.
- In the Then section, specify the action for the automation:
- Click Add Action, then select Create To-Do: Action Item.
- Enter a name for the action item and, optionally, a description.
- In the Assignee(s) list, select Users, then select users to assign the to-do item to.
Instead of selecting a fixed list of users, you can use subscriptions from a fixed reference fact sheet of any type within the workspace. This could be a fact sheet of the organization type or a custom type representing team or organizational entities. This method minimizes manual maintenance and allows dynamic assignment. To implement this, in the Assignee(s) list, select Fixed Fact Sheet subscriptions, select a reference fact sheet, then select subscription types and roles. - In the Due (in days) field, enter the number of days indicating when the to-do item is due.
- Save the automation.
Adding a Subscription on Subscription Addition or Removal
Certain subscription changes, especially removals, may require increased visibility, for example, when an Accountable or Responsible user is removed from applications marked as Mission critical. Since notifications about fact sheet changes are primarily sent to subscribers, it's beneficial to assign additional users, such as enterprise architects, as subscribers to these fact sheets. This ensures that subscribed users can monitor the situation and seek a replacement if necessary.
The following image shows the logic of the automation.

Automation: Adding a Subscription on Subscription Addition or Removal
To configure the automation, follow these steps:
- Enter a name and select an owner for the automation. Optionally, enter a description.
- In the When section, specify the trigger for the automation:
- In the Fact Sheet Type list, select a fact sheet type.
- In the Event list, select Subscription is added (or Subscription is removed).
- Select a subscription type and, if applicable, subscription role.
- In the If section, specify conditions for the automation:
- Include or ignore fact sheets that are updated by technical users.
- Optional: Add conditions to trigger the automation for: fact sheet category, assigned tags, or single-select field values.
- In the Then section, specify the action for the automation:
- Click Add Action, then select Add subscription (or Set subscription).
- In the New Subscriber list, select User, then select a user.
- Select a subscription type and, if applicable, one or more subscription roles to apply.
- If needed, repeat the process to add more users.
- Save the automation.
Tagging on Subscription Changes
As mentioned earlier, missing or removed subscriptions often require action. A practical way to draw attention to these fact sheets is by assigning a specific tag (for example, "Application Owner Missing") when a subscription is removed. This tagging system simplifies the process of filtering for these fact sheets, ensuring prompt attention.
The following image shows the logic of the automation.

Automation: Adding a Tag on Subscription Addition or Removal
To configure the automation, follow these steps:
- Enter a name and select an owner for the automation. Optionally, enter a description.
- In the When section, specify the trigger for the automation:
- In the Fact Sheet Type list, select a fact sheet type.
- In the Event list, select Subscription is added (or Subscription is removed).
- Select a subscription type and, if applicable, subscription role.
- In the If section, specify conditions for the automation:
- Include or ignore fact sheets that are updated by technical users.
- Optional: Add conditions to trigger the automation for: fact sheet category, assigned tags, or single-select field values.
- In the Then section, specify the action for the automation:
- Click Add Action, select Add tag (or Remove tag), then select a tag.
- If needed, repeat the process to add more actions for tags.
- Save the automation.
Best Practices and Use Cases for Automations with Webhooks
You can create automations where the action is sending a webhook to a target URL. To learn more, see Sending a Webhook from an Automation.
Follow these best practices:
- Before implementing an automation with a webhook, use a test target URL. You can use websites such as https://webhook.site/.
- Use an automation platform of your choice or any alternative method to process webhook payloads and initiate event-based actions. Here are example workflows that you can configure:
- Initiating calculations
- Updating fact sheet fields
- Sending notifications to users
- Initiating survey runs
- Creating and updating related fact sheets
- Managing user subscriptions on related fact sheets
- To retrieve and update your workspace data, use SAP LeanIX APIs. For more information, see SAP LeanIX APIs.
- If relevant, add a webhook action to existing automations to get event notifications.
The following examples are basic scenarios that you can use for reference as a starting point. Each use case includes an action that you should configure in your automation platform. For comprehensive instructions, refer to the documentation of your automation platform.
Sending Notifications on Quality State Changes
Whenever the Quality State field changes to Approved, notifications are sent to multiple stakeholders so that they could start the multi-stakeholder review process.
Set up an automation where the triggering event is Quality State changes to and the value is Approved. The action is to send a webhook to a target URL. On your automation platform, configure a process to receive this webhook and send a notification to multiple users, such as through the messenger that your organization uses.
Initiating a Survey Run when a Tag is Added
When a specific tag, such as Survey Required, is added to a fact sheet, a survey run is initiated. This can be useful for automatically gathering feedback or additional information when required.
Set up an automation where the triggering event is Tag is added. The action is sending a webhook to a target URL. On your automation platform, set up a process to receive this webhook and initiate a survey run. To initiate a survey run, make a POST request to the following endpoint:
https://{SUBDOMAIN}.leanix.net/services/poll/v2/pollRuns
Initiating Calculations on Lifecycle Phase Changes
You can calculate the anticipated resource allocation (such as manpower or financial resources) required for each application based on its lifecycle phase. For example, applications in the Plan or Phase in phase might require more resources due to the need for development or implementation, while applications in the Active phase might require less. Whenever the lifecycle phase changes, you can initiate an automation to calculate resources required for maintenance or decommissioning.
Create an automation where the triggering event is Lifecycle phase change, then select a specific phase. The action is to send a webhook to a target URL. On your automation platform, set up a process to receive this webhook and then calculate the resources required for each phase. Set up the calculation based on your requirements.
Initiating Calculations on Field Changes
You can set up a custom calculation, such as risk scores, on field changes. Create single-select fields for assessing risk scores, such as Data Sensitivity and Regulatory Compliance. The Data Sensitivity field could have options like Low, Medium, and High, and Regulatory Compliance could have options like Compliant, Partially Compliant, and Non-Compliant. Whenever the values of these fields change, a custom calculation of risk scores is initiated.
For example, you might assign a risk score of 1 for Low data sensitivity, 2 for Medium, and 3 for High. For Regulatory Compliance, Compliant could correspond to a risk score of 1, Partially Compliant to 2, and Non-Compliant to 3. The total risk score for an application could then be calculated as the sum of these two scores.
Create an automation where the triggering event is Field changes, then select specific fields and their values. The action is to send a webhook to a target URL. On your automation platform, set up a process to receive this webhook and then calculate the risk scores based on specific fields, such as Data Sensitivity and Regulatory Compliance. For example, if an application's Data Sensitivity changes from Low to High, the webhook would trigger a recalculation of the risk score, increasing it from 1 to 3. Similarly, if Regulatory Compliance changes from Compliant to Non-Compliant, the risk score would increase from 1 to 3.
Updated about 2 months ago