
Notifications Center
Configure notification settings for your workspace.
Overview
In the Notifications Center section of the admin area, admin users can configure default notification settings for the workspace, defining how users get notified of workspace events.
The Notifications Center allows administrators to configure how the users of a workspace will receive notifications:
- It allows to completely disable all notifications or certain channels
- It allows to mute notifications triggered due to changes by technical users
- It allows configuring, which topics users of the workspace may receive
- By completely disabling certain topics
- By enforcing certain topics to be received by all users
- By limiting certain topics to only have some of the available options (never, instantly, daily, weekly)
- It allows to setup & test of custom configuration for the E-Mail channel
- Workspace branding to be used for the default header & footer
- Custom header & footer (HTML)
- Custom SMTP server
- It allows to setup & test of custom configuration for the Microsoft Teams channel
- Setup Bot & Microsoft Teams tenant ID
- It offers an Audit Log that allows seeing which notifications have been sent recently
Users can customize their individual notification preferences in the Notifications section of their user settings. For more information, see Notifications.
Notification Channels
The following notification channels are available:
- Email: Users receive notifications at the email addresses linked to their SAP LeanIX accounts. This is the primary notification channel. For more details, see Configuring the E-mail Channel.
- Microsoft Teams: If the integration with Microsoft Teams is configured for a workspace, users can receive notifications there. For more details, see SAP LeanIX App for Microsoft Teams.
On the Channels tab of the Notifications Center page, you can navigate to a channel's configuration by clicking Edit Settings. You can enable or disable notifications from individual channels or both for all workspace users by using toggles. You can also mute notifications triggered by technical users, preventing alerts for actions related to events in your integrations.

Notifications Center in the Admin Area
Configuring the E-Mail Channel
If you choose to configure the E-Mail Channel, you will see three new tabs: Workspace Notifications, Account Email Template, and Account SMTP Configuration.
Workspace Notifications
The Workspace Notifications tab allows you to see different domains & topics that you can subscribe to on a certain workspace. Any change done on this screen will only affect the workspace you are currently in.
The administrator can configure for each topic, which options the users of the workspace can choose from for the Frequency of the notification (Never, Instant, Daily, Weekly) and which of these options should be the Default for new users that did not choose one explicitly.

By disabling all options but Never, the administrator can completely disable a topic. Similarly, they can enforce notifications for specific topics by only choosing the option Instant.
Fact Sheet Update Details
Under the Fact Sheets topic, you will be able to opt-in for showing details in Fact Sheet update notifications. Once this is enabled, the users of your workspace that have subscribed to Fact Sheet updated notifications on Email will see which field has changed on the Fact Sheet and the content of what has changed.
Note
The following changes on fact sheets don't trigger any notifications:
- Modifying a field on a fact sheet relation
- Adding or removing a tag

Customizing the Email Template
On the Account Email Template tab, you can customize the email template used for automated email notifications.
Note
The email template configuration applies on the account level across all of your organization’s workspaces.
Before saving changes to the email template, we recommend sending a test email to your email address by clicking Send test. If the Enable custom e-mail header and footer checkbox is deselected, the test email is sent without the custom header a footer. If the test email appears as expected, you can save the changes by clicking Save. This applies the email template to all of your organization’s workspaces.
Selecting the Email Template Design
In the Pre-defined Design section, select a workspace to apply its branding theme to the email template. If no workspace is selected, the default template is used. You can also adjust display settings for images.
Customizing the Email Header and Footer
To set a custom email header and footer, in the HTML Template section, select the Enable custom e-mail header and footer checkbox, then insert HTML code for the header and footer. Before applying the changes, send a test email to your email address by clicking Send test.
The following elements are supported:
- Standard HTML elements: You can use standard HTML elements to customize the look and feel of the template.
- Images: You can include images using standard HTML syntax. If the image source is unknown, users may need to allow images from unknown sources in their email client to view the image.
Base64-encoded images are also supported. However, we don’t recommend using them because some email clients may automatically block them due to security concerns. Additionally, such images can significantly increase the size of the email. - Placeholders: You can include the following placeholders:
{{recipient}}: This placeholder will be replaced with the recipient's display name (first and last name).{{email}}: This placeholder will be replaced with the recipient's email address.
The following example shows a custom email header and footer.
Example HTML header:
<div style="background-color:#002A86;color:white;padding:10px;">
  <h2 style="text-align:center;">Example Header</h2>
</div>
Example HTML footer:
<div style="background-color:#f2f2f2;padding:10px;">
  <p style="color:#002A86;font-weight:bold;">Your Company Name</p>
  <form action="https://www.yourcompanywebsite.com">
    <input type="submit" style="background-color:#002A86;color:white;" value="Visit Our Website">
  </form>
    <p>For any inquiries or support, please contact the workspace admin at [email protected]</p>
</div>
The following image illustrates how the example header and footer are rendered.
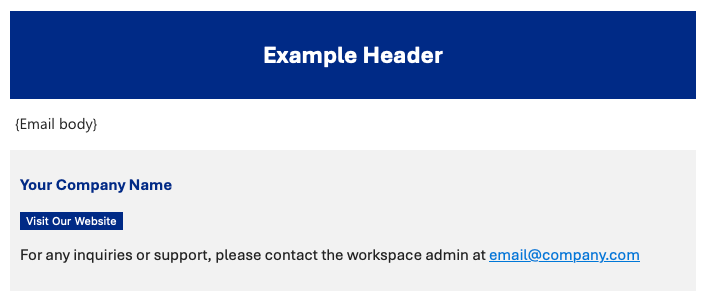
Email with a Custom Header and Footer
Setting Up a Custom SMTP Server for Email Delivery
On the Account SMTP Configuration tab, you can set up configuration to use a custom Simple Mail Transfer Protocol (SMTP) server instead of the default SAP LeanIX mail service. SMTP is an internet standard for email transmission across IP networks.
The SMTP protocol, in our implementation, supports the STARTTLS extension and is compatible with the TLS protocol up to version 1.2.
Note
The SMTP configuration applies on the account level across all of your organization’s workspaces.
Authentication
Authentication is supported through a username and password, allowing the following methods: PLAIN (as per the standards outlined in RFC 4616) and LOGIN. If both authentication methods are supported by the SMTP server, the most appropriate one is determined and used, in the following order:
- PLAIN
- LOGIN
SMTP Configuration
Provide the following details for the SMTP server:
- Host: The hostname or IP address of your SMTP server.
- Port: The port number your SMTP server uses for outgoing mail. Common ports include 25, 465, and 587.
- Username and Password: The credentials required to authenticate with your SMTP server.
- Sender Display Name: The name that will appear in the "From" field in emails.
- Sender Email: The email address that will appear in the "From" field in emails.
Before activating the configuration, we recommend sending a test email to your email address to verify the SMTP settings. To do that, click Test SMTP Configuration. If the test is successful, it indicates that the SMTP server can send emails with the provided configuration.
To activate the configuration, select the Activate checkbox, then click Save. This applies the SMTP configuration to all of your organization’s workspaces.
Note
If you're using a Microsoft Office 365 mail server, ensure that you activated authenticated client SMTP submission in your Microsoft 365 admin center. For more information, refer to the Microsoft documentation.
Blocked Email Addresses
Information
This section does not apply if you have an active Account SMTP Configuration

The Blocked Users tab allows you to identify which email addresses are currently on the blocked list. This list is maintained to protect our email sender's reputation. If an email delivery failed with a permanent error (e.g. a mistyped / non-existent email, a non-existent destination server), the email address will be blocked. Trying to send emails to addresses that are known to result in an error, hurts our mail reputation, which can lead to Emails being classified as spam by the mail server.
If you find an email address on the block list, which you know to be working and want to remove it from the list, please contact our support.
Configuring the Microsoft Teams Channel
If you choose to configure the Microsoft Teams channel, you will see three new tabs: Workspace Notifications and Account Microsoft Teams Configuration and Teams Users.
Workspace Notifications
The Workspace Notifications tab allows you to see different domains & topics that you can subscribe to on a certain workspace. Any change done on this screen will only affect the workspace you are currently in.
The administrator can configure for each topic which options the users of the workspace can choose from for the Frequency of the notification (Never, Instant) and which of these options should be the Default for new users that did not choose one explicitly.

By disabling all options but Never, the administrator can completely disable a topic. Similarly, the administrator can enforce notifications for certain topics by only choosing the option Instant.
Fact Sheet Update Details
Equivalent to the Email channel you will be able to opt-in for showing details in Fact Sheet update notifications on Microsoft Teams. Once this is enabled, the users of your workspace that have subscribed to Fact Sheet updated notifications on Microsoft Teams will see which field has changed on the Fact Sheet, as well as the content of what has changed.
Note
The following changes on fact sheets don't trigger any notifications:
- Modifying a field on a fact sheet relation
- Adding or removing a tag

Audit Log
On the Audit Log tab, you can view event logs for notifications. The log includes entries for the last 14 days.
The following table lists possible notification statuses for specific delivery channels.
| Status | Channel | Description |
|---|---|---|
| Bot disabled by admin | Microsoft Teams | The admin of the SAP LeanIX Microsoft Teams app blocked the app for all users. |
| Chat blocked by user | Microsoft Teams | The user blocked the chat for the SAP LeanIX Microsoft Teams app. |
| Considered spam | As reported by our email provider, the email was considered spam. | |
| Deferred | The delivery of the email was temporarily delayed by the SAP LeanIX email provider. This could happen for various reasons, such as the system endpoint being unavailable or the recipient's server being busy. | |
| Failed | This status is assigned in the following cases: - As reported by our email provider, the delivery attempt was unsuccessful. In the case of a direct SMTP connection, an error was returned by the SMTP server. - If we have not received any final status from our email provider after a period of 24 hours, the message initially marked as Sending is automatically updated to Failed. | |
| Failed | Microsoft Teams | The message delivery failed due to an error. |
| Pending | - Email - Microsoft Teams | The message is scheduled to be sent. |
| Sending | The email was transferred to the SAP LeanIX email provider for delivery, but we have not yet received a confirmation regarding the successful delivery of the email to the recipient. It's possible that the email was already delivered to the recipient, but the updated status is not visible through our email provider. | |
| Sent | As reported by our email provider, the email was successfully delivered to the recipient. In the case of a direct SMTP connection, this status means that we received a successful response from the SMTP server confirming the delivery. | |
| Sent | Microsoft Teams | The message was successfully sent through the Microsoft Teams API. |
| Unknown | - Email - Microsoft Teams | The information about the delivery status of the message is unavailable. |
Disabling All Notifications for Your Organization
If needed, you can disable notifications for all your organization's workspaces. To do that, on the Account Level Settings tab, select the Disable all account notifications checkbox.
Updated 24 days ago