Fact Sheet Relations
Relations represent connections between different fact sheets. Learn how to configure basic and advanced relations.
Overview
Fact sheet relations represent the connections or relationships between different fact sheets, showing how they interact or relate to each other.
In the standard meta model configuration, relations between certain fact sheet types are predefined. To get an overview of the meta model and fact sheet relations, see Meta Model.
The relation key reflects the direction of the relation, for example:
relApplicationToITComponent: Relation from an application to an IT component.relITComponentToApplication: Relation from an IT component to an application.
You can create or delete relations to adjust the meta model configuration to your organization’s needs.
Relation Multiplicity
Relation multiplicity determines the number of fact sheets that can be linked on both ends of a relation. Once set, the multiplicity on custom relations cannot be changed. Similarly, the multiplicity on predefined relations cannot be changed.
The following relation multiplicities are available:
- Many to many: Multiple fact sheets can link to multiple others. This multiplicity allows creating a complex network of relations.
- One to many: A single fact sheet can link to multiple others. This highlights the importance of a single fact sheet that is relevant to numerous others.
- Many to one: Multiple fact sheets can link to a single one. This multiplicity is the reverse of the One to many multiplicity.
- One to one: One fact sheet directly links to only one other. It's a direct and exclusive connection between two fact sheets, indicating a unique relationship where changes to one may directly impact the other.
Managing Relations
You can create and delete relations as needed to adjust the meta model to your needs.
Adding a Custom Relation
In addition to predefined relations, you can create custom relations between fact sheet types. If you configured custom fact sheet types, establishing relations with existing fact sheets enables you to define necessary dependencies, ensuring accurate representation of the data being modeled.
To create a relation, follow these steps:
-
In the administration area, navigate to the Meta Model Configuration section, then select a fact sheet type.
-
On the fact sheet configuration page, select a section or subsection, then click Add relation.

Adding a Relation
-
On the right-side panel, configure the relation.
- Select a target fact sheet type.
If a relation between fact sheet types already exists, provide a descriptor to distinguish the new relation from the existing one. The descriptor is added to the relation key. Use a meaningful descriptor showing the nature of the new relation. This is especially relevant when working with fact sheets through the API.
If a relation between fact sheet types doesn’t exist, the descriptor is optional. - Select the relation multiplicity. For more information, see Relation Multiplicity.
- Select a section on the target fact sheet where the relation will appear.
- Decide whether you want to make the relation visible by switching the Visible toggle on or off.
- To show relations grouped by fact sheet subtype on a fact sheet, enable the corresponding toggle.
- Select a target fact sheet type.
-
Save the changes.
Deleting a Relation
If a relation becomes obsolete, you can delete it. To do that, select a relation, click Delete on the right-side panel, confirm your action, then save the changes.
Caution
When you delete a relation, this also removes all associated data from both sides of the relation. This action is irreversible. To prevent any potential disruptions or negative experiences for workspace users, consider deleting relations outside of regular business hours.
The following relations cannot be deleted:
- The relation includes all fact sheet types as its target, such as in a parent-child relation.
- The relation is a constraining relation or is constrained by another relation.
- The relation is part of a naming rule for a fact sheet type. Naming rules, which may be predefined in the meta model configuration, define how the display name of a fact sheet is formed.
Fields on Relations
Fields on relations serve as attributes that provide additional information about the relation between two fact sheets.
To create a field on a relation, on the fact sheet configuration page, select a subsection representing a relation, click Add field, then configure the field and save the changes.
Self-Referencing Relations
Self-referencing relations enable you to create relations between fact sheets of the same type. These relations work like regular relations between fact sheets, with the exception that both ends of the relation target the same fact sheet type.
When you create a self-referencing relation, two subsections are generated on a fact sheet to represent both ends of the relation. Like with regular relations, you can create fields on self-referencing relations.
With self-referencing relations, you can create relations between subtypes of the same fact sheet type, for example, between business applications and deployments, which are subtypes of the application fact sheet. After you’ve created a self-referencing relation, make the relation conditional by using conditional attributes. This allows you to ensure that only the relevant relation appears on a specific fact sheet subtype. For more information, see Creating a Conditional Relation Between Subtypes of the Same Fact Sheet Type.
Creating a Self-Referencing Relation
Follow these steps:
-
In the Meta Model Configuration section of the administration area, select a fact sheet type. If needed, select a subtype to create a relation for.
-
On the fact sheet configuration page, select a section, then click Add relation.
-
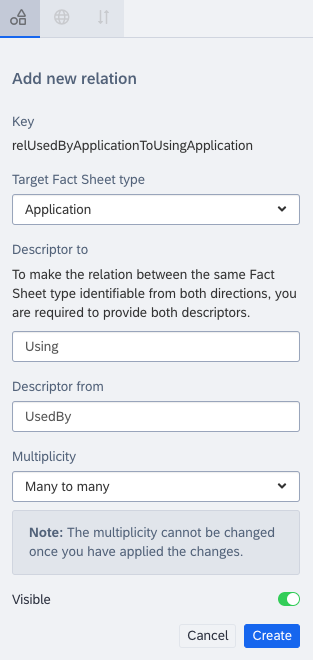
In the sidebar, in the Target Fact Sheet type list, select the same fact sheet as the target for the relation. As an example, we’re creating a self-referencing relation for application fact sheets.
-
Identify the relation from both directions by entering descriptors in the Descriptor to and Descriptor from fields. These descriptors form part of the unique identifiers (keys) for the relation. Descriptive names help users differentiate between the two sides of the relation when working with fact sheets through the API.
For example, ifUsingandUsedByare the descriptors, the keys representing both sides of the relation appear as follows:relUsedByApplicationToUsingApplicationrelUsingApplicationToUsedByApplication
-
Adjust other relation settings, then save the changes.

Creating a Self-Referencing Relation for the Application Fact Sheet
A self-referencing relation generates two new subsections on a fact sheet, representing both ends of the relation. Each end of the relation has a unique identifier (key).
The translations for both ends of the relation are prefixed with the descriptors you provide. You can move subsections within a fact sheet and edit translations independently.

Subsections on a Fact Sheet Representing a Self-Referencing Relation
Conditional Relations Between Fact Sheet Subtypes
You can create a relation between specific fact sheet subtypes by using conditional relations. To learn more about conditional attributes, see Conditional Attributes.
In this section, you'll learn how to create a conditional relation between:
- Subtypes of different fact sheet types
- Subtypes of the same fact sheet type
Creating a Conditional Relation Between Subtypes of Different Fact Sheet Types
Because relations between base fact sheet types are available in the meta model by default, you don’t need to create them. You only need to make the relation conditional on both ends for specific subtypes.
Follow these steps:
-
Create a conditional relation on the source fact sheet.
-
In the meta model configuration, select a fact sheet, then navigate to the Conditional Attributes tab.
-
Click Add New Condition.
-
In the When filling out this field list, select Subtype.
-
In the If the value selected is list, select a fact sheet subtype.
-
In the Then display these attributes list, select a fact sheet type to link to. You will select a specific subtype when creating a conditional relation on the second fact sheet.
-
Save the condition by clicking the checkmark icon.
The following image shows a conditional attribute for the team subtype on the organization fact sheet and the business context fact sheet.

Conditional Attribute for the Team Fact Sheet Subtype and the Business Context Fact Sheet
-
-
Create a conditional relation on the target fact sheet.
-
In the meta model configuration, select a fact sheet, then navigate to the Conditional Attributes tab.
-
Click Add New Condition.
-
In the When filling out this field list, select Subtype.
-
In the If the value selected is list, select a fact sheet subtype.
-
In the Then display these attributes list, select a fact sheet type for which you’ve created a conditional relation in the previous step.
-
Save the condition by clicking the checkmark icon.
The following image shows a conditional attribute for the business product subtype on the business context fact sheet and the organization fact sheet.

Conditional Attribute for the Business Product Fact Sheet Subtype and the Organization Fact Sheet
-
A conditional relation is created. When you create a new fact sheet of a specific subtype, you can link it to the corresponding fact sheet subtypes. In the example, we created a relation between the following subtypes:
- Team subtype on the organization fact sheet
- Business product subtype on the business context fact sheet
Creating a Conditional Relation Between Subtypes of the Same Fact Sheet Type
You can create a conditional relation between subtypes of the same fact sheet type, for example, between business applications and deployments, which are subtypes of the application fact sheet. A relation between subtypes of the same fact sheet type is known as a self-referencing relation.
To learn how to create fact sheet subtypes, see Fact Sheet Subtype Management.
To view fact sheet subtypes recommended for the meta model v4, see Add Fact Sheet Subtypes to Several Fact Sheet Types.
Follow these steps:
-
Create a self-referencing relation between fact sheet subtypes. For details, see Self-Referencing Relations. Use meaningful names for descriptors to reflect the subtype names. For example, if
BusinessAppandDeploymentare the descriptors, the keys representing both sides of the relation appear as follows:relBusinessAppApplicationToDeploymentApplicationrelDeploymentApplicationToBusinessAppApplication
-
Make the self-referencing relation conditional on one end:
- On the fact sheet configuration page, navigate to the Conditional Attributes tab.
- Click Add New Condition.
- In the When filling out this field list, select Subtype.
- In the If the value selected is list, select a fact sheet subtype, for example, business application.
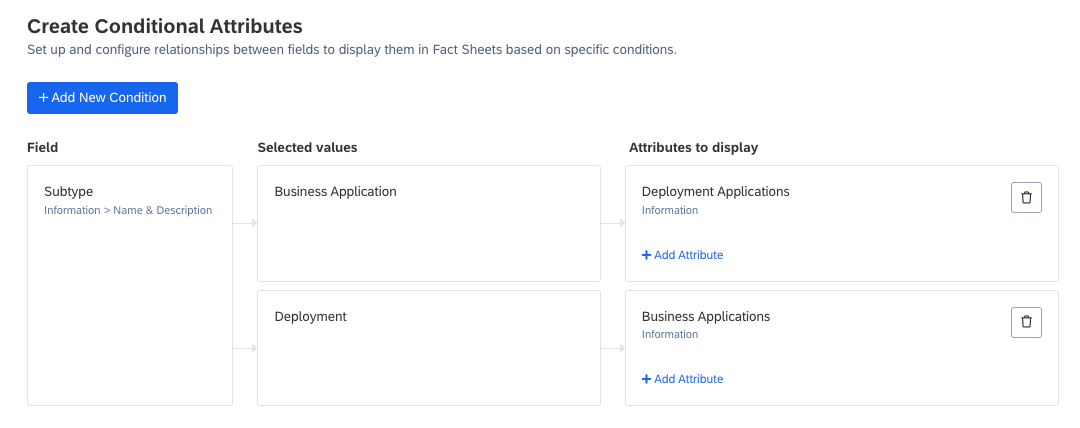
- In the Then display these attributes list, under Relations, select a fact sheet subtype for which you’ve created a self-referencing relation, for example, deployment.
- Save the condition by clicking the checkmark button.
-
Make the self-referencing relation conditional on another end:
-
Still on the Conditional Attributes tab, click Add New Condition.
-
In the When filling out this field list, select Subtype.
-
In the If the value selected is list, select a fact sheet subtype that represents another end of the relation, for example, deployment.
-
In the Then display these attributes list, under Relations, select the corresponding subtype, for example, business application.
-
Save the condition by clicking the checkmark button.
The following image illustrates two conditions for a self-referencing relation.

Self-Referencing Relation Between Two Subtypes of the Same Fact Sheet Type
-
Once you’ve created a conditional relation between two fact sheet subtypes, you can follow the same steps to create relations between other subtypes.
Updated 3 months ago
