
Virtual Workspaces Configuration
Set up virtual workspaces to manage access for custom user groups
Prerequisites
Virtual workspaces only work with SSO configured for your SAP LeanIX:
- Make sure that users are authenticated via SSO from your IdP, meaning the access to SAP LeanIX is managed by your IdP.
- Make sure that users are authorized via SSO, meaning your IdP sends the user roles (viewer, member, admin).
- Make sure you can add attributes to the SSO configuration. You need to be able to do this in later steps of the configuration. If you are not able to do this, reach out to the administrator of your IdP for the configuration.
To learn more, see Single Sign-On.
Step 1: Define User Groups for Access Control
It is important to have a solid concept of your user groups. Keep it as simple as possible to also keep the maintenance of the access control easy. It can help to draw a diagram to get an overview and leave out unnecessary details.
- List your access control entities that will be represented by virtual workspaces.
- Group your users and assign the required access control entities.
- Define which user groups need read and/or write access to which fact sheets.
Step 2: Create Access Control Entities in SAP LeanIX
Configure access control entities in SAP LeanIX.
-
Navigate to Administration > Access Control.
-
Choose Add Entity.
-
Enter an access control entity ID in uppercase letters with no space. Underscores are allowed.
Each attribute value must match theentryACIvalue configured in your IdP. For example, the access control value ID valueFINANCE_DEPTmatches theentryACIvalueFINANCE_DEPT.
-
Enter a Display name.
For example:Finance
The display name is visible in SAP LeanIX when assigning access control entities manually. -
In the Description field, give more details as necessary to make the maintenance of access control entities easier in the future.
-
Repeat to add more access control entities.
Step 3: Update the SSO Configuration with the Access Control Attribute
In the SSO configuration, you need to add a new attribute. You do this in your IdP, for example Okta, Entra ID, or similar. The exact steps depend on your IdP. In general, access control is configured in a similar way that you assign roles. To learn more, see Single Sign-On.
- In your IdP, create the Active Directory (AD) groups for the assignment of access control entities. Add users to the AD groups.
- In the IdP, navigate to the SSO configuration for your SAP LeanIX application.
- Add the new attribute
entryACI. - Assign the
entryACIvalues to the corresponding AD user groups.
Ensure the attribute value is uppercase with no spaces. Underscores are allowed.
Each attribute value must match the access control entity ID configured in SAP LeanIX. For example, theentryACIvalueFINANCE_DEPTmatches the access control entity IDFINANCE_DEPT. - Verify that the IdP sends the the correct
entryACIvalue to SAP LeanIX.
Use one of the following options to test theentryACIvalues:- Recommended: Check the Session Details
As this option is more precise it is recommended especially for troubleshooting. - Check the Profile Details
- Recommended: Check the Session Details
Check the Session Details
-
Choose a (test) user that has specific user group assignments or put your own user into the AD user groups.
-
Open an incognito browser window and log in to SAP LeanIX.
-
Open a new tab and open the following link, replacing the placeholder with your subdomain:
https://{SUBDOMAIN}.leanix.net/Shibboleth.sso/Session
If the SSO configuration was successful, the access control entities are visible.
Check the Profile Details
- Choose a (test) user that has specific user group assignments or put your own user into the AD user groups.
- Open an incognito browser window and log in to SAP LeanIX.
- Select the profile icon.
If the SSO configuration was successful, the access control entities are visible.

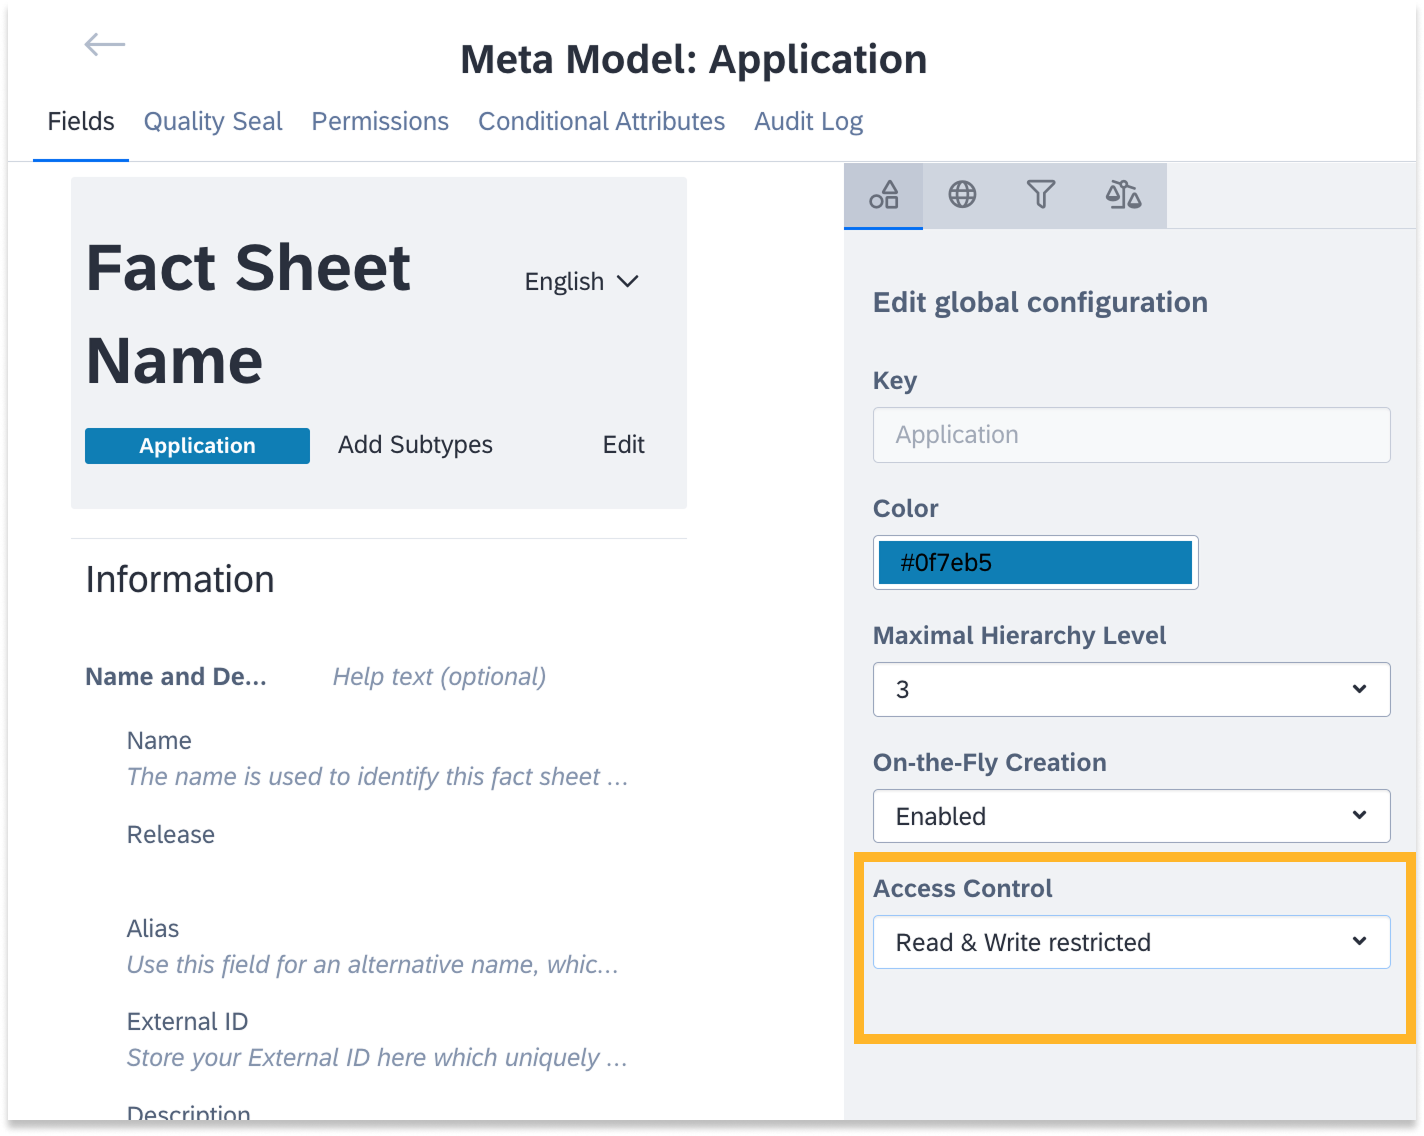
Step 4: Configure Global Read/Write Settings for New Fact Sheets
Configuring the global access settings reduces maintenance in the future. New fact sheets are automatically created with the correct access settings.
Example: How do the global access settings work?
Let’s look at the global settings with a small example.
A member with the access control entities “Finance” and region “AMER” creates a new fact sheet. This is how the access settings for new fact sheets will be populated:
- Global unrestricted
The fact sheet is visible to all users from all workspaces. Editing is possible for all users with the member role. - Read & Write restricted
The fact sheet is automatically restricted to “Finance” and region “AMER” users. All members with these access control entities can edit the fact sheet. - Write restricted
The fact sheet is visible to all users from all workspaces.
Editing is automatically restricted to “Finance” and region “AMER” members.
Note
The global access setting does not apply for users with the admin role.
Admins can always see all fact sheets and configure all access settings. Therefore, fact sheets created by an admin cannot be populated with access control information.
Admins always have to select the access settings when creating a new fact sheet. Otherwise the fact sheet is accessible to everyone across all virtual workspaces.
-
In SAP LeanIX, navigate to Administration > Meta Model Configuration.
-
Choose a fact sheet type.
-
Choose Edit.
-
In the configuration, choose your preferred setting from the Access Control dropdown.
Step 5:Assign Access Control to Existing Fact Sheets
Assigning Access Control Entities Through Import
It’s best to use the import option to assign the access control entities in bulk for a large number of existing fact sheets. To learn more, see Importing Fact Sheet Data Through Excel File.
-
Navigate to the Inventory.
-
Change to the table view.
-
Select the columns for Read access and Write access.

-
Export the Excel file.
-
In the Excel file, add the access control entities for each fact sheet.
You can add more than one access control entity per fact sheet.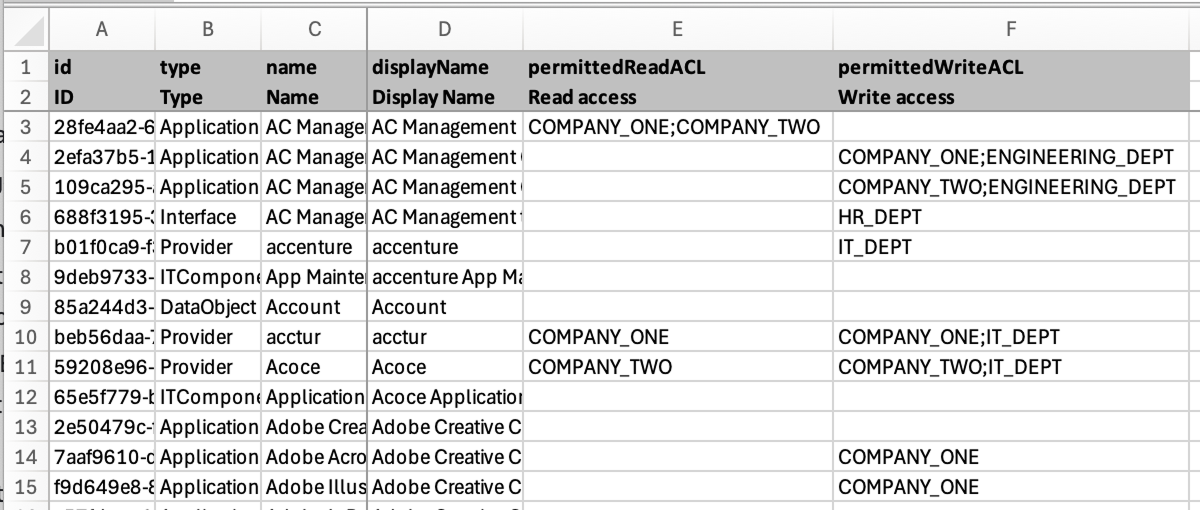
-
Import the updated Excel file.
Assigning Access Control Entities in the Inventory Table View
The table view of the inventory offers an overview of access permissions. In the table, you have quick access to a dropdown to configure access control entities for each fact sheet and easily navigate between fact sheets.
-
Navigate to the Inventory.
-
Change to the table view.
-
Select the columns for Read access and Write access.

-
Choose Edit.
-
Choose a field with Read access or Write access and start typing.
The available access control entities are displayed in a dropdown. You can add more than one access control entity for each fact sheet.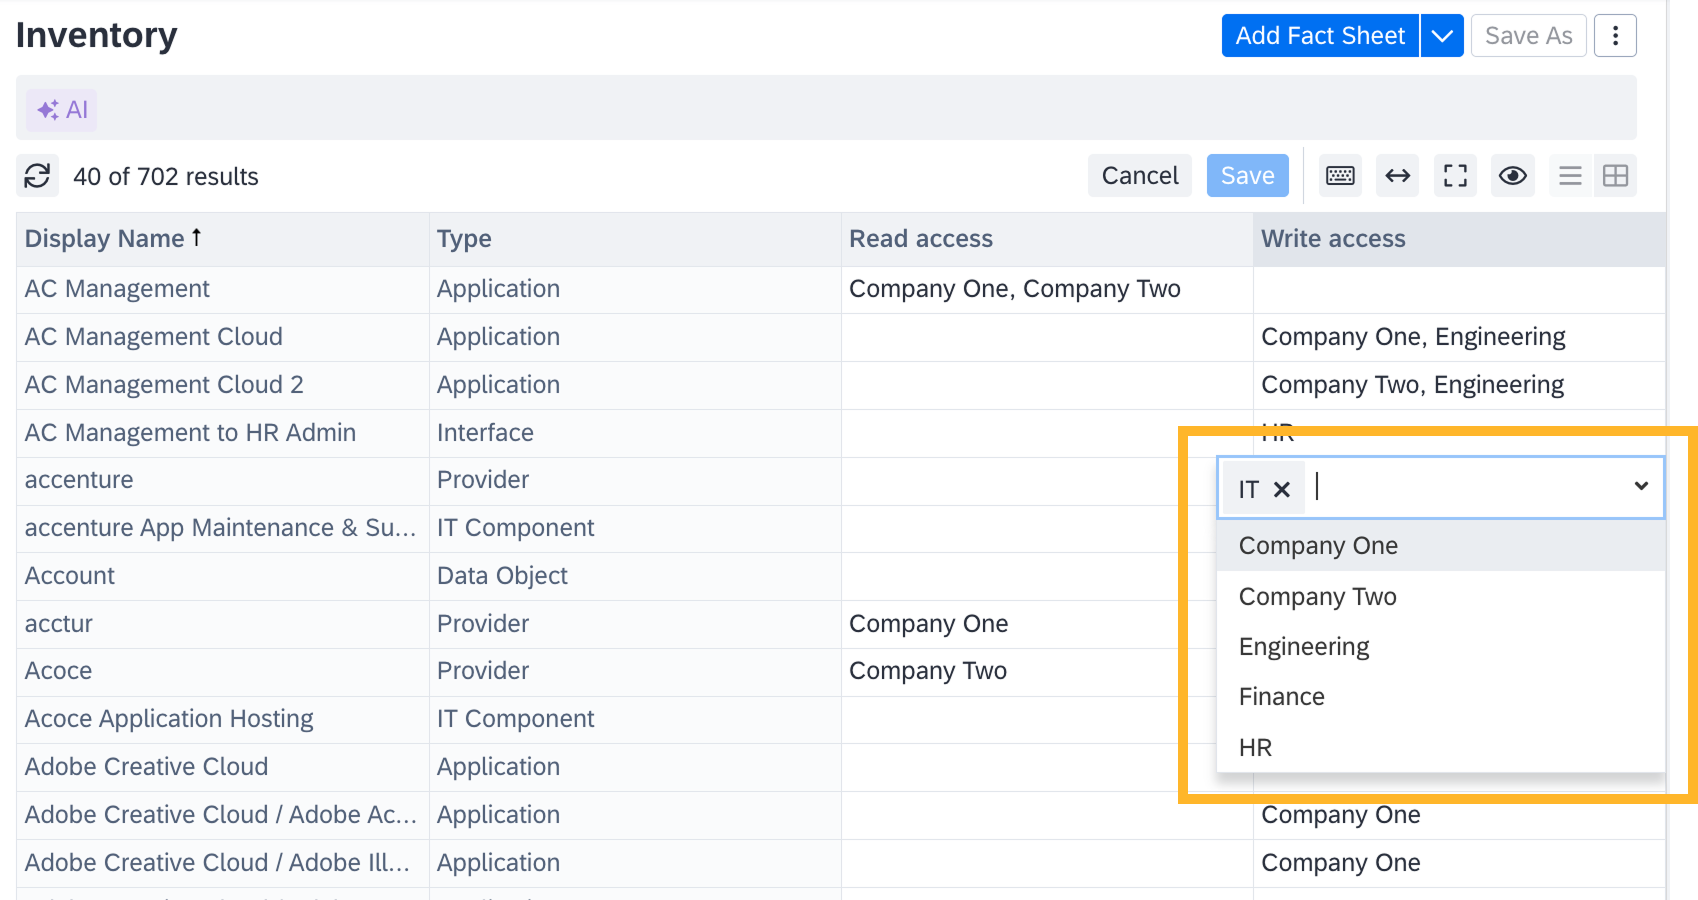
-
Update all required fact sheets manually.
-
Choose Save.
Assigning Access Control Entities for a Single Fact Sheet
You can update the access permissions directly in the fact sheet settings.
-
Navigate to the fact sheet.
-
On the Fact Sheet tab, go to the Access Control List (optional) section.
-
Choose Edit.
-
Choose a field with Read access or Write access.
The available access control entities are displayed in a dropdown. You can add more than one access control entity for each fact sheet.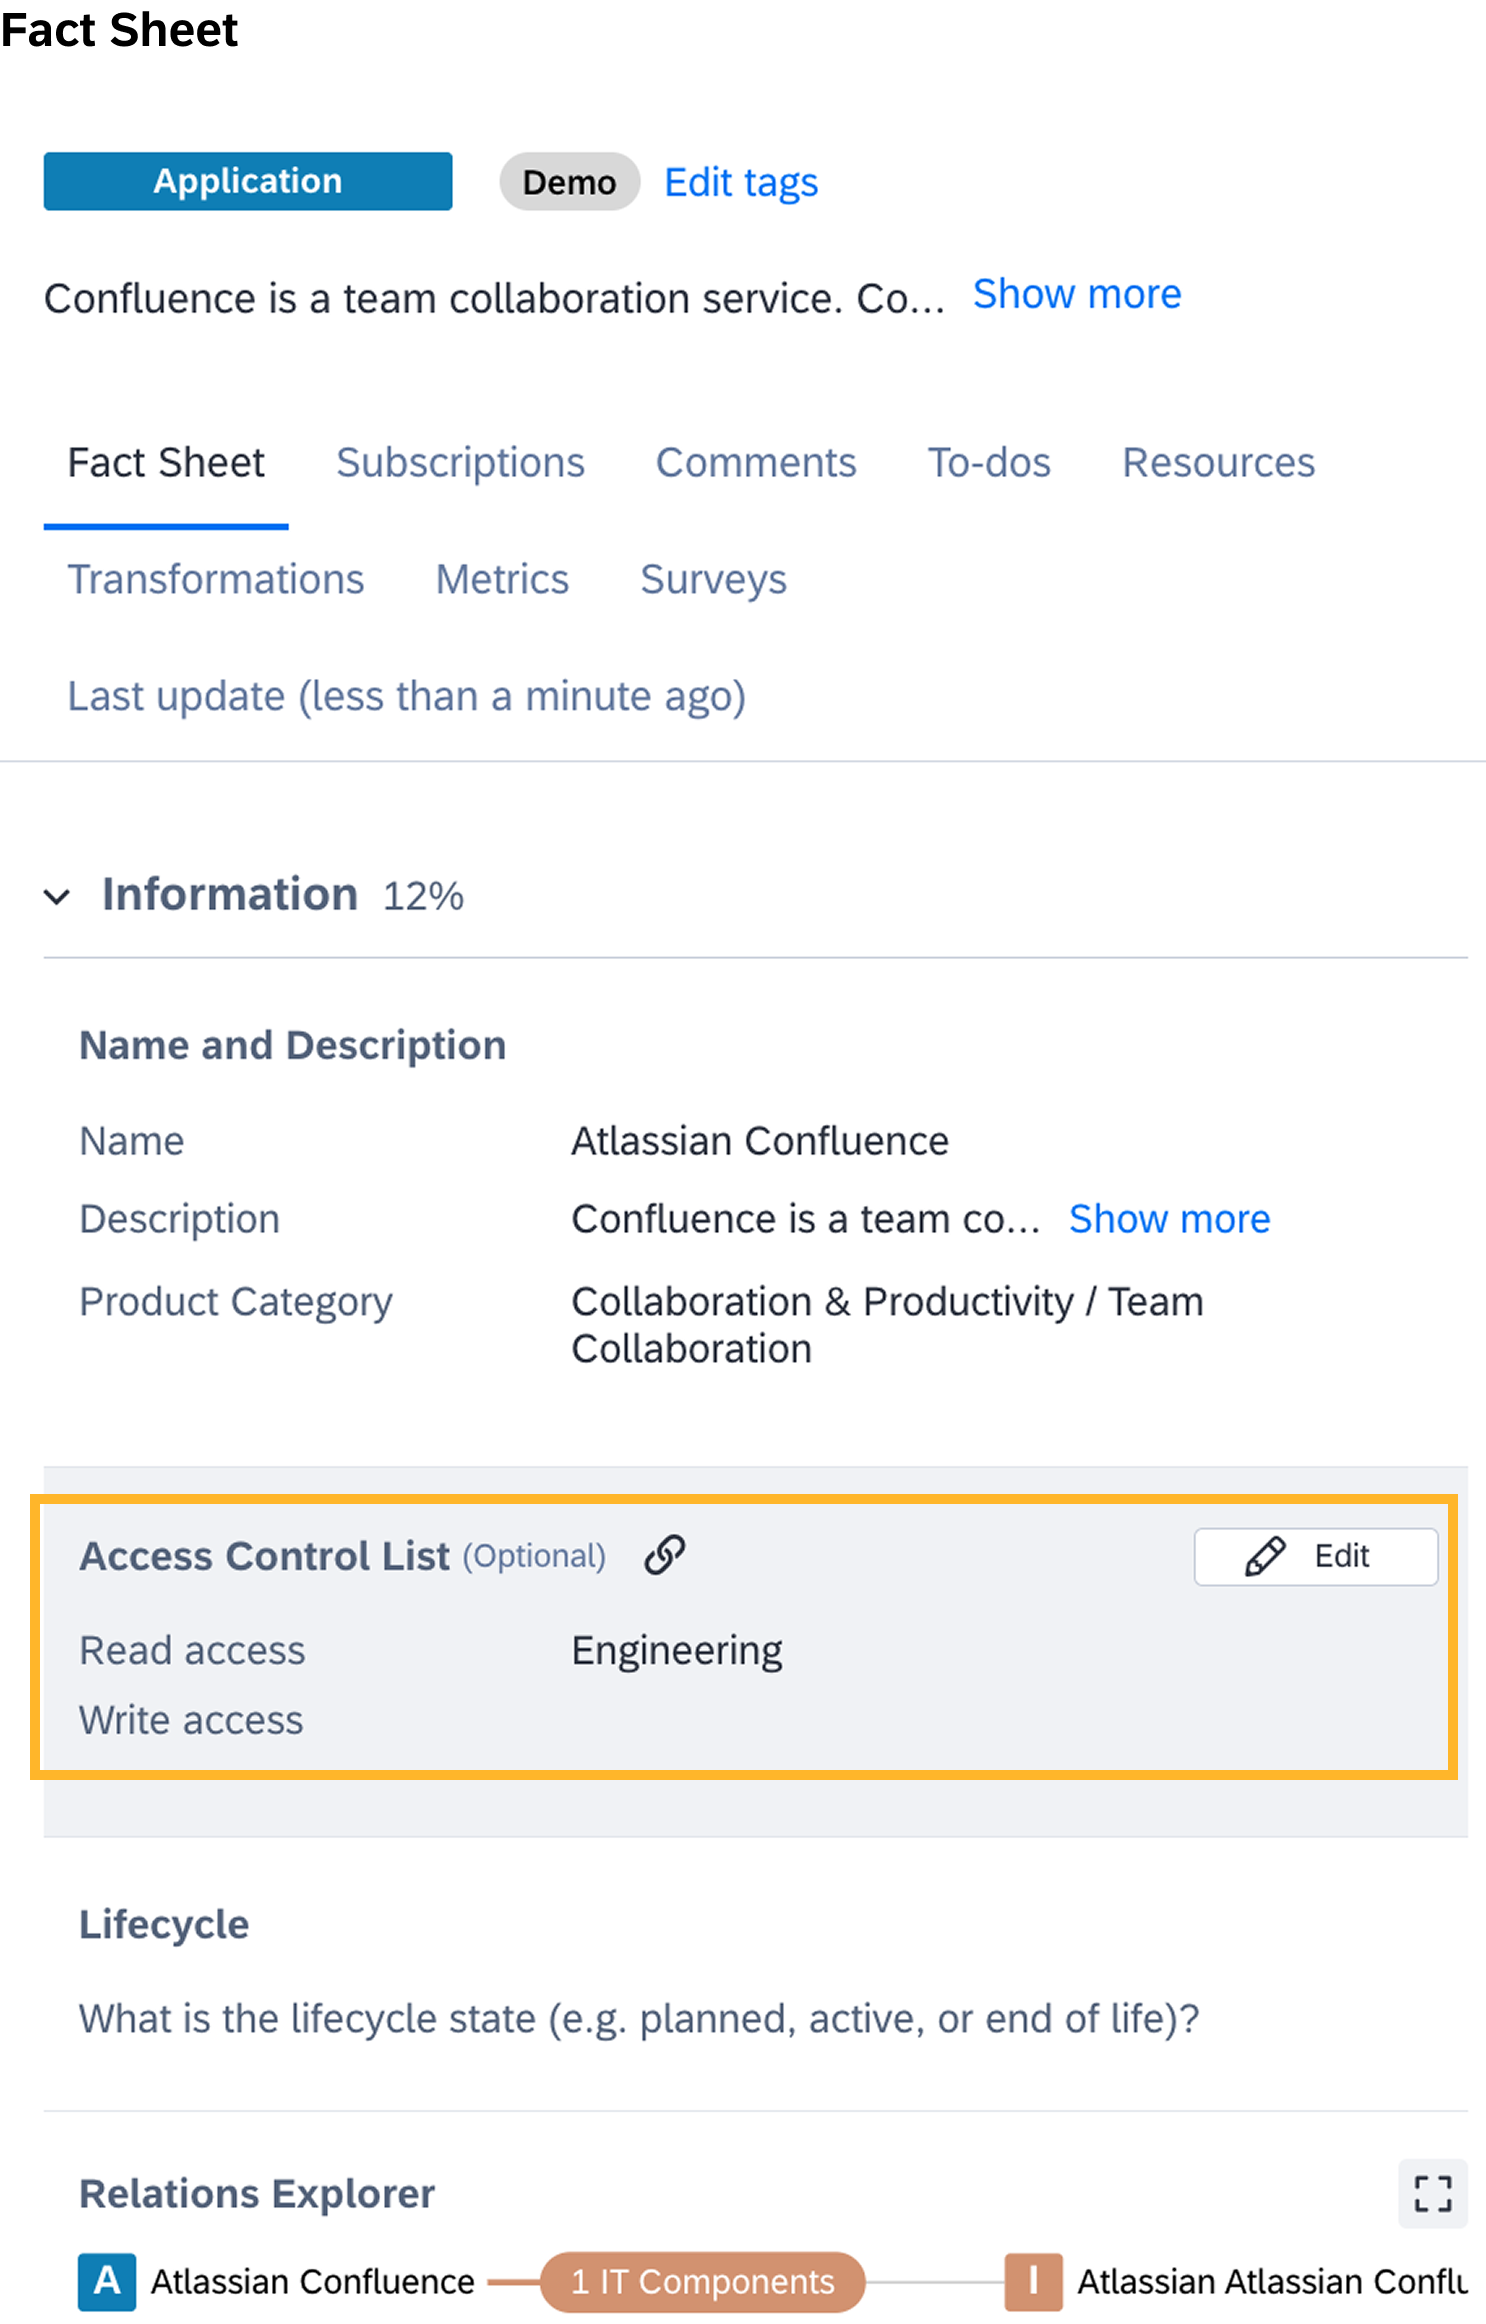
Updated about 1 month ago